
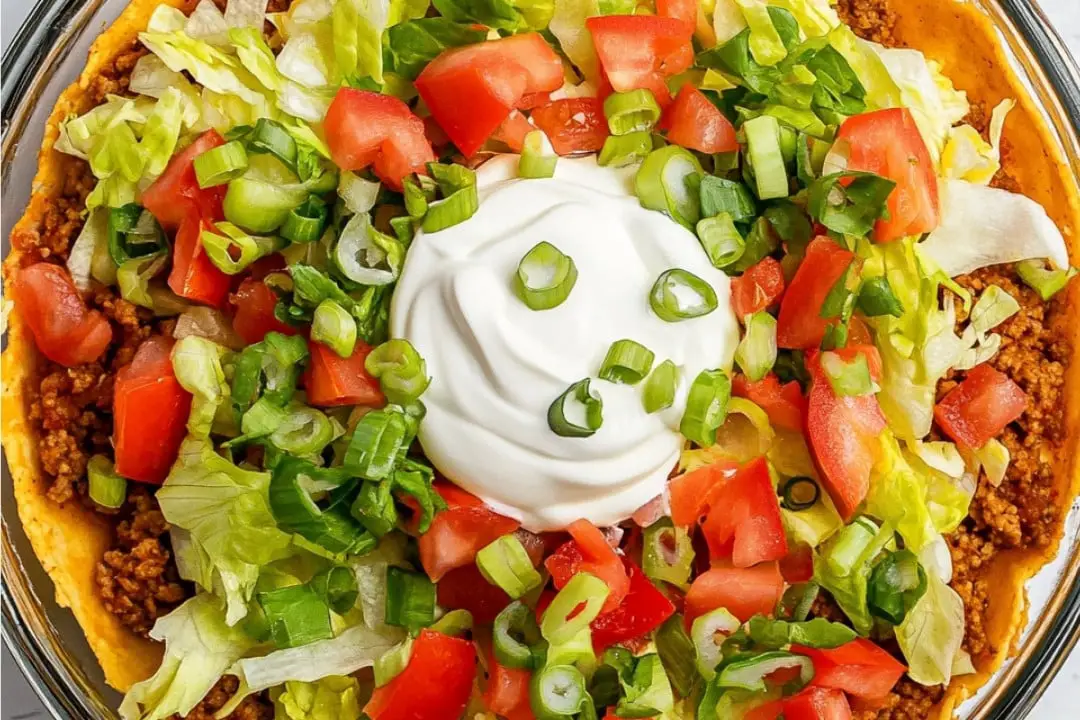
Get ready to fall in love with this Walking Taco Casserole—a hearty, cheesy, incredibly flavorful dish that’s perfect for busy weeknights. Imagine all the bold, zesty goodness of tacos layered into a warm, ooey-gooey casserole. It’s ridiculously simple to whip up and will have the family rushing to the dinner table. Bonus? It’s topped with crunchy Fritos and fresh veggies for a fun and satisfying twist!
Why You’ll Love This Recipe
- Quick and Fuss-Free: With just 15 minutes of prep time and simple ingredients, this dish is a lifesaver on hectic nights.
- Packed with Flavor: From seasoned ground beef to melty cheese and crisp chips, every bite is a fiesta of taste and texture.
- Kid and Crowd-Approved: It’s fun to make, serve, and eat—perfect for sharing with family or during game nights.
- Customizable: You can easily tweak the ingredients to fit what you have on hand or the flavors you love most.

Ingredients You’ll Need
This recipe uses pantry staples and some fresh toppings, making it an affordable and convenient option. Here’s what you’ll need:
- Ground beef: The heart of the dish. Ground turkey or plant-based crumbles work as well if you’re after something lighter or vegetarian.
- Onion: Adds sweetness and depth of flavor while cooking with the beef.
- Cream cheese: The secret to a creamy, rich base.
- Taco seasoning: Your shortcut to the irresistible taco flavor! Feel free to use a homemade mix if you like controlling the spice level.
- Green chilis: A mild yet flavorful kick of heat.
- Fritos corn chips: The salty crunch factor! Use classic Fritos or go bold with a flavored variety like chili cheese.
- Shredded taco blend cheese: Melty, cheesy perfection—feel free to swap it for Monterey Jack, cheddar, or even a spicy pepper jack.
- Lettuce and tomato: The fresh, cool contrast to the warm casserole.
- Sour cream and salsa: Optional but so good for that extra creaminess and zing.
Pro Tip: Keep these ingredients in your pantry and fridge, and you’ll always have the makings of an easy, crowd-pleasing dinner.
Variations
- Make It Spicy: Add diced jalapeños, a splash of hot sauce, or spicy taco seasoning for heat lovers.
- Vegetarian Option: Replace beef with black beans or pinto beans, and skip the green chilis if preferred.
- Different Chips: No Fritos? Tortilla chips or Doritos work wonderfully for added flavor.
- Top It Up: Get creative with toppings—black olives, avocado slices, or sliced green onions would be fantastic additions!
How to Make Walking Taco Casserole
Step 1: Preheat the Oven
Set your oven to 350°F (175°C). Preheating ensures everything bakes evenly—don’t skip this step, okay?
Step 2: Cook the Beef and Onions
In an oven-safe skillet, brown the ground beef with the chopped onion over medium-high heat. Cook until the beef is no longer pink and the onions are soft and fragrant. Drain any excess grease, if necessary.
Step 3: Build That Flavor Base
Stir in the taco seasoning, green chilis, and cream cheese. Cook for a few minutes, letting the cream cheese fully melt and coat everything in delicious goodness. This step makes the base irresistibly creamy and flavorful!
Step 4: Layer the Casserole
Spread the seasoned beef mixture evenly in the skillet. Top with a generous layer of Fritos, followed by the shredded taco blend cheese. Trust me, this is where the magic happens.
Step 5: Bake
Pop the skillet into the preheated oven and bake for about 20 minutes, or until the cheese is melted and bubbling slightly. Your kitchen will smell incredible by now!
Step 6: Add Fresh Toppings
Pull the casserole out of the oven and finish it off with shredded lettuce and diced tomato. For extra flair, serve it with a dollop of sour cream and some salsa on top.
Pro Tips for Making Walking Taco Casserole
- Choose the Right Skillet: Use a large oven-proof skillet so you can transition from stovetop to oven seamlessly. If you don’t have one, transfer the mixture to a baking dish before layering and baking.
- Don’t Skip the Crunch: The Fritos add a crave-worthy texture, so don’t skimp on them. Add them right before baking to keep them crispy.
- Go Heavy on the Cheese: You can never have too much gooey, melted cheese. Add an extra handful if you’re a cheese enthusiast!
How to Serve
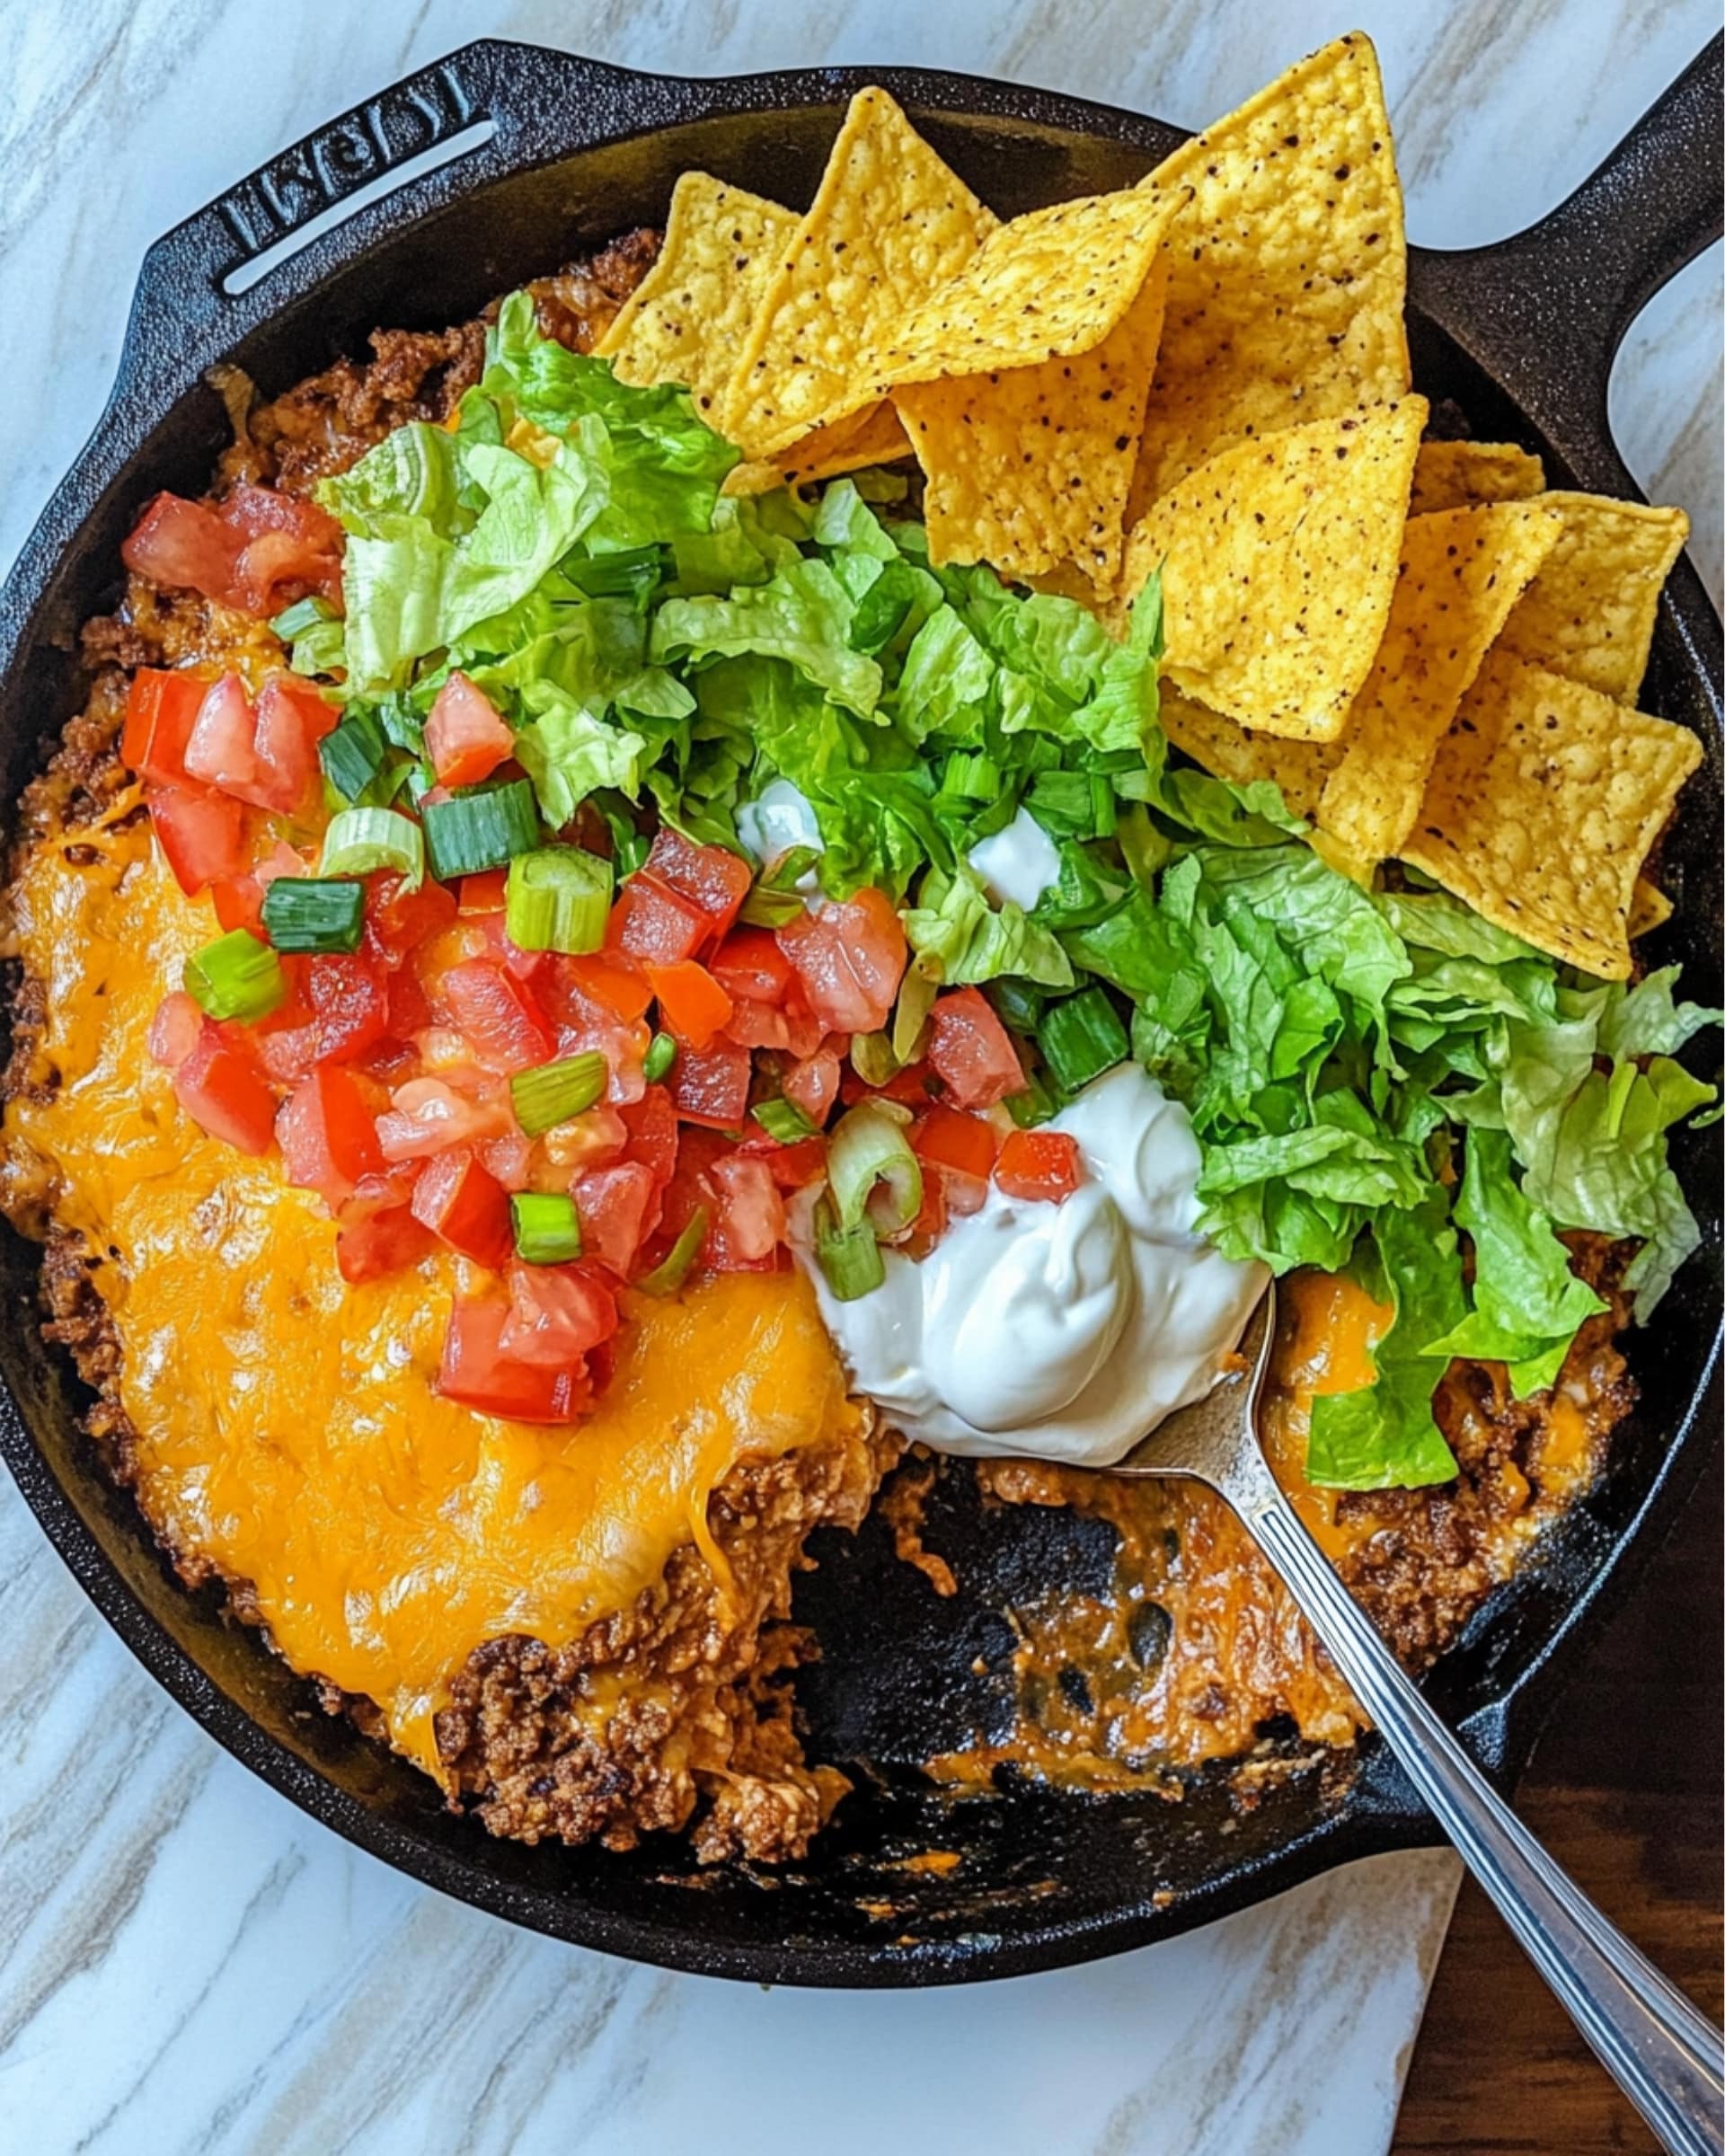
Serve this Walking Taco Casserole straight out of the skillet, family style, for a fun and casual meal. Scoop portions into bowls and top with your favorite garnishes like fresh cilantro, sliced jalapeños, or guacamole.
Perfect Pairings:
- A fresh side salad with lime vinaigrette
- Mexican-style rice or a zesty corn salad
- Ice-cold beverages like margaritas or agua frescas
Make Ahead and Storage
Storing Leftovers
Transfer leftovers to an airtight container and store in the refrigerator for up to 3 days.
Freezing
This casserole freezes well! Skip the fresh toppings, wrap tightly in plastic wrap and foil, and freeze for up to 2 months. Thaw in the fridge overnight before reheating.
Reheating
To reheat, bake in a 350°F oven until warmed through or microwave in individual portions. Add fresh toppings, like lettuce and tomato, right before serving to keep them crisp and vibrant.
FAQs
1. Can I make this in advance?
Yes! Cook the beef and layer with Fritos and cheese in the skillet. Cover tightly and refrigerate for up to a day. Bake it fresh when you’re ready to serve, adding 5-10 extra minutes to the cooking time.
2. Can I use a different type of meat?
Absolutely. Ground turkey, chicken, or even shredded rotisserie chicken would work beautifully here.
3. How can I make this dish healthier?
Use lean ground beef or turkey, opt for baked tortilla chips instead of Fritos, and pile on extra fresh veggies for toppings. You can even serve it over shredded lettuce for a taco salad vibe!
4. What other cheeses can I use?
While a taco blend works great, you can use mozzarella, cheddar, Monterey Jack, or even a smoked cheese to switch up the flavor profile.
Final Thoughts
This Walking Taco Casserole is like a warm, comforting taco hug in a skillet! It’s simple to make, packed with bold flavors, and totally customizable for whatever you’re craving. Whether you’re feeding a hungry family or need a quick dinner idea, this recipe has your back. Go ahead—grab your skillet, pile on the Fritos, and get ready for a new weeknight favorite. Trust me, it’s a winner!
Print
Walking Taco Casserole Recipe
- Prep Time: 40 minutes
- Cook Time: 35 minutes
- Total Time: 1 hour 15 minutes
- Yield: 12 buns
- Category: Breakfast
- Method: Baking
- Cuisine: American
- Diet: Vegetarian
Description
Sticky Buns are a decadent and rich pastry made with soft, fluffy dough, a cinnamon sugar filling, and a sticky caramelized pecan topping. Perfect as a breakfast indulgence or a delightful dessert, these buns combine irresistible flavors and textures for a perfect treat.
Ingredients
Dough:
- 1 cup warm milk
- 1 package active dry yeast
- 1/2 cup sugar
- 6 tablespoons unsalted butter
- 1 egg
- 2 yolks
- 1 teaspoon salt
- 1 tsp vanilla extract
- 4 cups all-purpose flour plus more for dusting counter
Topping:
- 3/4 cup packed light brown sugar
- 1/2 cup unsalted butter
- 1/4 cup honey
- 1/2 tsp salt
- 1 1/2 cups (6 ounces) coarsely chopped pecans
Filling:
- 1/2 cup packed light brown sugar
- 2 tsp ground cinnamon
- 4 tablespoons unsalted butter, melted
Instructions
- Activate the yeast: Warm the milk on the stove or in the microwave until it’s no hotter than 110°F, which could kill the yeast. Add the yeast and half the sugar to the warm milk, then stir to combine. Let the mixture sit for 8-10 minutes until the yeast is foamy and activated.
- Prepare the wet ingredients: Melt the butter in a microwave-safe bowl. Once melted, whisk in the egg yolks, vanilla extract, and the remaining sugar until fully combined.
- Mix and knead the dough: Add the yeast mixture and the butter mixture to the bowl of a stand mixer. Add half the flour and stir until just combined before adding the remaining flour. Attach the dough hook and mix on medium speed for 5 minutes until a cohesive dough forms. Transfer to a floured surface and knead by hand for 2-3 minutes until elastic and bouncy.
- First rise: Lightly butter a large glass bowl and place the dough ball inside. Cover with plastic wrap or a lid, and let the dough rise for 2 hours, or until it has doubled in size.
- Prepare the topping: In a small pot over low heat, combine the brown sugar, honey, butter, and salt. Heat gently until the butter and sugar completely dissolve. Pour the mixture into a buttered 9×13 baking dish, sprinkle with chopped pecans evenly, and set aside.
- Roll out the dough: Preheat the oven to 375°F. Transfer the risen dough to a floured surface and roll it into a 12×18-inch rectangle, ensuring an even thickness throughout.
- Prepare the filling: Combine brown sugar and cinnamon in a small bowl. Brush the rolled-out dough with the melted butter, then evenly sprinkle the cinnamon sugar mixture across the surface.
- Shape the buns: Starting from the long edge, roll the dough tightly into a log. Using a sharp knife or bench scraper, slice the log into 12 even pieces. Arrange the pieces swirl-side up in the baking dish on top of the pecan topping.
- Bake the sticky buns: Bake the buns for 30-35 minutes at 375°F, or until golden brown. If the buns start to brown too quickly, cover them with foil halfway through the baking time.
- Cool and release the sticky buns: Remove the baking dish from the oven and allow the buns to cool for 5-8 minutes. Run a knife around the edges, then carefully flip the buns onto a platter to release them. Serve warm and enjoy!
Notes
- Ensure the milk is not hotter than 110°F to avoid killing the yeast.
- For clean slices of the dough roll, use a sharp knife or unflavored dental floss to cut the pinwheels.
- If you dislike pecans, you can substitute with walnuts or omit nuts altogether.
- Sticky buns are best enjoyed warm. Reheat leftovers for a few seconds in the microwave or a low oven.
- You can prepare the buns the night before, let them rise in the fridge, and bake them in the morning for a fresh breakfast treat.
Nutrition
- Serving Size: 1 bun
- Calories: 350
- Sugar: 20g
- Sodium: 250mg
- Fat: 18g
- Saturated Fat: 9g
- Unsaturated Fat: 6g
- Trans Fat: 0g
- Carbohydrates: 42g
- Fiber: 2g
- Protein: 5g
- Cholesterol: 55mg

Your email address will not be published. Required fields are marked *