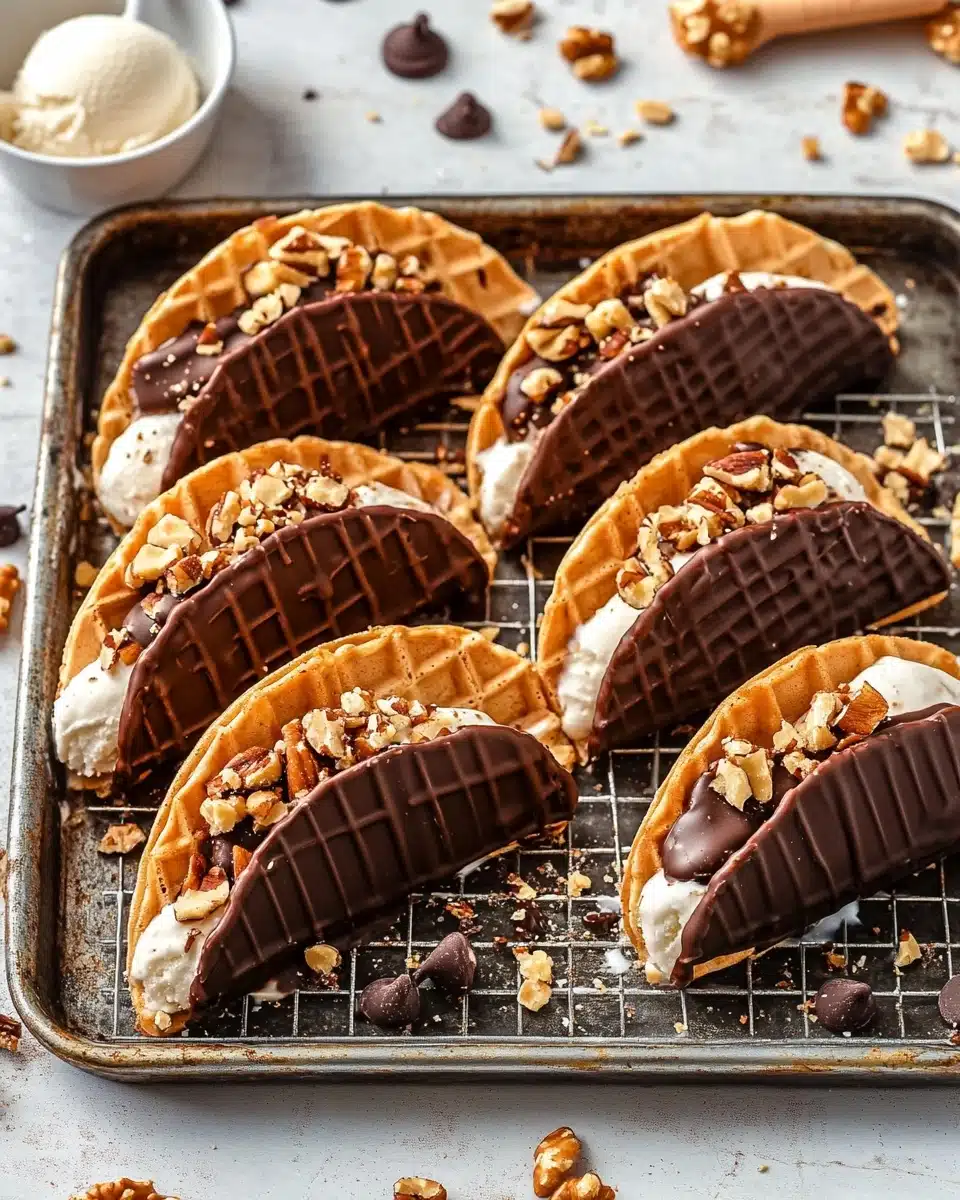
Craving a nostalgic treat with a made-from-scratch twist? These Homemade Choco Tacos are the ultimate throwback dessert, combining crisp, golden waffle “taco” shells, creamy vanilla ice cream rippled with decadent fudge, and a magical chocolate-peanut shell. Every bite is a perfect marriage of crunch, creaminess, and chocolatey goodness — and yes, you absolutely can make them at home!
Why You’ll Love This Recipe
- Nostalgia with a Twist: Revisit a childhood favorite with the power to customize every layer — it’s a homemade spin that seriously outshines the original.
- Ultimate Texture Play: Enjoy the contrast of homemade crispy waffle shell, rich fudge ripple, creamy ice cream, and snappy chocolate-peanut coating in every delicious bite.
- Fun for All Ages: These Homemade Choco Tacos are just as delightful for adults as they are for kids — perfect for parties, cookouts, or simply for treating yourself.
- Make-Ahead Magic: Prep them in advance and keep them stashed in your freezer, ready for whenever dessert cravings strike!
Ingredients You’ll Need
Don’t be intimidated by the layers — each ingredient in Homemade Choco Tacos is simple, familiar, and brings something bold to the flavor party. With pantry staples and a few special touches, you’ll create a dessert that’s dazzlingly good from the shell all the way to the final sprinkle of peanuts.
- Heavy Cream: Whips up luxuriously into the base for your no-churn vanilla ice cream — don’t skip the chilling step for max volume!
- Sweetened Condensed Milk: Adds sweetness and creates a creamy, smooth foundation for your cold treat.
- Vanilla Bean Paste or Extract: Vanilla bean paste brings extra oomph, but pure vanilla extract also infuses your ice cream with wonderful flavor.
- Salt: Just a pinch heightens all those flavors for well-balanced results.
- Cocoa Powder: Gives the fudge ripple its deep chocolate flavor — use unsweetened for the richest result.
- Granulated Sugar: Added to both the fudge and the shells for the right level of sweetness and structure.
- Heavy Cream (for fudge): Adds body to your fudge ripple, making it silky and easy to drizzle.
- Unsalted Butter: For ultra-glossy fudge and tender waffle shells.
- Egg Whites: Essential for crispy, pliable homemade waffle shells.
- Brown Sugar: Adds complexity and a gentle caramel note — especially lovely in the shells.
- Flour: Classic all-purpose flour gives your shells strength and just the right bite.
- Melted Butter: Boosts flavor and aids in crisping up your taco shells.
- Chocolate Chips: Melt down for the classic choco taco “shell” — use semi-sweet or dark, depending on how chocolatey you’re feeling.
- Coconut Oil: Helps make your chocolate shell quick-setting and wonderfully glossy.
- Finely Chopped Peanuts: The must-have for that choco taco crunch, adding salty, nutty goodness to the chocolate shell.
Variations
Homemade Choco Tacos are a blank canvas for your cravings! It’s so easy to swap out ingredients or add your own flourishes to suit preferences or dietary needs — get playful and make them truly yours.
- Dairy-Free Dream: Use coconut whipped topping and your favorite non-dairy ice cream for a delicious vegan take — and swap in vegan butter for the shells.
- Chocolate-Lovers Edition: Whisk a little cocoa powder into the waffle shell batter for a “double chocolate” effect that’s pure decadence.
- Fruit & Nut Add-Ons: Layer chopped hazelnuts, almonds, or freeze-dried raspberries along with or instead of peanuts in the shell for a personalized twist.
- No Waffle Maker? No Problem: Use thin store-bought pizzelle cookies, gently warmed and shaped, for a quick hack (they make adorable mini tacos, too!).
How to Make Homemade Choco Tacos
Step 1: Make the Fudge Ripple
Start by whisking together the cocoa powder, sugar, and heavy cream in a small saucepan over medium-low heat. When the mixture warms up, toss in the butter and whisk until it melts and everything gets gorgeously shiny and smooth. Remove from the heat, then stir in vanilla and salt. Let this decadent fudge ripple cool completely — trust me, this is what gives your Homemade Choco Tacos their swirled, chocolaty magic!
Step 2: Prepare the Ice Cream Base
Pour your well-chilled heavy cream into a mixer and whip it until soft peaks become firm and lush. In a separate large bowl, combine the sweetened condensed milk, vanilla bean paste (or extract), and a pinch of salt. Gently fold in about a cup of whipped cream to lighten the mix, then add the rest, folding carefully so you keep all that airy texture. Your homemade vanilla ice cream is about to steal the show!
Step 3: Ripple & Freeze the Ice Cream
Now for the magical layering: Spread a quarter of your ice cream base in a loaf pan, then drizzle over a third of your cooled fudge ripple. Repeat this process — ice cream, ripple, repeat — to create dreamy ribbons of chocolate. Finish with a layer of ice cream on top and freeze until nicely set, at least 3 hours. This patience totally pays off.
Step 4: Make and Shape the Waffle Taco Shells
In a bowl, beat the egg whites, both sugars, and vanilla extract until fully combined and a little frothy. Mix in the salt and half the flour, then add the rest of the flour and the melted butter for a thick, smooth batter. Preheat your waffle cone maker and cook a heaping tablespoon of batter until golden brown — usually about 3 minutes. Quickly (but carefully!) shape the hot waffle into a taco using your hands and hold it in place for around 15 seconds. They’ll crisp up just like magic!
Step 5: Assemble and Fill the Tacos
Let your ice cream soften slightly, then scoop generous spoonfuls into each cooled taco shell. Use the back of a spoon or a mini spatula to smooth it out. Freeze the filled tacos another 10-15 minutes — this quick chill will help everything hold its shape for the chocolate dipping finale.
Step 6: Make the Chocolate-Peanut Coating & Finish
Microwave chocolate chips and coconut oil in short bursts, stirring until silky smooth. Gently cool the mixture before stirring in the chopped peanuts. One by one, dip the top of each stuffed taco into this chocolate heaven, then set on a lined tray. Pop them into the freezer for one last set — about 5-10 minutes — until the chocolate is perfectly snappy. Congratulations — you’ve just made real-deal Homemade Choco Tacos!
Pro Tips for Making Homemade Choco Tacos
- Shell Shaping Speed: Shape your waffle shells as soon as you remove them from the waffle maker—work quickly, as they become crisp and unbendable in seconds!
- Fudge Ripple Cool-Down: Make sure your fudge ripple is thoroughly cooled before swirling it into your ice cream, or you’ll risk melting those perfect vanilla swirls.
- Freezer Prep: Always chill your filled tacos before dipping in chocolate—ice cream that’s too soft will slide right out of the shells during coating.
- Chocolate Dipping Temperature: Let your chocolate-peanut coating cool for a few minutes after melting—if it’s too hot, it will melt the ice cream, but too cool and it won’t set nicely.
How to Serve Homemade Choco Tacos

Garnishes
Make your Homemade Choco Tacos pop with a sprinkle of extra chopped peanuts, mini chocolate chips, or even a dusting of colored sprinkles right after dipping in chocolate. For a grown-up twist, try a light drizzle of salted caramel or a whisper of flaky sea salt on top. Each garnish adds its own charm and extra layer of flavor!
Side Dishes
Serve your choco tacos alongside fresh fruit (like berries or sliced bananas) for a balancing brightness, or pair them with a shot of espresso or cup of hot coffee. For a show-stopping dessert board, arrange the tacos with bowls of extra fudge sauce, whipped cream, or even a scoop of sorbet for color contrast.
Creative Ways to Present
Set up a DIY choco taco “bar” with a lineup of toppings and dips for parties — think mini marshmallows, toasted coconut, sprinkles, and multiple fudge sauces! For a charming retro look, serve tacos tucked upright in a taco stand or propped in a pint glass so they don’t topple. For special occasions, wrap each taco in parchment and tie with twine for adorable (and portable) dessert gifts.
Make Ahead and Storage
Storing Leftovers
Your Homemade Choco Tacos store beautifully in the freezer! Once they’re fully assembled, transfer them to an airtight container, layering with parchment paper to keep things tidy. This helps preserve both the shell’s crispness and the creamy center for up to 2 weeks.
Freezing
Freeze your assembled choco tacos on a baking sheet until the chocolate sets, then stack them carefully in a freezer-safe container. If you love prepping ahead, these treats can be made and frozen in advance—just make sure to keep them sealed well to prevent freezer burn.
Reheating
No need for reheating — just let your Homemade Choco Tacos sit at room temperature for about 5 minutes before enjoying. This short “rest” softens the ice cream just enough to give you that classic creamy bite and brings out all those big flavors.
FAQs
-
Can I make Homemade Choco Tacos without a waffle cone maker?
Absolutely! You can use store-bought pizzelle cookies or thin wafer cookies—just warm them slightly (10 seconds in the microwave) to soften, then shape them into taco shells by hand. They’ll harden as they cool, and though the texture is a little different, they’re still delicious and fun.
-
Can I use store-bought ice cream instead of making my own?
Definitely! If you’re short on time or want to save a step, just use your favorite vanilla ice cream or try something creative (like chocolate or caramel-swirled). Let it soften a bit before scooping into the shells, and proceed with the fudge ripple and chocolate coating.
-
My taco shells broke when shaping — any tips?
Speed is key! Shape each shell right after they come off the waffle maker, while they’re still hot and flexible. If they cool too much, they’ll snap instead of bend. If you have extra batter, practice a shell or two to get the timing just right.
-
How do I keep Homemade Choco Tacos from getting soggy in the freezer?
Let the taco shells cool completely before filling, and always use an airtight container lined with parchment to minimize moisture. For extra crispness, you can paint a thin layer of melted chocolate inside each shell and let it harden before adding ice cream. This chocolate “seal” keeps everything perfectly crunchy!
Final Thoughts
If you’ve ever wished you could bring the magic of a Choco Taco back to life, now’s your moment! There’s nothing quite like the pride (and pure delight) of crafting your own Homemade Choco Tacos, right in your kitchen. Treat yourself, surprise your friends, and let every bite remind you that the best desserts are those made with a little bit of fun and a whole lot of love. Give these a try—you’ll never look at an ice cream taco the same way again!
Print
Homemade Choco Tacos Recipe
- Prep Time: 30 minutes
- Cook Time: 25 minutes
- Total Time: 4 hours 55 minutes
- Yield: 8-10 choco tacos
- Category: Dessert
- Method: Mixing, Freezing, Baking
- Cuisine: American
- Diet: Vegetarian
Description
Indulge in the deliciousness of homemade Choco Tacos with this easy-to-follow recipe. These sweet treats feature a creamy ice cream base, a decadent fudge ripple, crispy waffle cones, and a chocolate-peanut topping.
Ingredients
Ice cream base:
- 2 cups heavy cream, cold
- 1 14oz can sweetened condensed milk
- 1 tbsp vanilla bean paste or 2 tsp vanilla extract
- Pinch of salt
Fudge ripple:
- 2 tablespoons cocoa powder
- 2 tablespoons granulated sugar
- 2 tablespoons heavy cream
- 1 tablespoon unsalted butter
- 1/2 teaspoon vanilla extract
- Pinch of salt
Waffle cones:
- 2 egg whites
- 3 1/2 tablespoons granulated sugar
- 3 1/2 tablespoons brown sugar
- 3/4 teaspoon vanilla extract
- 1/8 teaspoon salt
- 2/3 cup flour
- 2 tbsp melted butter
For coating:
- 1 1/2 cups chocolate chips
- 1 1/2 tablespoon coconut oil
- 3/4 cup finely chopped peanuts
Instructions
- Make the fudge sauce for the ice cream ripple: In a small saucepan, whisk together the cocoa powder, sugar and heavy cream over medium-low heat. Once it starts to heat up, add in the butter and whisk until the butter is melted and the mixture is smooth and shiny. Remove from heat and whisk in the vanilla and salt. Set aside to cool.
- Prepare the ice cream base: Add heavy cream to a stand mixer (or a bowl with a hand mixer) and beat until stiff peaks form. In a large bowl, mix together condensed milk, vanilla bean paste, and salt. Gently fold in whipped cream until no lumps remain.
- Layer the ice cream: Pour ice cream base into a loaf pan, then drizzle fudge sauce. Repeat layers, finishing with ice cream. Freeze until set.
- Make the waffle cones: Mix ingredients to form a thick batter. Cook in a waffle cone maker until golden brown. Shape into taco shells.
- Scoop ice cream into shells and freeze briefly: Fill taco shells with ice cream and freeze for 10-15 minutes.
- Prepare peanut-chocolate topping and assemble: Melt chocolate chips and coconut oil, stir in peanuts. Dip taco tops in mixture, freeze until hardened.
Notes
- Waffle cone maker: This is the one we use.
- Make it dairy free: Use your favorite store-bought nondairy ice cream for the filling, and use nondairy butter in the waffle cone batter!
- Re-freeze choco tacos after filling with ice cream to prevent melting during chocolate coating.
- Cool fudge sauce and taco shells before use.
- Cool chocolate-peanut topping slightly before dipping ice cream-filled shells.
- Trademark disclaimer: Choco Taco is a registered trademark of Simco Logistics, Inc. and/or Klondike, a Unilever brand. This recipe is a homemade version inspired by the original Choco Taco and is not affiliated with or endorsed by Klondike or Unilever.
Nutrition
- Serving Size: 1 choco taco
- Calories: 380
- Sugar: 28g
- Sodium: 110mg
- Fat: 26g
- Saturated Fat: 16g
- Unsaturated Fat: 8g
- Trans Fat: 0g
- Carbohydrates: 35g
- Fiber: 2g
- Protein: 4g
- Cholesterol: 65mg


Your email address will not be published. Required fields are marked *