
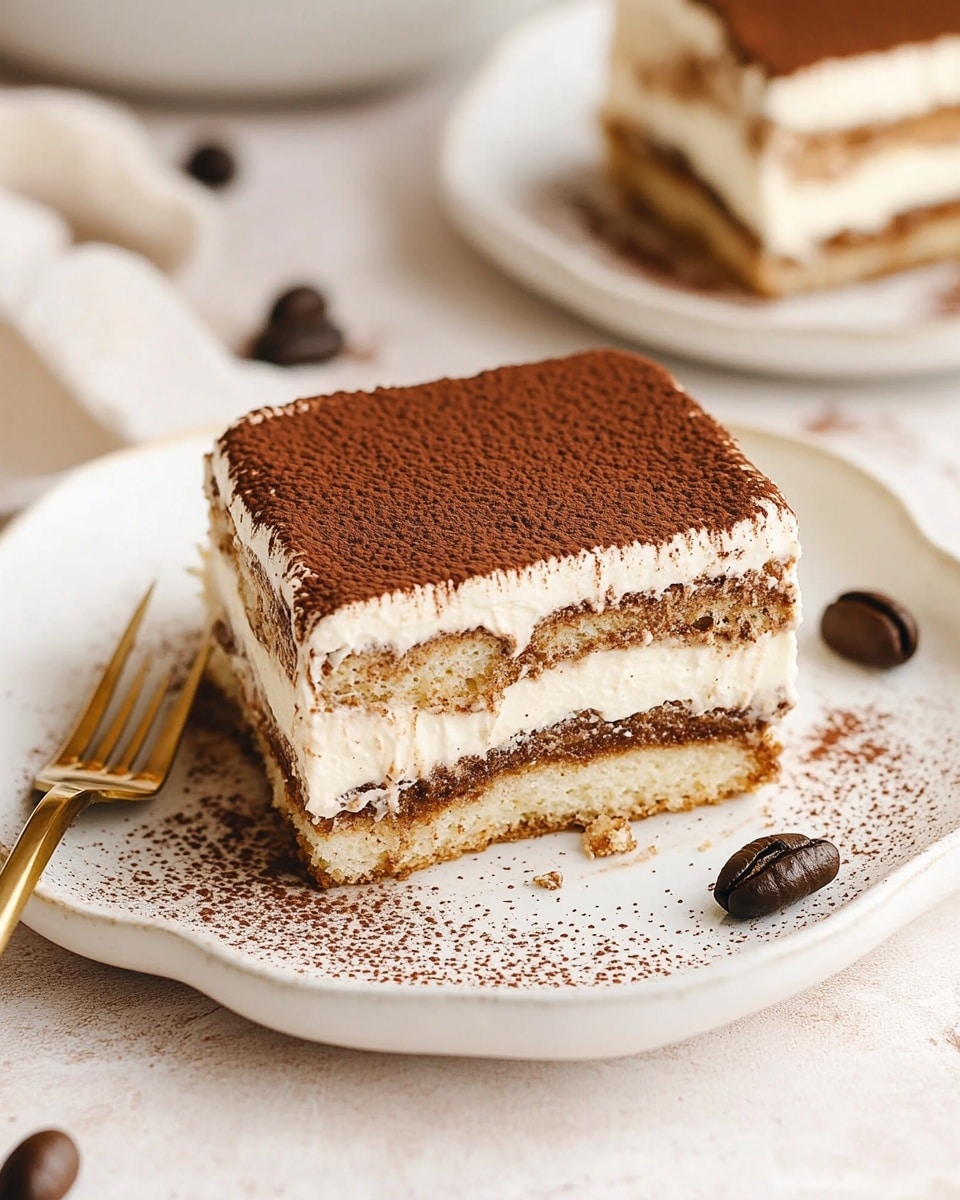
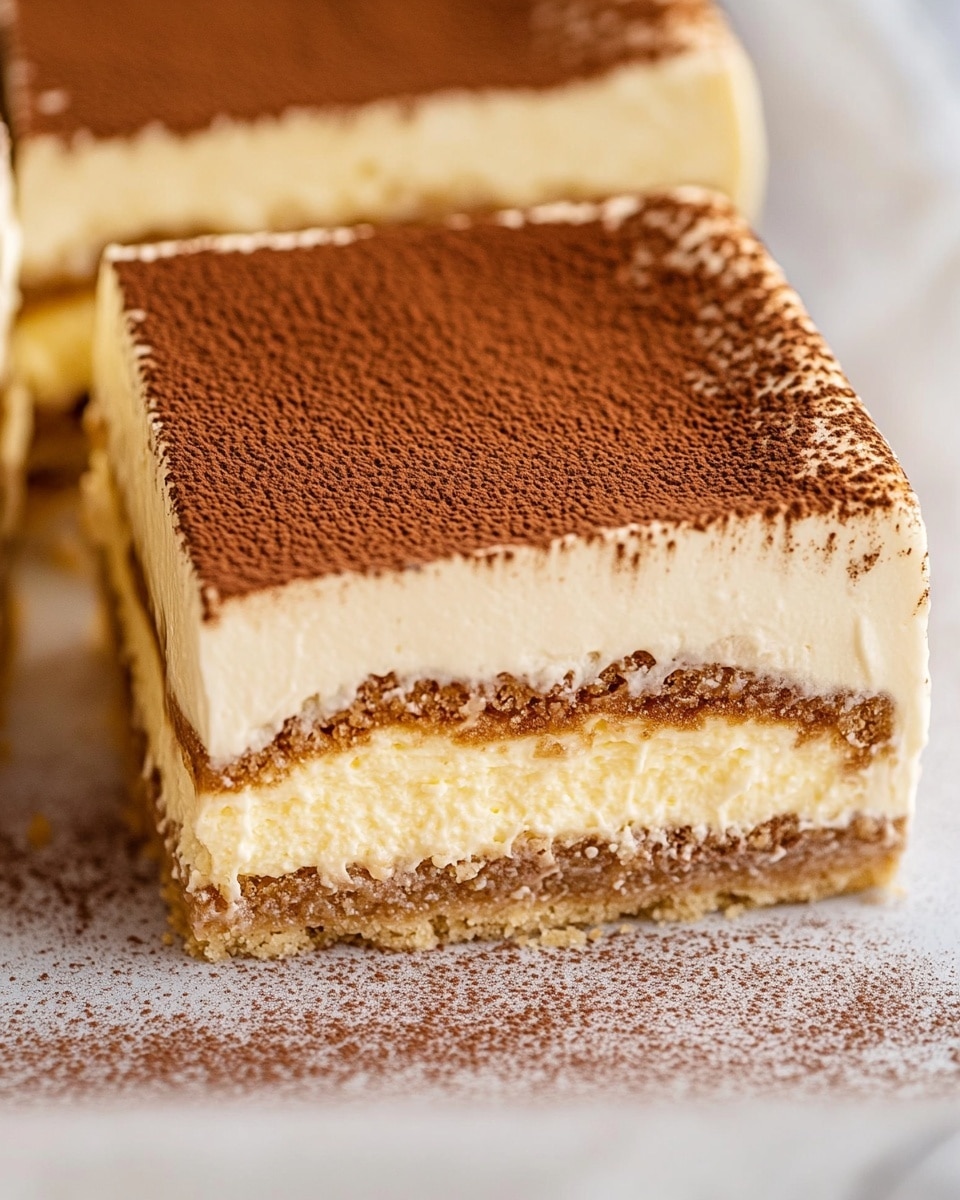
If you’ve ever dreamed of capturing the essence of Italy in one luscious, creamy dessert, then you’re going to adore this. The Best Classic Italian Tiramisu Recipe is exactly that—rich mascarpone cream layered with coffee-soaked ladyfingers and a dusting of cocoa, offering that perfect balance of sweetness and bold espresso flavor. I love this recipe because it’s truly authentic, and after making it a handful of times, I’ve nailed the technique to get every texture just right—light yet indulgent, easy to slice, and downright irresistible.
This recipe works wonderfully for dinner parties, family gatherings, or when you just want to treat yourself to something special without fussing over complicated steps. What makes it worth trying? The magic happens overnight in the fridge, which means you can prep it ahead and spend less time stressing and more time enjoying. Trust me, you’ll appreciate knowing the secret to the Best Classic Italian Tiramisu Recipe—it’s a game-changer for dessert lovers everywhere.
Why You’ll Love This Recipe
- Authentic Flavor: Uses traditional ingredients like mascarpone and espresso-soaked ladyfingers for that genuine Italian taste.
- Simple Yet Elegant: The assembly is straightforward, making it approachable even if you’re new to Italian desserts.
- Prep Ahead Friendly: Make it the day before and let it chill to develop depth and creaminess.
- Versatile Cream Options: Choose between whipped cream or egg whites for mascarpone filling based on your comfort and preference.

Ingredients You’ll Need
The secret to a smooth and authentic tiramisu lies in fresh, quality ingredients that blend seamlessly. For example, using cold mascarpone cheese ensures a creamy result, while freshly brewed strong coffee delivers that signature kick without bitterness.
- Mascarpone cheese: Choose a full-fat, high-quality brand like Galbani for the creamiest texture.
- Egg yolks: Bring them to room temperature to make whisking easier and smoother.
- Granulated or caster sugar: Fine sugar dissolves more quickly, ensuring no gritty texture.
- Vanilla extract: Adds a subtle warmth that balances the bitterness of the coffee.
- Salt: Just a pinch enhances all the flavors beautifully.
- Heavy cream: Chilled and whipped to medium peaks for lightness; can be swapped with egg whites if preferred.
- Egg whites: If using, prepare them carefully into a stable meringue for that airy lift.
- Ladyfingers: The key is to dip quickly so they soak coffee but don’t become soggy.
- Strong black coffee: Brewed fresh and cooled; espresso or dark roast works best for robustness.
- Cocoa powder: Unsweetened, for dusting to add that final chocolatey touch.
Variations
I love that the Best Classic Italian Tiramisu Recipe is customizable enough that you can add your personal touch without losing its traditional soul. Whether you want to lighten it up or deepen the coffee notes, a few tweaks can make this dessert just right for your table.
- Using egg whites instead of heavy cream: I tried this once for a lighter texture and found it gives a beautifully airy tiramisu, but be sure to whisk the meringue carefully for stability.
- Adding a splash of coffee liqueur (like Kahlúa): This boosts flavor depth, my family swears by it for a grown-up twist.
- Chocolate shavings on top: For an extra indulgent take, sprinkle dark chocolate curls instead of plain cocoa dust.
- Decaf or espresso alternate: If you want less caffeine, freshly brewed decaf works fine—just keep it strong.
- Gluten-free ladyfingers: I’ve used these for friends with dietary needs, and it works just as well, don’t skip the quick coffee dip!
How to Make Best Classic Italian Tiramisu Recipe
Step 1: Prepare the Mascarpone Cream
Start by whisking the cold mascarpone cheese in a medium bowl on medium speed for about 30 to 60 seconds until it’s smooth and slightly fluffy. I like to scrape down the bowl once to make sure there are no lumps. Next, create a double boiler by boiling 1 to 2 inches of water in a saucepan and lowering the heat. Place a heat-proof bowl with egg yolks and sugar on top, whisking vigorously at medium-high speed for exactly 2 minutes until the mix is light and fluffy. Be really careful here — if you overheat or overmix, it can get grainy, which is a texture you want to avoid at all costs. Then, gently whisk the egg yolk mixture into the mascarpone with vanilla and salt, mixing just enough to combine.
Step 2: Whip the Cream or Egg Whites
If you’re using heavy cream (which I recommend as it’s easier and creates a rich texture), whip it until you see medium stiff peaks—meaning the cream holds its shape but isn’t too stiff or dry. For the egg white option, whisk the egg whites with sugar over the double boiler until you reach 160°F, then whisk off heat until it turns glossy and holds stiff peaks. Both methods add volume and lightness, but the cream option feels silkier in the final dessert.
Step 3: Fold the Whipped Mixture into the Mascarpone
This is where patience is your best friend. Add the whipped cream or meringue in two or three additions to the mascarpone mixture, gently folding with a rubber spatula. You want to preserve as much air as possible for that fluffy texture, so avoid vigorous stirring. I usually take my time here, folding slowly until everything looks uniform and delicate.
Step 4: Assemble the Tiramisu
Pour your cooled, strong coffee into a wide, shallow bowl. Quickly dip each ladyfinger on both sides — trust me, the dips should be quick, like a fast two-second swirl each side; you don’t want soggy sponge, just moist with coffee flavor. Layer the dipped ladyfingers in the bottom of an 8×9.5 inch rectangular dish until you have a nice, even base. Spread half the mascarpone cream mixture evenly over them. Repeat with another layer of soaked ladyfingers and top with the remaining cream. Cover tightly with plastic wrap and refrigerate for at least 6 hours—overnight is even better for all the flavors to meld.
Step 5: Dust and Serve
When you’re ready to enjoy, just sift a generous layer of unsweetened cocoa powder over the top for that classic finish. Use a sharp knife to cut neat slices, and watch your family or guests’ eyes light up. Pro tip: use a warm knife (run it under hot water and wipe dry) for clean cuts that don’t squish the dessert.
Pro Tips for Making Best Classic Italian Tiramisu Recipe
- Double Boiler Mastery: Keep the water at a low simmer to avoid overheating your eggs—the key to silky smooth mascarpone cream.
- Ladyfinger Timing: Dip each ladyfinger just briefly; too long and they’ll soak up too much coffee and turn soggy.
- Folding Technique: Fold gently with patience. It makes all the difference in keeping the mixture light and airy.
- Chill Properly: Resist the urge to rush; allowing a minimum of 6 hours (preferably overnight) makes your tiramisu dreamily creamy and allows flavors to harmonize.
How to Serve Best Classic Italian Tiramisu Recipe
Garnishes
I usually keep it classic with a generous dusting of unsweetened cocoa powder on top—it’s simple yet perfectly bittersweet. Occasionally, I’ll toss on some finely grated dark chocolate or a few chocolate shavings for an elegant touch that everyone loves. Fresh mint leaves or even a sprinkle of espresso powder can also add a beautiful visual contrast and an extra hint of flavor.
Side Dishes
This tiramisu stands beautifully on its own, but I’ve found my guests enjoy it paired with freshly brewed espresso or a smooth dessert wine like Vin Santo. Light biscotti or almond cookies can complement the creaminess while keeping the Italian vibe alive. For a fresh contrast, a small bowl of seasonal berries alongside works surprisingly well, adding a touch of brightness to each bite.
Creative Ways to Present
For special occasions, I love making individual tiramisu servings in small glass jars or elegant coupe glasses—it looks stunning and lets everyone have their own. Layer the mascarpone and ladyfingers carefully and finish with a dust of cocoa. Another fun idea I’ve tried is making tiramisu cupcakes or trifle-styled glasses that showcase all the layers; it’s a showstopper and perfect for parties.
Make Ahead and Storage
Storing Leftovers
Once assembled and chilled, your tiramisu keeps well covered in the fridge for up to 3 days. I always store leftovers in an airtight container or tightly wrapped with plastic wrap to prevent the dessert from absorbing any fridge odors. It actually tastes even better after the first day because the flavors deepen, so leftovers are a lucky treat!
Freezing
Personally, I’ve frozen tiramisu a couple of times and was pleasantly surprised that it holds up well. Make sure to freeze it in an airtight container and thaw overnight in the fridge when ready to serve. Keep in mind the texture might be slightly softer after freezing, but the taste remains fantastic, making it a handy option for unexpected guests.
Reheating
Tiramisu is best served cold, so reheating isn’t typical. If you want to take the chill off, just let it sit at room temperature for 10-15 minutes before serving. This softens the cream slightly and brings out the flavors beautifully without losing that signature texture.
FAQs
-
Can I make tiramisu without raw eggs?
Yes! This Best Classic Italian Tiramisu Recipe uses a double boiler to gently cook the egg yolks, making it safe, but if you want to avoid eggs altogether, you can substitute with whipped heavy cream only or use pasteurized eggs that are safer for raw consumption.
-
How do I prevent the ladyfingers from getting soggy?
The trick is to dip ladyfingers very quickly—about one to two seconds per side—so they soak up coffee but don’t fall apart. Also, ensure the coffee is at room temperature to avoid prematurely melting the mascarpone cream.
-
What’s the difference between using heavy cream and egg whites in the mascarpone cream?
Using heavy cream gives a richer, silkier texture, which is my favorite for a classic tiramisu. Egg whites make the filling lighter and airier but require careful preparation to make stable meringue. Both work, so pick what feels comfortable for you.
-
Can I use instant coffee instead of espresso?
Strongly brewed instant coffee works as well and is a convenient alternative if you don’t have an espresso machine. Just make sure it’s cooled before dipping ladyfingers to maintain the perfect texture.
-
How long should I chill tiramisu before serving?
At a minimum, chill for 6 hours to let the flavors develop and the cream set properly, but I’ve found overnight chilling yields the best texture and taste.
Final Thoughts
Making the Best Classic Italian Tiramisu Recipe has become a little ritual in my kitchen that I genuinely look forward to. It’s more than just dessert—it’s about creating moments, impressing friends, and enjoying a little slice of Italy no matter where you are. I’m confident that once you try this recipe, following the tips and steps I shared, you’ll come back to it time and time again. So, grab your mascarpone, brew that coffee, and let’s make some tiramisu magic happen!
Print
Best Classic Italian Tiramisu Recipe
- Prep Time: 30 minutes
- Cook Time: 0 minutes
- Total Time: 6 hours 30 minutes
- Yield: 8-10 servings
- Category: Dessert
- Method: No-Cook
- Cuisine: Italian
Description
Classic Italian Tiramisu is a luscious no-bake dessert featuring layers of espresso-soaked ladyfingers and a creamy mascarpone mixture. This recipe offers two mascarpone cream options—one using heavy cream for richness and another using egg whites for a lighter texture—ensuring a silky, airy finish. Perfectly dusted with cocoa powder, this traditional Tiramisu requires refrigeration to meld the flavors, making it an irresistible treat for any occasion.
Ingredients
Mascarpone Cream:
- 16 oz Mascarpone cheese (450g), cold from the fridge (recommend Galbani)
- 4 egg yolks
- 2/3 cup granulated or caster sugar (133g)* (if using egg whites, divide into 1/3 cup and 1/3 cup)
- 1 tsp vanilla extract
- 1/4 tsp salt
- 1 1/2 cup heavy cream, chilled (360g) OR 4 egg whites
Assembly:
- 30-36 ladyfingers
- 1 1/2 cup strong black coffee, room temperature (360g)
- 2 tbsp cocoa powder to dust
Instructions
- Prepare the mascarpone cheese: Whisk the mascarpone cheese on medium speed for 30-60 seconds until creamy. Scrape down the bowl and set aside.
- Make the egg yolk mixture: In a separate heat-proof bowl, combine the egg yolks and 2/3 cup sugar. Set up a double boiler by boiling 1-2 inches of water in a saucepan and reducing heat to low. Place the bowl on top, ensuring the water does not touch the bowl bottom. Whisk on medium-high speed for exactly 2 minutes until the mixture is light and fluffy. Remove from heat promptly to avoid graininess.
- Combine mascarpone and yolk mixture: Pour the egg yolk and sugar mixture onto the mascarpone. Add salt and vanilla. Whisk on medium speed just until combined, scraping the bowl halfway. Do not overmix.
- Whip the heavy cream: In a separate chilled bowl, whip the cold heavy cream to medium stiff peaks—just enough to hold shape without overwhipping.
- Fold cream into mascarpone mixture: Gently fold the whipped cream into the mascarpone mixture in 2-3 additions using a rubber spatula. Be careful to keep the mixture light and airy.
- Prepare coffee soak: Pour the room temperature strong black coffee into a wide bowl for dipping ladyfingers.
- Dip ladyfingers: Quickly dip each ladyfinger on both sides into the coffee, ensuring they absorb some liquid but do not become soggy. Arrange a layer in the bottom of an 8 x 9.5-inch rectangular dish.
- Layer mascarpone cream: Spread half of the mascarpone cream evenly over the ladyfinger layer.
- Add second layer: Repeat dipping and layering the remaining ladyfingers over the cream.
- Finish with mascarpone cream: Spread the remaining mascarpone cream on top to cover the ladyfingers completely.
- Chill: Cover the dish and refrigerate for at least 6 hours or ideally overnight to allow flavors to meld and dessert to set.
- Serve: Before serving, sift cocoa powder evenly over the top. Cut into slices and enjoy.
Notes
- If using egg whites for the mascarpone cream, whisk egg whites and remaining sugar over a double boiler until 160°F (5-8 minutes), then whip to stiff peaks before folding into mascarpone.
- Do not overmix mascarpone and yolk mixture as it can become grainy.
- Use strong brewed coffee cooled to room temperature to avoid soggy ladyfingers.
- Refrigeration time is crucial for the best texture and flavor melding.
- Galbani mascarpone is recommended for authenticity and creaminess.

Your email address will not be published. Required fields are marked *