

If you’re on the hunt for a fun, festive treat that’s not only adorable but totally plant-based, you’re going to love this Spooky Vegan Spider Cookies Recipe. These little creepy-crawly cookies are perfect for Halloween or any spooky-themed party, and I promise, they’re as yummy as they are cute. I absolutely love how these cookies come together – they’re soft, slightly nutty from the SunButter, and those mini Sun Cups with candy eyes just make everyone smile. Keep reading because I’m sharing all my tips to help you nail these creepy critters with ease.
Why You’ll Love This Recipe
- Totally Vegan & Allergy-Friendly: Made with SunButter and a simple egg replacer, these cookies are kind to nut-sensitive and vegan diets.
- Fun and Festive: The candy eyes and spider legs make these irresistibly cute for Halloween parties or casual spooky snacking.
- Soft & Chewy Texture: These cookies stay soft and moist, which is a refreshing change from the usual crunchy sugar cookies.
- Easy to Make: The recipe is straightforward with no special skills or odd ingredients required. Perfect if you want a quick spooky treat!

Ingredients You’ll Need
The beauty of this Spooky Vegan Spider Cookies Recipe is in its simple, wholesome ingredients that come together beautifully. I like to shop for organic sugars and a reliable egg replacer to keep flavors clean and baking consistent.
- Shortening: This helps the cookies stay nice and soft, plus it holds up well without butter.
- SunButter: A nut-free alternative that adds richness and a mild, buttery flavor—perfect for allergy-friendly baking.
- Brown sugar: Brings a hint of molasses and chewiness to these cookies.
- Granulated sugar: Balances sweetness and helps with that slight crisp edge when baked.
- Egg replacer: I use Bob’s Red Mill for reliable texture without eggs.
- Dairy-free milk: Adds moisture so the dough isn’t dry; almond or oat milk work great.
- Vanilla extract: A must for depth of flavor.
- All-purpose flour (or gluten-free blend): The base that holds everything together.
- Baking soda: For just enough lift and softness.
- Salt: A pinch to enhance all the other flavors.
- Sanding sugar: For rolling the dough balls and adding sparkle without mixing into the dough.
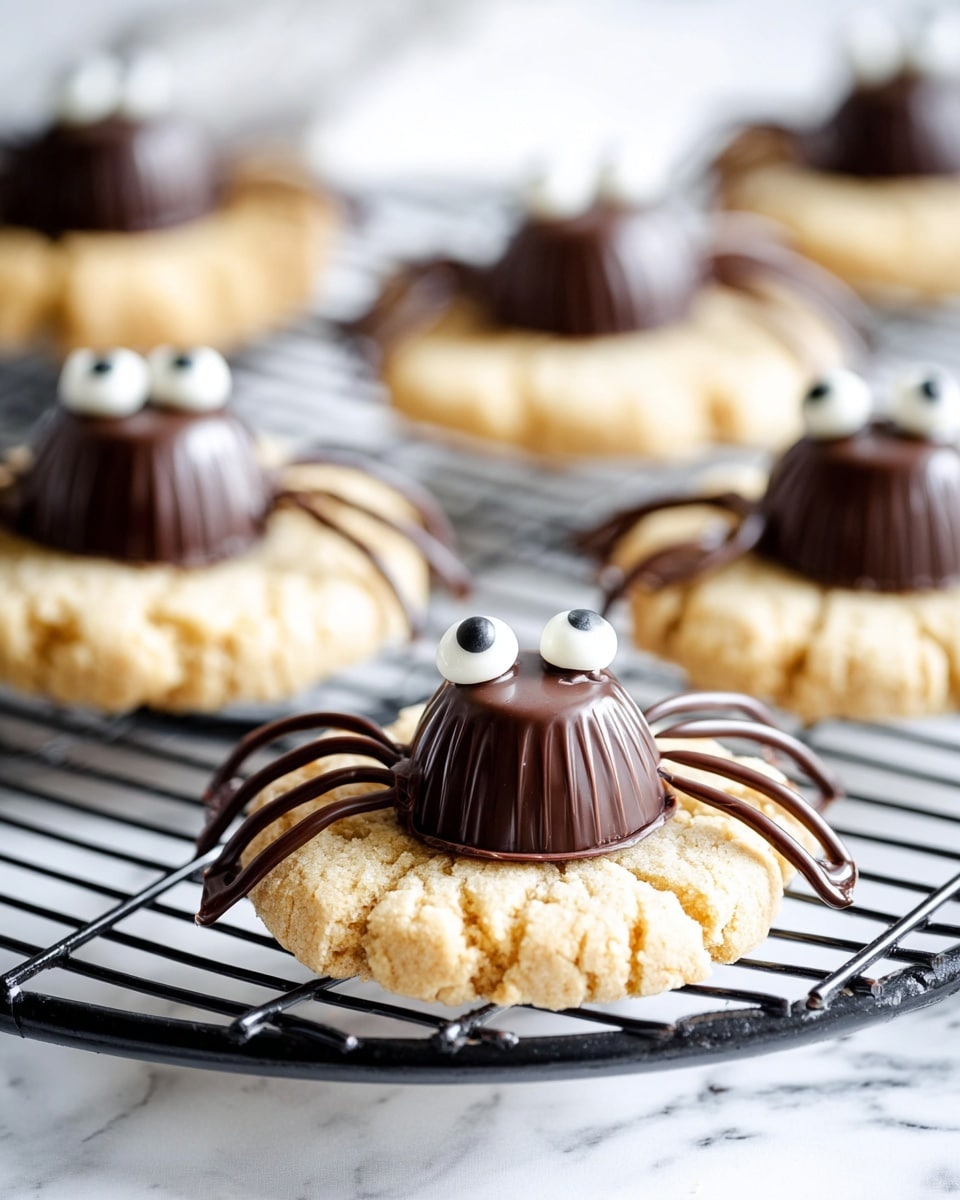
- Mini free2b Sun Cups: These mini chocolate cups are vegan and perfect as spider bodies.
- Candy eyes: They make these cookies literally come alive!
- Vegan chocolate chips: For piping on the legs and attaching the eyes.
Variations
One of the most fun things about the Spooky Vegan Spider Cookies Recipe is how easy it is to customize. I’ve tried a few tweaks over the years, and honestly, it’s so worth playing around with to make these your own.
- SunButter Swap: I once swapped SunButter for tahini, which added a subtle nuttiness that was surprisingly delicious.
- Gluten-Free Option: Using a 1:1 gluten-free flour blend works perfectly here—my gluten-sensitive friends never guessed!
- Decorating Fun: Instead of candy eyes, try mini chocolate chips or dyed icing for extra spooky designs.
- Spiced Up: Add a pinch of cinnamon or pumpkin pie spice to the dough for an autumn twist I adore.
How to Make Spooky Vegan Spider Cookies Recipe
Step 1: Prepping Your Ingredients and Oven
I like to start by popping the Sun Cups into the fridge so they’re nice and firm when it’s time to use them, which helps prevent melting during decorating. While that chills, preheat your oven to 375°F and line a baking sheet with parchment paper — you want a non-stick surface so your cookies bounce right off once baked.
Step 2: Make Your Vegan Egg Mixture
Mix 1 tablespoon of Bob’s Red Mill egg replacer with 2 tablespoons water and let it sit for a minute. This little step is crucial because it helps the egg replacer activate and bind your cookie dough just like a real egg would. I’ve learned the hard way that skipping it makes the dough crumbly and hard to handle.
Step 3: Cream the Fats and Sugars
In a large bowl, cream together the shortening, SunButter, brown sugar, and granulated sugar until everything is smooth and fluffy — this usually takes about 2-3 minutes with a hand mixer. The texture here makes a difference in how tender and moist your cookies will be.
Step 4: Combine Wet Ingredients
Beat your vegan egg mixture into the creamy mixture until fully combined, then stir in the dairy-free milk and vanilla extract. This extra bit of liquid keeps things soft and moist without weighing down the batter.
Step 5: Mix Dry Ingredients and Form Dough
In a smaller bowl, whisk together the flour, baking soda, and salt. Then gradually add this dry mix to the wet bowl and stir until completely incorporated—you’ll get a soft dough that’s easy to work with. Divide it into 24 equal balls for consistency, which helps them all bake evenly.
Step 6: Sugar Roll and Bake
Sprinkle sanding sugar into a shallow bowl and roll each dough ball in it to get a sparkling outer layer. This adds a festive shimmer and just a bit of crunch on the surface without affecting that soft inside. Arrange your sugar-coated balls about two inches apart on your baking sheet.
Bake for 10-12 minutes, keeping an eye out—cookies should be lightly browned with a soft center. Leaving them to cool on the sheet for 5 minutes helps them set before you transfer to a cooling rack.
Step 7: Decorate Your Spooky Spiders
Once cooled slightly, press the chilled Sun Cups upside down into the center of each cookie. Then pop the whole tray back into the fridge for 10 minutes so the chocolate sets up and won’t melt when you add the legs.
Melt vegan chocolate chips in bursts of 20 seconds in the microwave, kneading in between. Snip a tiny corner off a zippered bag and pipe a small dab on the back of each candy eye to stick them in place. Finally, draw eight spider legs on each cookie with the melted chocolate, then refrigerate again for 10 minutes to harden the design.
Pro Tips for Making Spooky Vegan Spider Cookies Recipe
- Chill the Sun Cups: Keeping the Sun Cups cold while decorating really helps prevent a chocolate meltdown – learned that one the sticky way!
- Use Parchment Paper: It makes cleanup a breeze and ensures your cookies release easily without breaking.
- Don’t Overbake: Cookies might feel soft when you pull them out, but they’ll firm up as they cool—this keeps them chewy and perfect.
- Practice Your Piping: If your hands are shaky, try piping on parchment first to get comfortable, then go for the spiders!
How to Serve Spooky Vegan Spider Cookies Recipe
Garnishes
I usually keep it simple with the candy eyes and chocolate legs, but I’ve also added red sanding sugar for a creepy blood drip effect once. For a more dramatic presentation, a light dusting of cocoa powder or edible glitter can elevate the spooky vibe.
Side Dishes
These cookies pair wonderfully with a big mug of hot apple cider or a pumpkin spice latte for parties. If you’re planning a spooky spread, I like to serve them alongside vegan caramel popcorn and roasted pumpkin seeds — talk about a seasonal snack fest!
Creative Ways to Present
Last Halloween, I arranged these spiders crawling up a “web” created with spun sugar on a platter. It wowed guests! You can also display them on multi-level trays with mini pumpkins, or even package them in small cellophane bags with a handwritten spooky note for party favors.
Make Ahead and Storage
Storing Leftovers
I store leftover Spooky Vegan Spider Cookies in an airtight container at room temperature, separated by parchment layers to keep legs from sticking together. They stay fresh and chewy for about 3 days — sometimes longer if no one sneaks a midnight snack!
Freezing
If you want to freeze them, I recommend freezing the undecorated cookie dough balls or baked cookies before adding the Sun Cups and decorations. This way, once defrosted, you can decorate fresh without soggy chocolate or lost detail. I’ve had great results freezing dough up to a month and baking straight from frozen with an extra minute or two of baking time.
Reheating
These cookies are best at room temperature, but if you prefer them slightly warm, pop them in the microwave for 10-15 seconds. Be careful not to heat too long or the chocolate legs might soften and lose shape.
FAQs
-
Can I substitute SunButter with peanut butter?
Absolutely! Peanut butter works great and provides a similar creamy texture. Just make sure it’s smooth peanut butter for easier mixing and shaping. Keep in mind it changes the flavor profile, but it’s delicious nonetheless.
-
What if I don’t have candy eyes? Can I still make the spider cookies?
Yes! You can get creative by piping small chocolate dots for eyes, or using mini chocolate chips, raisins, or even edible markers to draw eyes directly on the Sun Cups once the chocolate sets.
-
How do I make these cookies gluten-free?
Simply swap the all-purpose flour for a 1:1 gluten-free baking blend. I’ve had great success with my favorite blends in this recipe and the texture remains soft and tasty.
-
Can I prepare the dough the night before?
Definitely! Refrigerate the dough overnight wrapped tightly in plastic wrap. Before baking, let it come to room temperature for easier rolling and then roll in sanding sugar as usual.
-
What’s the best way to melt vegan chocolate chips for decorating?
I prefer microwaving in short bursts of 20 seconds, stirring in between until smooth. This prevents burning and gives you great control over the consistency for piping spider legs.
Final Thoughts
I truly adore making this Spooky Vegan Spider Cookies Recipe every fall—it brings a little joy, creativity, and a lot of smiles around our kitchen table. These cookies are a fantastic way to include everyone, vegan or not, in the fun of Halloween baking. Plus, they’re surprisingly easy to make, which means more time to enjoy decorating (and sneaking bites!). I can’t wait for you to try them and see how they make your spooky celebrations extra special.
Print
Spooky Vegan Spider Cookies Recipe
- Prep Time: 10 minutes
- Cook Time: 10 minutes
- Total Time: 35 minutes
- Yield: 24 cookies
- Category: Dessert
- Method: Baking
- Cuisine: American
- Diet: Vegan
Description
These Spooky Vegan Spider Cookies are a fun and festive treat perfect for Halloween or any spooky celebration. Made with a dairy-free and egg-free base using SunButter, these soft and chewy cookies are topped with mini Sun Cups, candy eyes, and piped vegan chocolate legs to create adorable spider designs. They are easy to make, vegan, and visually impressive for parties or cozy gatherings.
Ingredients
Cookie Dough
- 1/4 cup shortening
- 1/4 cup SunButter (or nut-free butter of choice)
- 1/4 cup brown sugar (Florida Crystals recommended)
- 1/4 cup granulated sugar (Florida Crystals Organic Cane recommended)
- 1 egg replacer equivalent (e.g., 1 tablespoon Bob’s Red Mill Egg Replacer mixed with 2 tablespoons water)
- 1 tablespoon dairy-free milk
- 1/2 teaspoon vanilla extract
- 1 cup all-purpose flour (or 1:1 gluten-free blend)
- 1/2 teaspoon baking soda
- 1/4 teaspoon salt
For Rolling and Decorating
- 1/8 cup sanding sugar (for rolling only; do not add to dough)
- 24 mini free2b Sun Cups
- Candy eyes (24 pieces)
- 1/4 cup vegan chocolate chips
Instructions
- Prepare Ingredients: Refrigerate the Sun Cups ahead of time to keep them firm for pressing into the cookies later. Preheat the oven to 375°F (190°C) and line a baking sheet with parchment paper.
- Make Vegan Egg: In a small bowl, mix 1 tablespoon of Bob’s Red Mill Egg Replacer with 2 tablespoons water and set aside to activate.
- Cream Wet Ingredients: In a large mixing bowl, cream together shortening, SunButter, brown sugar, and granulated sugar until smooth and fluffy. Beat in the prepared vegan egg replacer until fully incorporated, then add dairy-free milk and vanilla extract and mix until smooth.
- Mix Dry Ingredients: In a separate small bowl, whisk together flour, baking soda, and salt. Gradually add the dry mixture to the wet ingredients and stir until a uniform dough forms.
- Shape and Roll: Divide the dough into 24 equal portions and shape each into a ball. Pour sanding sugar into a shallow bowl and roll each dough ball in the sanding sugar to coat. Place the coated dough balls about 2 inches apart on the prepared baking sheet.
- Bake Cookies: Bake the cookies in the preheated oven for 10-12 minutes until they turn a light brown color and feel soft to the touch. Remove from oven and allow cookies to cool on the sheet for 5 minutes, then transfer to a cooling rack to cool completely.
- Add Sun Cups: Remove the Sun Cups from the refrigerator and unwrap them. Press each upside-down Sun Cup firmly into the center of each cooled cookie. Return the cookies to the refrigerator for 10 minutes to prevent the Sun Cups from melting during decoration.
- Melt Chocolate: Place vegan chocolate chips in a corner of a zippered sandwich bag. Microwave for 20 seconds, knead the chocolate, and microwave again in 20-second increments until fully melted and smooth. Cut a small corner off the bag to create a piping tip.
- Decorate Spiders: Pipe a tiny dot of melted chocolate on the back of each candy eye and press it onto the Sun Cup on each cookie. Using the melted chocolate, pipe eight legs around each Sun Cup to resemble spider legs.
- Set Decoration: Place the decorated cookies back in the refrigerator for 10 minutes to allow the chocolate legs to set firmly before serving.
Notes
- Ensure Sun Cups are well chilled before pressing onto cookies to minimize melting.
- You can substitute the SunButter with any nut-free butter alternative if desired.
- Gluten-free flour can be used in a 1:1 ratio for a gluten-free option.
- The vegan egg replacer mix is important for binding the dough since this recipe is egg-free.
- Handle the melted chocolate carefully; warming in short increments prevents burning.
- For best results, decorate cookies after they are fully cooled to avoid melting chocolate.
Nutrition
- Serving Size: 1 cookie
- Calories: 120
- Sugar: 8g
- Sodium: 90mg
- Fat: 6g
- Saturated Fat: 1g
- Unsaturated Fat: 5g
- Trans Fat: 0g
- Carbohydrates: 16g
- Fiber: 1g
- Protein: 2g
- Cholesterol: 0mg

Your email address will not be published. Required fields are marked *