

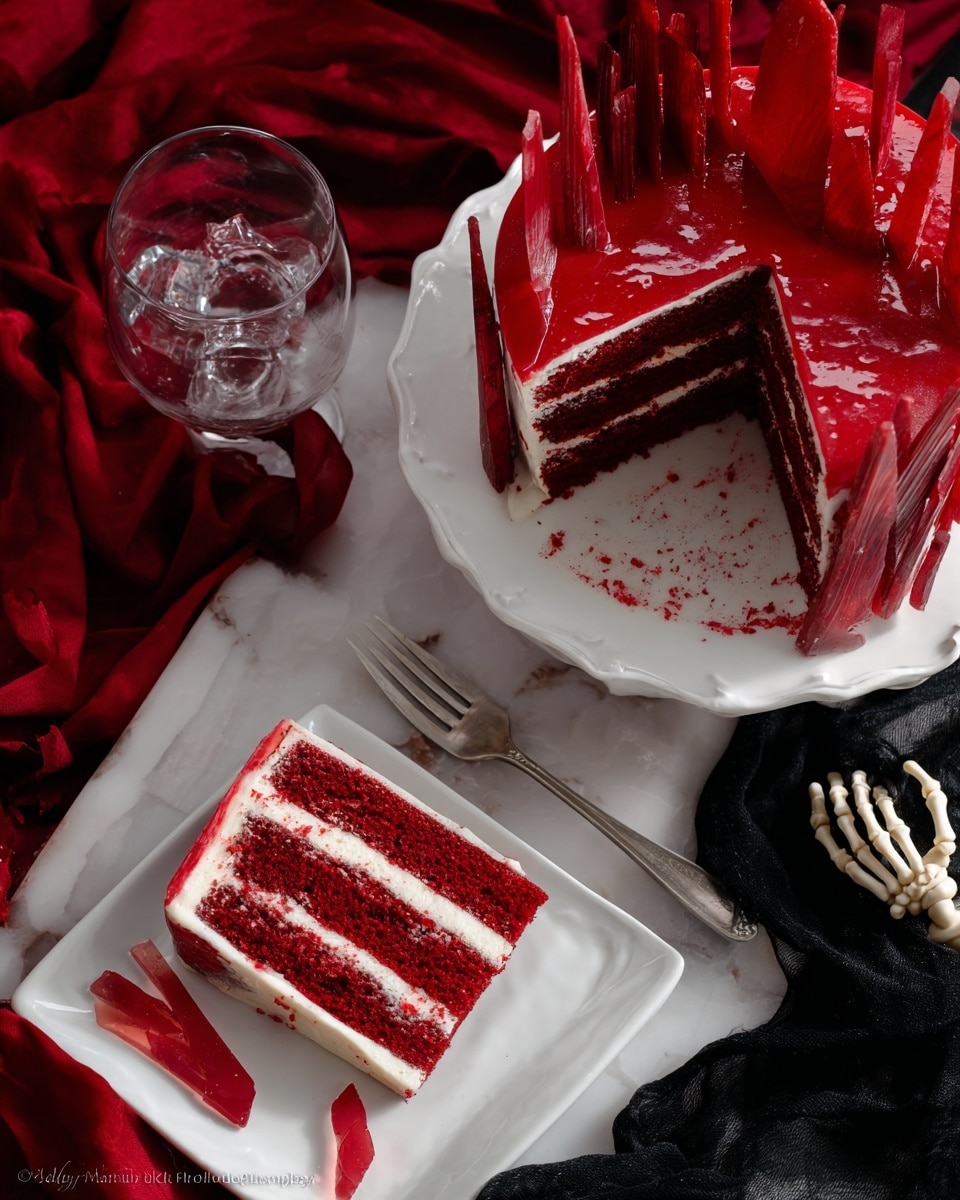
If you’re craving a showstopping dessert that’s as stunning as it is delicious, you’re in the right place. I’m excited to share my Bloody Red Velvet Cake Recipe—a dramatic twist on the classic red velvet that’s rich, moist, and topped with a white chocolate “blood” ganache and delicate candy shards that look like broken glass. I promise, once you try this recipe, you’ll understand why it’s become a favorite at Halloween parties and special occasions alike!
Why You’ll Love This Recipe
- Dramatic Presentation: The candy “glass” shards add a beautiful and spooky effect that will wow your guests.
- Moist & Flavorful Cake: Combining sour cream, buttermilk, and vinegar keeps the cake tender and bursting with classic red velvet flavor.
- Rich Swiss Meringue Buttercream: This frosting is silky smooth, less sweet, and not as heavy as traditional buttercream.
- Showstopper Ganache: The white chocolate blood ganache with a hint of red and black food coloring is the perfect finishing touch that you’ll love drizzling over the cake.

Ingredients You’ll Need
Every ingredient in this Bloody Red Velvet Cake Recipe plays a crucial role—from the candy shards to the cake layers and the frosting. I’ll share little tips here for picking the best quality ingredients to get the flavor and texture just right.
- Granulated sugar: Essential for both the cake and the candy shards; I prefer fine sugar for better dissolving.
- Light corn syrup: This keeps the candy shards flexible enough to spread evenly but crisp when hardened.
- Cream of tartar: A key ingredient for candy making that helps prevent crystallization in candy shards.
- All-purpose flour: Use fresh, unbleached flour for the best crumb texture in your cake.
- Cocoa powder: Natural cocoa powder brings the subtle chocolate undertone that’s signature to red velvet.
- Baking powder & baking soda: Leavening agents that ensure your cake layers rise beautifully.
- Unsalted butter: Soften at room temperature for easy creaming; also important for your buttercream.
- Brown sugar: Adds moisture and a deep note of sweetness to the cake.
- Eggs: Large eggs work best for consistency and structure.
- Sour cream: Adds moisture and richness to keep this cake delightfully tender.
- Vanilla extract: A must for enhancing all the flavors in the cake and frosting.
- Vinegar: Don’t skip this—it reacts with baking soda to help the cake rise and intensify the cake’s velvet texture.
- Buttermilk: You can easily make a substitute — just add lemon juice or vinegar to milk; it’s key for that tangy richness.
- Red food coloring: Use gel or paste for vivid colors without thinning your batter.
- Egg whites: Needed for the Swiss meringue buttercream to create that light and airy texture.
- Salt: Just a pinch enhances sweetness and balances flavors in both cake and frosting.
- White chocolate & heavy cream: For the luscious “blood” ganache that drips down the cake—choose high-quality white chocolate for the best melt.
- Dark chocolate (for grating): Adds both texture and a deep bittersweet contrast when grated between layers.
Variations
I love that you can customize this Bloody Red Velvet Cake Recipe to fit the occasion or your dietary preferences. Over time, I’ve tried a few tweaks that make it even more special—and they’re all easy to adapt.
- Vegan variation: I’ve experimented using aquafaba in place of egg whites for the meringue buttercream and a flaxseed egg for the cake—it’s delicious, but the texture is slightly different. Definitely worth a try if you want to make it plant-based!
- Spicy twist: Adding a pinch of cinnamon and cayenne pepper to the cake batter gives an unexpected warmth, perfect for colder months—my family was obsessed when I tried it!
- Chocolate lover’s version: Fold finely chopped dark chocolate into the batter before baking for extra bursts of chocolate throughout the cake.
- Seasonal ingredient swap: For a fruity hint, adding fresh raspberries between layers complements the tang from the buttermilk buttercream beautifully.
How to Make Bloody Red Velvet Cake Recipe
Step 1: Create the Candy “Glass” Shards
This step might look intimidating if you’re new to candy making, but trust me, it’s easier than you think. Combine the sugar, corn syrup, water, and cream of tartar in a saucepan—then stir over medium-high heat until the sugar dissolves and the mixture boils. Resist the urge to stir once boiling starts; eye on your candy thermometer until it hits 300°F. Pour carefully onto a parchment-lined baking sheet and spread evenly.
Patience here is key! Let the candy harden completely for at least two hours without disturbing it. When it’s set, use a hammer (wrapped in a kitchen towel) to break into beautiful shards. Watch your fingers and go slow—these look delicate and add such drama to the final cake.
Step 2: Mix and Bake the Cake Layers
Preheat your oven and prep four 6-inch round pans with parchment and a quick spray. Whisk the dry ingredients together in a bowl to get everything evenly distributed. Then, beat the butter and sugars until fluffy—this is where air gets incorporated for that tender crumb. Add your eggs one at a time and fold in sour cream, vanilla, and vinegar for that velvety texture and subtle tang.
Whisk your red food coloring into the buttermilk, then combine that gently into the batter. Don’t overmix here; just ensure the color is uniform. Divide the batter evenly between pans and bake for about 25-27 minutes. A toothpick should come out clean when it’s done. Let the cakes cool before your frosting magic begins.
Step 3: Whip Up Swiss Meringue Buttercream
Swiss meringue buttercream can seem high-maintenance, but this method is well worth the creamy, shiny finish. Warm egg whites, sugar, and salt over simmering water until the sugar dissolves and mixture hits 150-160°F, then whip until fluffy and cool. Add cold butter, piece by piece, beating continuously—the texture will look strange at times, but keep going and it will come together beautifully.
If your buttercream looks runny or curdled, I’ve learned to pop it in the fridge for 30 minutes before continuing. Sometimes gently warming a little frosting in the microwave then whipping it back in can save it too.
Step 4: Make the White Chocolate “Blood” Ganache
Simply melt the white chocolate with heavy cream in short bursts in the microwave, stirring to get that silky smooth texture. Stir in red food coloring and just a tiny bit of black to deepen the shade—don’t overdo the black or it’ll look muddy. Let it cool until slightly thickened before drizzling.
Step 5: Assemble and Frost the Cake
Stack the cake layers with buttercream and grate a generous amount of dark chocolate between each. Freezing the stacked layers for 30 minutes helps stabilize the cake for easier frosting. Start with a thin crumb coat, chill again, then add a final smooth coat. Pour the ganache starting from the sides so it drips down beautifully, then fill the center.
Finally, press your candy shards into the cake, adding a little ganache over them if you want to secure the pieces and add extra “bloody” shine. The effect is so stunning, your guests will be asking how you made it!
Pro Tips for Making Bloody Red Velvet Cake Recipe
- Candy Shard Safety: Always wrap the candy with a towel before breaking to avoid flying shards and accidental cuts.
- Moisture Control: I found that using fresh buttermilk or the homemade substitute keeps the cake tender and prevents dryness over time.
- Buttercream Rescue: If your buttercream looks broken, warming a small portion and whipping it back in will bring it back to silky perfection—patience is key!
- Ganache Thickness: Chill the ganache or the cake slightly if your drip is running too fast—this tip gave me perfect control for neat, elegant drips.
How to Serve Bloody Red Velvet Cake Recipe
Garnishes
I absolutely love topping this cake with extra grated dark chocolate and a few fresh raspberries for a tart contrast. The candy shards speak for themselves, so I keep garnishes simple to let that visual pop. Sometimes, a light dusting of powdered sugar or edible glitter adds a magical touch without distracting from the theme.
Side Dishes
This cake pairs beautifully with a simple cup of coffee or rich dark roast tea—perfect for cozy gatherings. For a party, I like serving it alongside fresh whipped cream or a scoop of vanilla bean ice cream to balance the rich flavors.
Creative Ways to Present
For Halloween or themed events, I’ve draped edible “blood” made from extra ganache over the cake stand and set the cake among faux cobweb decorations. Another fun touch is to arrange the candy shards not only on top but cascading down the sides for a “shattered” effect. Try placing the cake on a mirrored plate for an elegant, spooky reflection!
Make Ahead and Storage
Storing Leftovers
I store leftover cake in an airtight container in the fridge; it keeps fresh for about 3-4 days. I like to bring the slices to room temperature before serving because the buttercream softens and the flavors really shine through.
Freezing
Freezing this cake works surprisingly well—just wrap individual slices tightly in plastic wrap and place in a freezer bag. When you’re ready to enjoy, thaw overnight in the fridge. This came in handy when I prepped the cake for a big party and saved time on the day of!
Reheating
Since this is a frosted cake, I don’t recommend reheating in the microwave directly. Instead, let it sit out for about 30 minutes after removing from the fridge, which warms the buttercream gently and makes the texture just right for eating.
FAQs
-
Can I make the candy shards ahead of time?
Absolutely! The candy shards can be made up to a week in advance. Just store them in an airtight container at room temperature to keep them crisp and ready for your cake assembly.
-
What can I substitute for buttermilk?
A quick homemade buttermilk substitute is adding 1/2 tablespoon lemon juice or white vinegar to a measuring cup and filling it with milk until it reaches 1/2 cup. Let it sit for 5 minutes before using—it’s a simple fix if you’re out of buttermilk.
-
How do I know when the Swiss meringue buttercream is done?
It’s done when the buttercream is smooth, silky, and creamy without any lumps. Sometimes it looks curdled mid-way—don’t worry! Keep beating, and it will come together. If it doesn’t, refrigerate briefly and try again.
-
Can I use regular frosting instead of Swiss meringue buttercream?
Yes, you can, but the Swiss meringue buttercream is less sweet and lighter, which complements the red velvet better and balances the rich ganache and candy shards visually and flavor-wise.
-
How do I prevent the ganache from running too fast?
If your ganache drips too quickly, chill the cake or the ganache to thicken it. This slows the drip and gives you control over the look—you’ll get those gorgeous slow drips without the mess.
Final Thoughts
This Bloody Red Velvet Cake Recipe has quickly become a cherished recipe in my kitchen, especially around holidays when I want to impress without resorting to complicated techniques. The combination of flavors, textures, and that unforgettable presentation makes it so worth the effort. Whether you’re baking for a party or just treating yourself, give this cake a try—you’ll be so glad you did, and I guarantee it’ll become a favorite in your dessert rotation too!
Print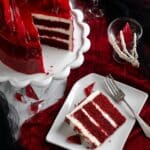
Bloody Red Velvet Cake Recipe
- Prep Time: 2 hours 30 minutes
- Cook Time: 27 minutes
- Total Time: 2 hours 57 minutes
- Yield: 10 slices
- Category: Baking
- Method: Baking
- Cuisine: American
Description
This Bloody Red Velvet Cake is a show-stopping dessert featuring moist red velvet layers layered with silky vanilla Swiss meringue buttercream, topped with a striking white chocolate ‘blood’ ganache and shards of homemade candy glass. Perfect for Halloween or any dramatic occasion, this recipe combines classic flavors with theatrical presentation.
Ingredients
Candy “Glass” Shards:
- 2 cups granulated sugar
- ⅔ cup light corn syrup
- ¾ cup water
- ⅛ teaspoon cream of tartar
Red Velvet Cake:
- 1 ¾ cup all-purpose flour
- 2 Tablespoons natural cocoa powder
- 1 teaspoon baking powder
- ½ teaspoon baking soda
- ½ teaspoon salt
- ¾ cup unsalted butter, softened
- 1 cup granulated sugar
- 2 Tablespoons brown sugar
- 2 eggs
- ¾ cup sour cream
- 1 ½ teaspoon vanilla extract
- ½ teaspoon vinegar
- ½ cup buttermilk (see notes)
- 1 Tablespoon red food coloring (Wilton’s No Taste Red gel food coloring recommended)
Vanilla Swiss Meringue Buttercream:
- 7 large egg whites
- 2 ¼ cup granulated sugar
- ¼ teaspoon salt
- 1 ¾ cup (3 1/2 sticks) unsalted butter, cold and sliced into about 20 pieces
- 1 teaspoon vanilla extract
White Chocolate “Blood” Ganache:
- 3 ounces white chocolate, chopped or chips
- ¼ cup heavy cream
- Red and black food coloring
For Assembly:
- Grated dark chocolate
Instructions
- Make the “Glass” Shards: Line a large baking sheet with parchment paper. In a medium saucepan over medium-high heat, combine sugar, light corn syrup, water, and cream of tartar. Stir until the mixture comes to a boil, then stop stirring. Boil until a candy thermometer reaches 300ºF, then immediately pour onto the prepared baking sheet and spread evenly with a heat-resistant spatula. Let harden for 2 hours. Once solid, carefully break into shards with a hammer.
- Make the Cake: Preheat oven to 350ºF. Line four 6-inch round cake pans with parchment paper and spray with nonstick spray. Whisk flour, cocoa powder, baking powder, baking soda, and salt in a bowl. In a mixer bowl, beat butter and sugars until pale and fluffy. Add eggs one at a time, then sour cream, vanilla, and vinegar. Mix dry ingredients into wet until combined. Whisk red food coloring into buttermilk and add to batter. Divide evenly into pans and bake 25-27 minutes or until toothpick is clean. Cool in pans 10 minutes then transfer to racks to cool completely.
- Make the Buttercream: Combine egg whites, sugar, and salt in a mixer bowl and heat it over simmering water until sugar dissolves and temperature reaches 150-160°F, whisking constantly. Whip the mixture on high speed until fluffy and cooled to room temperature. Add butter pieces one at a time continuing to beat until smooth and creamy. Add vanilla and beat an additional 30 seconds. If curdled, keep beating until smooth or follow notes for fixing texture.
- Make the Ganache: Microwave white chocolate and heavy cream for 30 seconds, stir until smooth; heat in additional 15-20 second increments if needed. Stir in red food coloring and a tiny drop of black food coloring for depth. Let cool and thicken about 30 minutes.
- Assemble the Cake: Place one cake layer on a plate. Spread a layer of buttercream, then grate dark chocolate evenly over it. Repeat layering with remaining cakes. Freeze assembled layers for 30 minutes to stabilize. Apply a crumb coat of frosting and freeze until firm. Add a final layer of buttercream ensuring complete coverage. Pour ganache around the top edges to drip down the sides, then fill the center with ganache. Decorate by pressing candy glass shards into the top and sides, adding more ganache over shards if desired.
Notes
- If you don’t have buttermilk, add 1/2 tablespoon lemon juice or white vinegar to a measuring cup, then add milk to equal ½ cup and let sit for 5 minutes before using.
- Wilton’s No Taste Red gel food coloring is recommended for vibrant color without flavor impact.
- If buttercream looks runny, refrigerate for 30 minutes and then continue beating. For curdled frosting, microwave 2 tablespoons until liquified, mix into frosting, and whip until smooth. Repeat if necessary.
- If ganache drips too fast, chill the cake for 15 minutes or refrigerate ganache for 10-15 minutes to thicken before pouring.
Nutrition
- Serving Size: 1 slice (1/10th of cake)
- Calories: 520
- Sugar: 50 g
- Sodium: 220 mg
- Fat: 28 g
- Saturated Fat: 16 g
- Unsaturated Fat: 11 g
- Trans Fat: 0.5 g
- Carbohydrates: 62 g
- Fiber: 2 g
- Protein: 5 g
- Cholesterol: 110 mg

Your email address will not be published. Required fields are marked *