
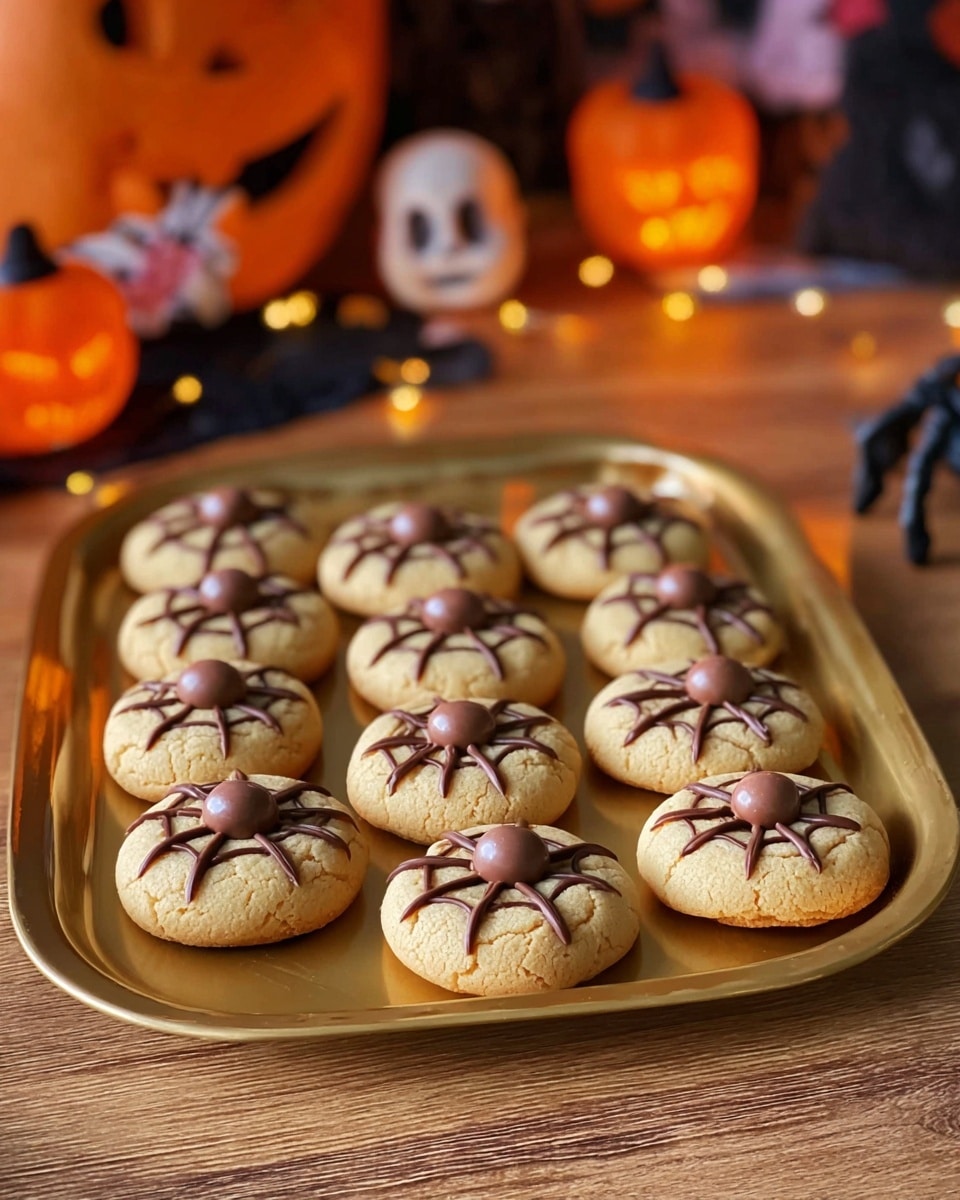
If you’re hunting for a Halloween treat that’s as fun to make as it is delicious to eat, you’re going to adore this Halloween Spider Cookies Recipe. These spooky, soft cookies decorated with chocolate legs and googly eyes never fail to bring smiles—and a few giggles—around my kitchen. I absolutely love how they balance a tender, buttery cookie base with playful decorations that turn snack time into a mini celebration. Stick with me and I’ll walk you through every step for stress-free success!
Why You’ll Love This Recipe
- Super Soft Texture: The cookies stay tender in the center with a golden crust, making every bite melt in your mouth.
- Fun and Festive: The spider decorations are easy to make but create a real wow factor for Halloween parties or classroom treats.
- Kid-Friendly Assembly: Decorating with chocolate and icing turns into a fun activity you can enjoy with your little helpers.
- Simple Ingredients: You probably have most of what you need already in your pantry, so it’s a no-fuss baking win.

Ingredients You’ll Need
These ingredients come together to create a rich, soft cookie dough that’s perfect for holding the festive spider decorations. I like to use a good-quality vanilla extract because it really boosts the flavor and makes the cookies smell amazing while baking.
- Butter: Unsalted is best so you can control the saltiness perfectly.
- Brown sugar: Adds moisture and that lovely caramel depth to the cookies.
- White sugar: Balances the sweetness and helps with the cookie’s delicate crisp edges.
- Egg: Binds everything together and lends structure to the dough.
- Vanilla essence: Boosts the flavor in the most comforting way.
- Plain (all-purpose) flour: The base for your cookies—sifted for that light texture.
- Salt: Just a pinch to enhance all the other flavors.
- Baking soda: Helps the cookies rise slightly and stay soft.
- Cornflour (cornstarch): The secret ingredient that makes these cookies tender.
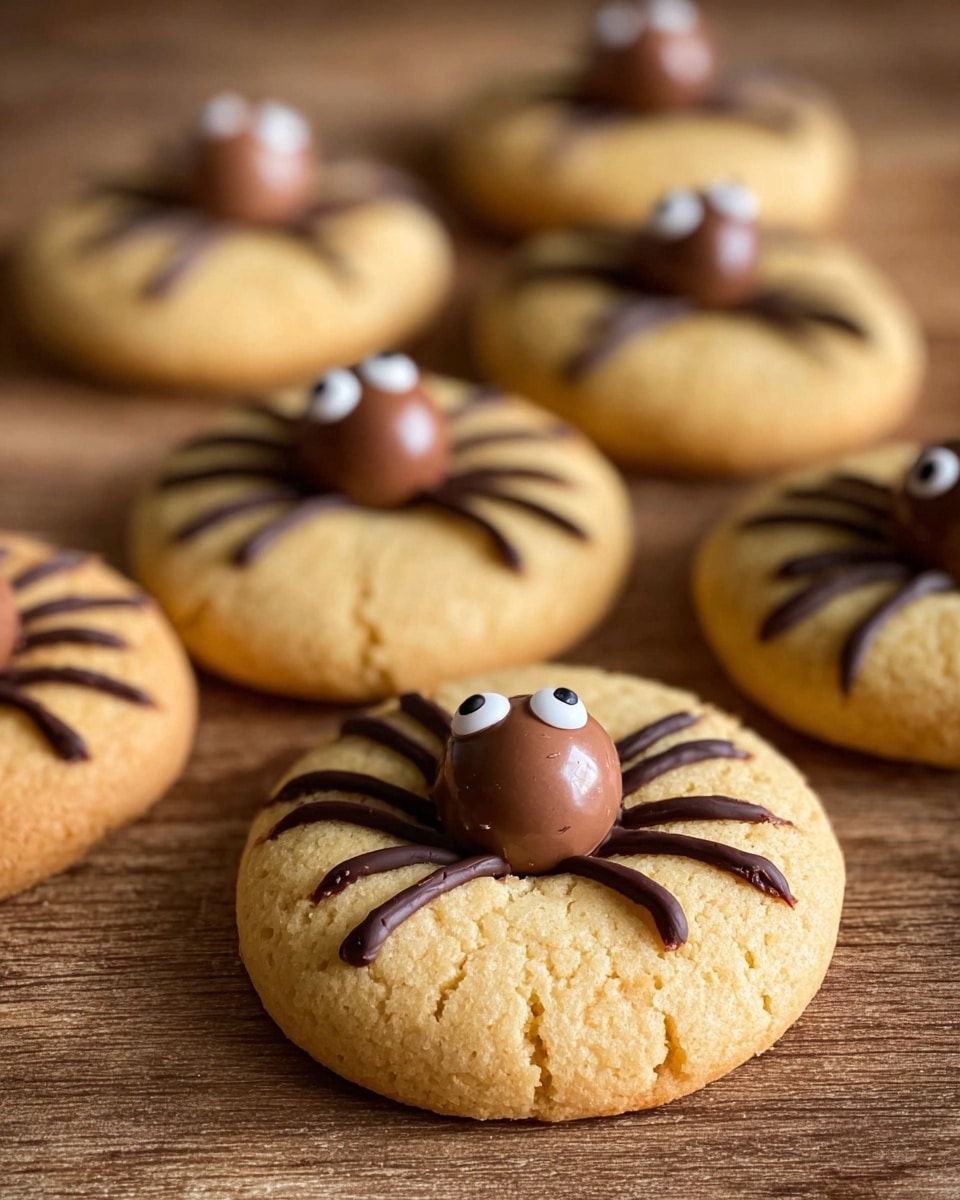
- Maltesers: Perfect for the round spider body—crispy and chocolaty.
- Dark chocolate: Melted for piping spider legs—bittersweet to contrast the sweetness.
- White icing: For cute spider eyes—you can find this in tubes at most baking aisles.
Variations
While I adore the traditional Halloween Spider Cookies Recipe as is, I’ve played around with a few variations that add even more fun and adapt to different tastes. Feel free to make it your own!
- Chocolate Chip Upgrade: I sometimes add a cup of chocolate chips into the dough before refrigerating for an extra chocolatey surprise in every bite.
- Gluten-Free Option: Swap the plain flour for a gluten-free mix and use gluten-free baking soda—you’ll still get great texture and taste.
- Use Candy Eyeballs: If you want to skip the piping icing eyes, specialty stores sell candy eyeballs which are super cute and save time.
- Peanut Butter Twist: For a nutty spin, replace some butter with peanut butter, but be sure to chill the dough longer so it doesn’t spread too much.
How to Make Halloween Spider Cookies Recipe
Step 1: Melt & Mix the Wet Ingredients
Start by melting your butter in a large glass bowl—about 30 to 50 seconds in the microwave usually does the trick. Whisk it gently until smooth, then add both sugars, your egg, and vanilla. Mixing everything until it’s lump-free is key here—this ensures your dough has that consistent sweetness and moisture throughout.
Step 2: Incorporate the Dry Ingredients
Sift your flour, salt, baking soda, and cornflour right over your bowl, then fold gently until just combined. Your dough will feel quite soft and thick, which is normal—I learned the hard way that if it feels too warm and sticky to handle, chilling it in the fridge or freezer for a bit really helps make rolling easier without losing moisture.
Step 3: Form and Bake the Cookies
Preheat your oven to 170°C fan bake. Roll your dough into balls roughly 2 tablespoons each (around 30-40g) and space them on a lined baking tray. Don’t forget to gently press them down a little—they should bake nice and even. I usually bake mine for 12-15 minutes; the edges get that perfect golden hue, while the centers stay soft and tender, which is exactly what you want.
Step 4: Add the Spider Body
When the cookies come out of the oven, while still warm, carefully press two Maltesers into each cookie to form the spider’s body. Give them about 10 minutes to set on the tray before transferring them to a wire rack to cool completely—this step keeps your cookies from breaking apart and helps the bodies stick securely.
Step 5: Pipe the Legs & Eyes
Melt your dark chocolate, then pop it into a small ziplock bag—cut a tiny hole in one corner for piping. I pipe four legs on each side of the spider, and it’s super satisfying to see them come to life. To finish, use white icing for two big dots as eyes, topping each with a small chocolate dot inside. Let everything harden completely before serving.
Pro Tips for Making Halloween Spider Cookies Recipe
- Chill the Dough: I discovered chilling the dough for at least 30 minutes prevents spread and keeps the cookies thick and soft.
- Work Quickly with Melted Chocolate: Chocolate sets fast, so pipe your spider legs in small batches and keep unused melted chocolate warm by placing the bowl in a warm water bath.
- Use a Cookie Scoop: I use a 40mm dough scoop to get uniform-sized cookies which bake evenly; this saves tons of guesswork.
- Don’t Skip Cooling: Let cookies cool completely before storing; otherwise, the chocolate decorations might smudge or melt.
How to Serve Halloween Spider Cookies Recipe
Garnishes
I usually keep it simple with these cookies—adding more garnishes can take away from their charm. That said, if you want to amp up the spooky vibe, a dusting of edible glitter or a tiny drizzle of orange-colored icing can look fantastic. Kids also love sprinkles, but beware of hiding those little legs!
Side Dishes
Pair your spider cookies with a tall glass of cold milk or your favorite hot cocoa for a cozy fall touch. If you’re throwing a Halloween party, these go wonderfully alongside caramel apples, pumpkin-shaped cupcakes, or a bowl of festive popcorn for a spooky snack spread.
Creative Ways to Present
I like arranging these cookies on a black platter lined with orange tissue paper for maximum Halloween effect. Another fun idea is placing each spider cookie on a mini cupcake liner or even giving each a little spider web made from piped royal icing or spun sugar—it makes a stunning centerpiece that guests will talk about for days!
Make Ahead and Storage
Storing Leftovers
Once fully cooled and decorated, I store these cookies in an airtight container at room temperature. They stay fresh and soft for up to a week, which is perfect if you want to prepare them a few days early without stress.
Freezing
Freezing works best before decorating—freeze the baked cookies in a single layer on a tray, then transfer to a freezer-safe bag. When you’re ready to serve, thaw completely before decorating. I tried freezing after decorating, but the chocolate legs sometimes break or smudge, so I avoid that.
Reheating
If you want to freshen them up a bit, pop your cookies in a warm oven (about 150°C) for 3-5 minutes. This softens the center and makes the butter aroma come back alive. Just be cautious not to melt the chocolate decorations!
FAQs
-
Can I use other types of chocolate candies instead of Maltesers?
Absolutely! While Maltesers are great for their crunch and size, you can use any round chocolate or candy ball like chocolate-covered malt balls or even large chocolate chips. Just make sure they’re big enough to look like a spider’s body.
-
What if I don’t have cornflour? Can I skip it?
Cornflour is key to getting that soft, melt-in-your-mouth cookie texture, so I recommend sticking with it if possible. If you must skip it, your cookies might turn out a little denser and less tender, but still tasty.
-
How long can I store these Halloween Spider Cookies?
Stored in an airtight container at room temperature, these cookies stay fresh for up to a week. For best flavor, try to eat them within that time frame before the texture starts to change.
-
Can kids help with decorating the spider legs and eyes?
Definitely! Decorating is one of the most fun parts and kids love it. Just be sure to supervise warm melted chocolate use, and have plenty of napkins on hand—it’s a messy, joyful process.
-
What’s the best way to prevent the cookies from spreading too much while baking?
Chilling the rolled dough balls before baking is a game-changer to controlling spread. Also, using a combination of baking soda and cornflour helps keep the cookie shape intact while providing softness.
Final Thoughts
I hope you’ll give this Halloween Spider Cookies Recipe a try this season! It’s one of those treats that looks spectacular but is truly straightforward to make—and you can’t beat the joy on everyone’s faces when they see these little spider critters come out of the oven. Whether you’re baking with kids or just want a festive treat for yourself, these cookies hit the mark. Have fun, get a little messy, and enjoy every spooky bite!
Print
Halloween Spider Cookies Recipe
- Prep Time: 20 minutes
- Cook Time: 12 minutes
- Total Time: 32 minutes
- Yield: About 20-24 cookies
- Category: Dessert
- Method: Baking
- Cuisine: American
Description
Delightfully spooky Halloween Spider Cookies featuring a soft, buttery cookie base decorated with Maltesers, melted dark chocolate legs, and icing eyes. These festive treats are perfect for Halloween parties and are easy to prepare with basic ingredients and simple decorating steps.
Ingredients
Cookie Dough
- 150g butter
- ½ cup brown sugar (100g)
- ½ cup white sugar (110g)
- 1 egg
- 1 tsp vanilla essence
- 2 cups plain flour (300g)
- ¼ tsp salt
- 1 tsp baking soda
- 2 Tbsp cornflour
Decorations
- 140g bag Maltesers
- 100g dark chocolate, melted
- 1 small tube white icing
Instructions
- Melt Butter: In a large glass bowl, melt the butter in the microwave for 30 to 50 seconds until soft and partially melted.
- Mix Wet Ingredients: Whisk the melted butter, then add the brown sugar, white sugar, egg, and vanilla essence. Mix until smooth and no lumps remain.
- Add Dry Ingredients: Sift the plain flour, salt, baking soda, and cornflour over the wet mixture. Fold everything together gently until combined. The dough will be soft but thick.
- Chill Dough if Needed: If the dough is warm and too soft to handle, refrigerate or freeze it briefly until firm enough to roll into balls.
- Preheat Oven: Set your oven to 170°C fanbake to prepare for baking the cookies.
- Shape Cookies: Roll the dough into balls of approximately 2 tablespoons (30-40g) each. Place them on a lined baking tray and press down slightly.
- Bake: Bake the cookies in the preheated oven for 12-15 minutes until golden on the outside but still soft in the center. Remove from the oven.
- Insert Maltesers: While the cookies are still warm, gently push two Maltesers into each cookie to form the spider body.
- Cool Cookies: After 10 minutes on the baking tray, transfer the cookies to a wire rack to cool completely.
- Prepare Chocolate Legs: Melt the dark chocolate completely, place into a small ziplock bag, and cut a tiny hole in one corner for piping.
- Decorate Legs: Pipe four chocolate legs on each side of the Maltesers to mimic spider legs.
- Add Eyes: Use the white icing to pipe two dots for the eyes on each spider body. Then, add small dots of dark chocolate inside the icing dots to create eyeballs.
- Set and Serve: Allow the chocolate legs and eyes to harden fully before serving the cookies.
- Storage: Store the decorated cookies in an airtight container for up to 1 week to maintain freshness.
Notes
- You can use a size 40mm cookie dough scoop to measure and shape the dough uniformly.
- To make chocolate chip cookies instead, mix in a cup of chocolate chips before chilling the dough.
- Candy eyeballs from specialty stores are a fun alternative to piping eyes with icing and chocolate.
Nutrition
- Serving Size: 1 cookie (approx. 40g)
- Calories: 180 kcal
- Sugar: 15 g
- Sodium: 90 mg
- Fat: 9 g
- Saturated Fat: 5 g
- Unsaturated Fat: 3 g
- Trans Fat: 0 g
- Carbohydrates: 22 g
- Fiber: 1 g
- Protein: 2 g
- Cholesterol: 30 mg

Your email address will not be published. Required fields are marked *