

If you’re looking for a fun, spooky twist on a classic snack, you’re going to love this Eyeball Deviled Eggs Recipe. I absolutely love how these eerie little bites turn out — they’re perfect for Halloween parties or anytime you want to surprise your guests with something playful and delicious. Plus, they’re surprisingly simple to make, and I’m excited to share some of my favorite tricks to help you nail them perfectly every time.
Why You’ll Love This Recipe
- Fun and Unique Presentation: These eyeball deviled eggs add a creepy-cute factor that will wow your guests.
- Easy to Make: With just a few simple ingredients and minimal prep, you’ll have spooky snacks ready in no time.
- Customizable Flavors: The pesto filling adds freshness, but you can easily tweak it to your taste.
- Kid-Friendly and Crowd-Pleaser: My family goes crazy for these, and kids especially love the gross-but-delicious concept.

Ingredients You’ll Need
All the ingredients here work together to create a creamy, flavorful filling with a pop of herbal goodness from the pesto — which I discovered makes deviled eggs taste so much fresher. Plus, the candy eyes are what really bring the eyeball effect to life, but I’ll give you options if you can’t find them!
- Hard-boiled eggs: Make sure they’re peeled properly for a smooth finish and to avoid any frustrating bits of shell.
- Green pesto: Adds a subtle herby flavor and lovely color contrast; homemade or store-bought both work great.
- Salt: Just enough to season and bring out the flavors of the filling.
- Black pepper: A pinch to add a tiny kick and depth.
- Mayonnaise: Keeps the filling creamy and rich; use your favorite brand or homemade for extra flavor.
- Candy eyes: These are the star decorations that turn regular deviled eggs into spooky eyeballs.
- Red gel food color: Used to paint veins for that realistic eyeball effect; gel colors are best for vibrant, streaky veins.
Variations
One of my favorite things about the Eyeball Deviled Eggs Recipe is how easy it is to make your own. I’ve tried switching up the fillings and decorations depending on the occasion — and you should definitely feel free to do the same!
- Swap candy eyes for sliced olives: When I couldn’t find candy eyes once, I sliced black olives instead, and they looked just as spooky, plus they added a salty, savory bite.
- Add more pesto or mayonnaise: I like to adjust the creaminess and herb punch based on my mood — sometimes more mayo to mellow it out, or more pesto for an extra punch of flavor.
- Spicy variation: For a little kick, add a dash of hot sauce or cayenne pepper to your filling — it gives a surprising depth that guests love.
- Halloween colors: You could dye the egg whites with natural food coloring or add edible glitter for an even wilder presentation.
How to Make Eyeball Deviled Eggs Recipe
Step 1: Perfectly Prep Your Eggs
Start by hard boiling your eggs—if you don’t have a foolproof method, here’s what I do: place eggs in boiling water for 10 minutes exactly, then transfer them to an ice bath immediately. This makes peeling a breeze. Cut the eggs in half lengthwise with a sharp knife, then gently scoop out the yolks with a teaspoon and pop them into a bowl. Be careful not to crack or tear the egg whites—they’re the canvas for your eyeballs!
Step 2: Mix the Magic Filling
In your bowl of yolks, add the green pesto, mayonnaise, a pinch of salt, and black pepper. Then mix everything up until you get a smooth-ish, creamy filling. I like my filling slightly rustic, so I don’t overmix it too much—some folks prefer it silky, so just go with what you enjoy. You’ll find that the pesto brings a delightful herbal freshness that pairs perfectly with the richness of the egg yolk.
Step 3: Create the Creepy Veins
This part is where the fun begins! Take a toothpick or a small brush, dip it in red gel food coloring, and paint thin, random squiggly lines on each egg white half. These veins don’t have to be perfect—actually, the more irregular, the better for that creepy vibe. I discovered this trick after trying to draw perfect lines and realizing that the natural, messy look is way more realistic and Halloween-appropriate.
Step 4: Fill and Finish
Spoon the pesto-yolk mixture back into the egg white cavities carefully. Don’t overfill; you want the filling just right, not overflowing. Finally, top each with one candy eye right on the center, which instantly turns these from regular deviled eggs into eyeballs! If you don’t have candy eyes, sliced olives are a close second. Then, you’re done and ready to impress everyone.
Pro Tips for Making Eyeball Deviled Eggs Recipe
- Use an ice bath after boiling: This tip saved me so much frustration peeling eggs perfectly smooth—highly recommend it.
- Gel food color works best: I switched to gel coloring after years of watery dye, and it gives those bright, vivid veins every time.
- Be gentle with the whites: Scoop yolks carefully to keep your egg white halves intact for a nice finish.
- Prep in advance: I like to boil and peel the eggs up to a day ahead and mix the filling the same day you serve for best freshness.
How to Serve Eyeball Deviled Eggs Recipe
Garnishes
I usually keep garnishes simple—after all, the candy eyes and red veins are the stars. But sometimes, I sprinkle a little paprika or fresh chopped parsley for a pop of color and extra flavor. Fresh herbs like dill or chives can also amp it up without stealing the spotlight from the eyeball effect.
Side Dishes
These deviled eggs are fantastic alongside other Halloween treats like spooky sliders, veggie trays with creepy dips, or even a simple cheese platter. Personally, I like serving them with crunchy crudités and a tangy ranch dip to balance the rich filling.
Creative Ways to Present
For Halloween parties, I’ve served these Eyeball Deviled Eggs Recipe on a bed of “fake” spider web made from stretched cheesecloth or cotton batting—it’s such a crowd-pleaser! Another time, I placed them in a hollowed-out pumpkin as a centerpiece for easy grabbing. Use a clear platter with some fresh herbs underneath to give a “sacred relic” vibe that adds to the fun.
Make Ahead and Storage
Storing Leftovers
If you have leftovers (which is rare in my house!), store them in an airtight container in the refrigerator. I like to keep the candy eyes off until the last minute to prevent them from softening. The filled eggs stay tasty for 1-2 days, but I recommend enjoying them fresh.
Freezing
I don’t recommend freezing deviled eggs, especially these eyeball versions, because the texture of the egg whites and the creamy filling change after thawing. Your best bet is to serve them fresh or prepare the filling ahead separately, but even that can lose some texture once frozen.
Reheating
Deviled eggs are best served cold or at room temperature, so reheating is usually unnecessary. If you make the filling ahead, I suggest bringing it to room temp before assembling for the best taste and texture.
FAQs
-
Can I use a different filling instead of pesto in this Eyeball Deviled Eggs Recipe?
Absolutely! While pesto adds a unique herbal flavor, you can substitute it with classic mustard-based filling, avocado, or even a spicy chipotle mayo. Just keep the consistency creamy enough to easily fill the egg whites.
-
Where can I find candy eyes for this recipe?
Candy eyes are available at most craft stores, baking supply shops, and online retailers, especially around Halloween. If you can’t find them, sliced black olives or small dollops of cream cheese with a dot of olive make excellent substitutes.
-
How far in advance can I prepare the Eyeball Deviled Eggs Recipe?
You can hard boil and peel the eggs up to two days ahead and prepare the filling the day before. Assemble the eggs shortly before serving to keep the candy eyes fresh and the red veins vibrant.
-
Can I make this recipe vegan or dairy-free?
For a vegan twist, you could use firm tofu or chickpea mash instead of egg yolks and swap mayonnaise for a plant-based version. The candy eyes would need to be checked for vegan compliance, or replaced with tiny cut veggies or olives.
Final Thoughts
This Eyeball Deviled Eggs Recipe holds a special place in my heart because it’s such a playful way to enjoy a classic snack. The combination of flavors, the fun presentation, and watching people’s reactions when they realize they’re eating spooky eyeballs never gets old. I truly hope you enjoy making and sharing them as much as my family and I have. Go ahead and give this recipe a try—you’ll find it’s easier than it looks, and the results are delightfully creepy and delicious!
Print
Eyeball Deviled Eggs Recipe
- Prep Time: 10 minutes
- Cook Time: 0 minutes
- Total Time: 10 minutes
- Yield: 12 pieces
- Category: Appetizer
- Method: No-Cook
- Cuisine: American
- Diet: Vegetarian
Description
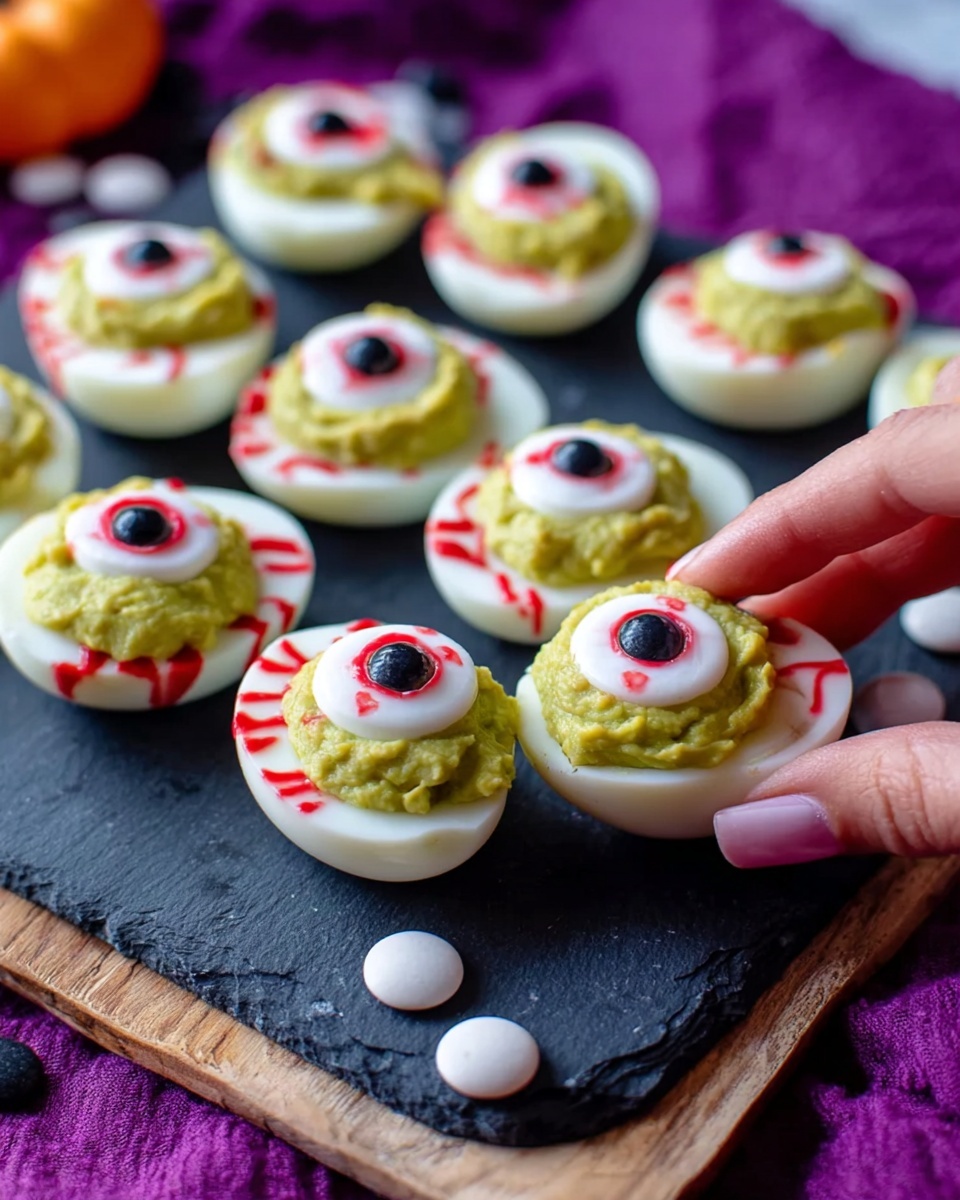
These spooky Eyeball Deviled Eggs are a fun and creepy twist on the classic appetizer, perfect for Halloween parties. Hard-boiled eggs are halved and filled with a creamy pesto-infused yolk mixture, then topped with candy eyes and decorated with red food coloring to mimic bloodshot veins, creating an eerie eyeball effect that’s both delicious and visually striking.
Ingredients
Eggs and Filling
- 6 hard-boiled eggs, peeled
- 2 tablespoons green pesto
- 2 tablespoons mayonnaise
- Salt, to taste
- Black pepper, a pinch
Decoration
- 12 candy eyes (large)
- Red gel food color
Instructions
- Prepare the yolk mixture: Cut each hard-boiled egg in half lengthwise and carefully scoop out the yolks using a teaspoon, placing them into a small bowl. Add 2 tablespoons of green pesto, 2 tablespoons of mayonnaise, salt to taste, and a pinch of black pepper. Mix thoroughly until the mixture becomes smooth but still has a slight texture. Set aside.
- Decorate egg whites: Using a toothpick dipped in red gel food color, paint thin lines resembling veins onto the surface of each egg white half to create a bloodshot eyeball effect.
- Fill the eggs: Spoon the prepared yolk mixture back into the cavities of the egg whites, filling each evenly.
- Add the eyeballs: Top each filled egg half with one candy eye, pressing gently to secure it in place.
- Serve and enjoy: Arrange the eyeball deviled eggs on a serving platter and serve immediately or keep refrigerated until ready to serve.
Notes
- You can adjust the amount of pesto or mayonnaise to achieve your desired creaminess and flavor intensity.
- Candy eyes are decorative and can be substituted with sliced black olives for a savory alternative.
- This recipe can be easily doubled or tripled to serve larger groups.
- Check the accompanying post for additional last-minute Halloween recipe ideas.
Nutrition
- Serving Size: 1 piece
- Calories: 70
- Sugar: 0.5g
- Sodium: 120mg
- Fat: 5g
- Saturated Fat: 1g
- Unsaturated Fat: 3.5g
- Trans Fat: 0g
- Carbohydrates: 1g
- Fiber: 0.2g
- Protein: 4g
- Cholesterol: 110mg

Your email address will not be published. Required fields are marked *