

I absolutely love how this Easy Skillet Apple Pie Recipe comes together—it’s like getting all the goodness of a classic apple pie but without the fuss or mess of a traditional double-crust pie. When I first tried it, I was surprised by how perfectly caramelized the apples get right in the skillet, and that buttery, brown sugar base? Pure magic. If you’re looking for a warm, comforting dessert that’s both simple and impressive, stick around because this is one recipe you’ll want to have in your back pocket.
Why You’ll Love This Recipe
- Effortless Preparation: You can whip this up in under two hours with minimal ingredients and zero fancy equipment.
- Perfectly Caramelized Apples: The skillet method gives the fruit a rich, buttery caramel base that’s simply irresistible.
- No Pie Plate Needed: Baking it right in a cast iron skillet cuts down on cleanup and gives a rustic charm.
- Crowd-Pleasing Flavor: My family always asks for seconds, and the leftovers reheated just as well the next day.

Ingredients You’ll Need
Each ingredient in this Easy Skillet Apple Pie Recipe plays a role in building that perfect balance between sweet, tart, and buttery. Using Granny Smith apples ensures the pie doesn’t get too mushy and holds a lovely tang that cuts through the sugar’s sweetness.
- Granny Smith Apples: Tart and firm, these apples hold their shape well and balance sweetness beautifully.
- Light Brown Sugar: Adds a deep, molasses-like flavor that pairs perfectly with apples and caramelizes nicely.
- Flour: Helps thicken the apple juices as the pie bakes, avoiding a soggy crust.
- Kosher Salt: Enhances all the sweet flavors and balances out the sugar.
- Cinnamon: That warm spice that’s a must-have in any apple pie.
- Butter: Gives the pie a rich, velvety base and helps the brown sugar caramelize.
- Pie Crusts (store-bought or homemade): You can save time with store-bought, but homemade crust adds that extra love and flakiness.
- Egg White: A simple egg wash to give the top crust a beautiful glossy finish.
- Granulated Sugar: Sprinkled on top to add a pleasant little crunch and sparkle.
Variations
I’ve played around with this recipe a bit over the years, and you’re welcome to swap things up according to your taste or what’s on hand. The skillet method is forgiving, so don’t hesitate to personalize it!
- Apple Variety Swap: I’ve tried Fuji and Honeycrisp apples instead of Granny Smith, and the pie turns out a little sweeter and softer but just as delicious.
- Spice It Up: Adding a pinch of nutmeg or allspice gives it a cozy autumn vibe—perfect for chilly evenings.
- Make it Vegan: Use coconut oil instead of butter and a plant-based pie crust to make a vegan-friendly version.
- Add Nuts: Chopped pecans or walnuts sprinkled over the apple filling before topping with the crust add a great crunch.
How to Make Easy Skillet Apple Pie Recipe
Step 1: Prep Your Apples and Flavor Base
Start by peeling and slicing your Granny Smith apples into half-inch slices—it’s the perfect thickness to hold shape but still soften nicely. Toss them in a big bowl with ¾ cup of light brown sugar, flour, half a teaspoon of kosher salt, and cinnamon. Stir everything together so the apples are fully coated. This mixture not only flavors the fruit but also helps thicken the filling once it bakes—trust me, it makes cleanup so much easier!
Step 2: Whip Up the Caramel Base in Your Skillet
Grab a 10-inch cast iron skillet and melt ½ cup of butter along with the remaining ½ teaspoon of salt and 1 cup of brown sugar over medium heat. Stir constantly—this is the time when you want your attention on the stove to prevent burning. After the mixture heats up and begins to bubble, let it boil for two full minutes. This step caramelizes the sugar and creates that luscious sauce your apples will sit on. Then, immediately remove it from the heat; patience here means silky smooth caramel, no bitterness.
Step 3: Layer It Up
Once your caramel is ready, carefully lay one of your pie crusts over the hot sugar mixture in the skillet, gently tucking the edges up along the sides. This creates the base containing all that juicy goodness. Next, pour in the coated apples, spreading them evenly. Finally, seal the pie by laying the second crust on top and pinching the edges firmly. If you want to be fancy, crimp or flute the edges for a nice rustic finish.
Step 4: Add the Finishing Touches and Bake
Brush the top crust with whisked egg white—that’s an easy way to get a beautiful golden gloss. Sprinkle two teaspoons of granulated sugar evenly for a bit of sparkle and crunch once baked. Place your skillet on a baking sheet to catch any drips and pop it into an oven preheated to 350°F. Bake for 60 to 70 minutes until the crust is golden brown, and you can see the filling bubbling happily beneath. If you notice the crust browning too fast near the end, tent it loosely with foil to prevent burning.
Pro Tips for Making Easy Skillet Apple Pie Recipe
- Choose the Right Skillet Size: Using a 10-inch cast iron skillet is just right—any larger and the pie might be too thin; smaller and it could overflow.
- Don’t Skip the Flour: The flour mixed into the apples prevents the filling from becoming runny, a game-changer for avoiding soggy crusts.
- Even Apple Slicing: Slice apples uniformly so they cook evenly—thinner slices cook faster but can become mushy, thicker slices might stay too firm.
- Watch the Brown Sugar Caramel: Stir continuously and don’t walk away during this step to avoid burning the butter and sugar mixture.
How to Serve Easy Skillet Apple Pie Recipe
Garnishes
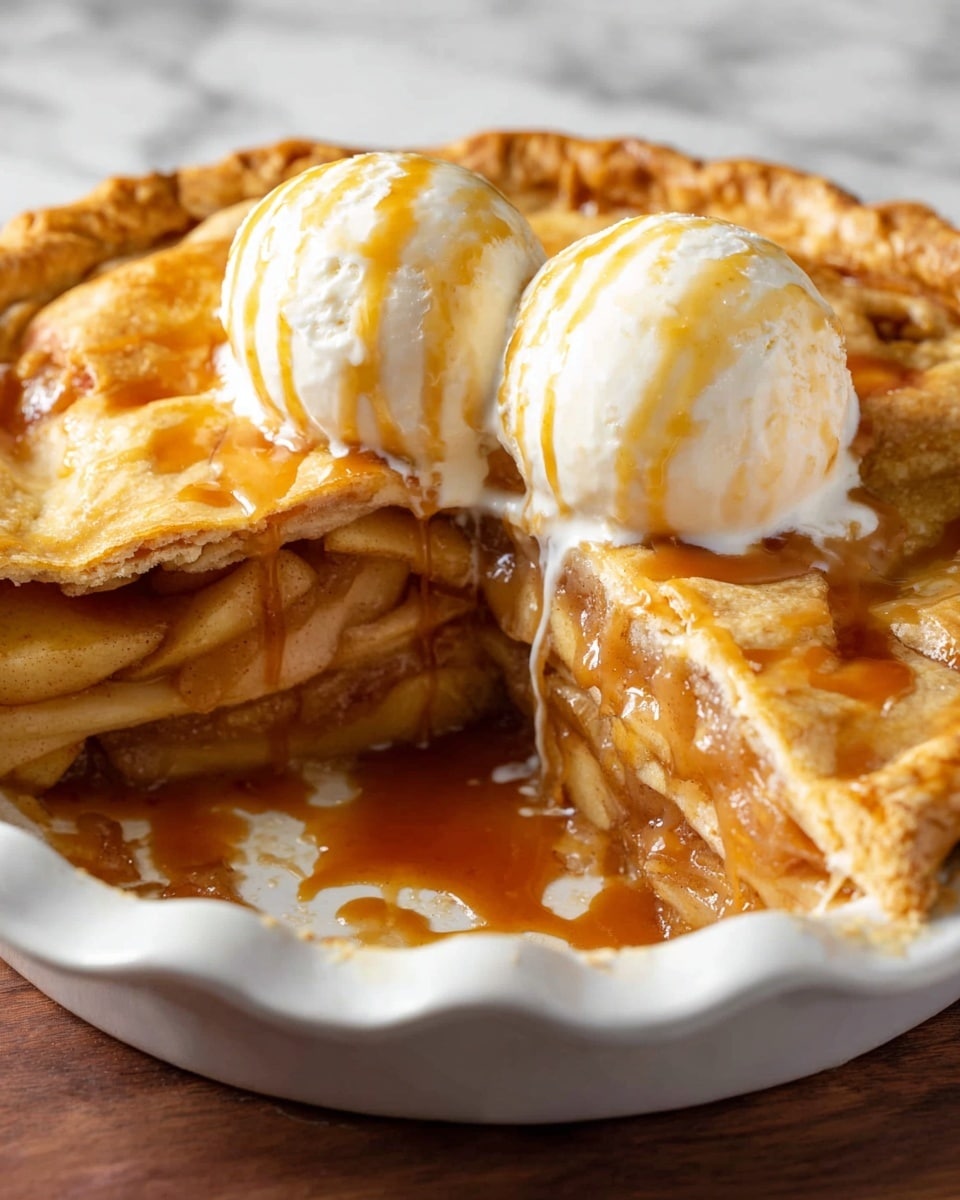
I love topping my skillet apple pie with a big scoop of vanilla ice cream—it melts right into the warm pie, making every bite dreamy. A drizzle of caramel sauce or a sprinkle of chopped toasted pecans adds a lovely finishing crunch and extra sweetness too. Sometimes, a dollop of whipped cream or a dusting of powdered sugar does the trick just fine.
Side Dishes
If you’re serving this as part of a cozy fall dessert spread, it pairs wonderfully with hot spiced cider or a warm cup of chai tea. For a heartier meal, I like to serve it after a simple roast chicken or pork tenderloin dinner to round things off sweetly without overwhelming.
Creative Ways to Present
For special occasions, I like to garnish the top crust with cut-out shapes—little leaves or hearts—from extra pie dough before baking. You can also place the skillet on a wooden board with a linen napkin for a rustic presentation that gets compliments every time. For an informal family gathering, everyone loves digging straight into the skillet with a big spoon—kind of fun and homey!
Make Ahead and Storage
Storing Leftovers
I store leftover skillet apple pie airtight at room temperature if I plan to eat it within two days. Beyond that, I pop it in the fridge where it keeps nicely for up to five days, though I recommend reheating before digging in to bring back that fresh-baked flavor and warm apples.
Freezing
Freezing this pie works surprisingly well! After it cools, I slice it into portions and wrap each piece tightly in plastic wrap and then foil to avoid freezer burn. It’s best eaten within 2-3 months. When you’re ready, thaw overnight in the fridge before reheating.
Reheating
The best way I’ve found to reheat leftovers is in a 350°F oven for about 15 minutes to revive that flaky crust and warm filling. Avoid the microwave if you want to keep the crust crisp—though in a pinch, it’ll do!
FAQs
-
Can I use apple varieties other than Granny Smith in this Easy Skillet Apple Pie Recipe?
Absolutely! While Granny Smith apples provide a great balance of tartness and firmness, you can substitute with Honeycrisp, Fuji, or Braeburn apples for a sweeter or milder flavor. Just keep in mind that sweeter apples might require adjusting the sugar to avoid an overly sweet pie.
-
Do I have to use a cast iron skillet for this recipe?
Cast iron is ideal because it distributes heat evenly and can go from stovetop to oven seamlessly, but if you don’t have one, a heavy oven-safe skillet or even a deep ovenproof pan can work. The key is sturdy, even heat to properly caramelize the sugar and bake the crust.
-
How can I prevent the crust from burning during baking?
If you notice the edges or top crust browning too quickly, loosely cover the pie with aluminum foil during the last 10-15 minutes of baking. This shields it from direct heat but still allows the pie to finish cooking through.
-
Can I make this Easy Skillet Apple Pie Recipe ahead of time?
You can assemble the pie a few hours ahead and keep it refrigerated before baking. Just make sure to bring it back to room temperature a bit before placing it in the oven for even cooking.
-
What’s the best way to serve this pie?
Serving warm with a scoop of vanilla ice cream is my favorite, but whipped cream, caramel drizzle, or toasted nuts all make delightful additions depending on your mood and occasion.
Final Thoughts
This Easy Skillet Apple Pie Recipe has truly become one of my go-to desserts when I want something cozy, impressive, and fuss-free. I love sharing it with friends because it reminds me of those warm kitchen moments where everything smells just right, and the simple act of sharing pie makes the day better. Honestly, if you give it a try, I’m pretty sure it’ll become a favorite in your home too—so go ahead, pull out your skillet, and create a little apple pie magic!
Print
Easy Skillet Apple Pie Recipe
- Prep Time: 30 minutes
- Cook Time: 1 hour 10 minutes
- Total Time: 1 hour 40 minutes
- Yield: 8 servings
- Category: Dessert
- Method: Baking
- Cuisine: American
Description
This Easy Skillet Apple Pie recipe combines the classic flavors of Granny Smith apples and cinnamon with a buttery brown sugar glaze, all baked perfectly in a cast iron skillet. Using two pie crusts, it creates a beautifully sealed, golden-brown pie that’s both rustic and delicious, making it a perfect comforting dessert for any occasion.
Ingredients
Filling
- 4 pounds Granny Smith Apples, peeled and sliced into 1/2-inch slices
- 1 3/4 cup light brown sugar, divided
- 1/4 cup flour
- 1 teaspoon kosher salt, divided
- 1 teaspoon cinnamon
Other Ingredients
- 1/2 cup butter
- 2 (round 12-inch) pie crusts, homemade or store bought
- 1 egg white, whisked
- 2 teaspoons granulated sugar
Instructions
- Preheat the oven: Set your oven to 350°F (175°C) to prepare for baking the pie.
- Prepare the apple filling: In a large bowl, combine the peeled and sliced Granny Smith apples with 3/4 cup brown sugar, flour, 1/2 teaspoon kosher salt, and cinnamon. Stir thoroughly to coat all apple slices evenly, then set this mixture aside.
- Melt butter and sugar mixture: In a 10-inch cast iron skillet, melt the butter with the remaining 1/2 teaspoon kosher salt and 1 cup brown sugar over medium heat. Stir constantly until it comes to a boil, then continue boiling and stirring for 2 minutes. Remove the skillet from the heat immediately to prevent burning.
- Assemble the pie base: Carefully place one of the 12-inch pie crusts evenly over the brown sugar mixture in the skillet, making sure to press the crust up along the edges to form a base for the filling.
- Add the apple filling: Pour the prepared apple mixture evenly over the bottom crust inside the skillet.
- Top the pie: Cover the apples with the second pie crust, then pinch the edges of the two crusts together to seal the pie securely.
- Prepare the crust topping: Lightly brush the top pie crust with the whisked egg white, then sprinkle the granulated sugar evenly over the surface for a crisp, sweet finish.
- Bake the pie: Place the skillet on a baking sheet for stability and ease of handling, then put it into the preheated oven. Bake the pie for 60 to 70 minutes until the crust is golden brown and the filling is bubbly. If the crust begins to brown too quickly, cover the edges with aluminum foil for the last 10 minutes to prevent burning.
Notes
- Store the pie airtight at room temperature for up to 2 days.
- For longer storage, refrigerate the pie airtight for up to 5 days.
Nutrition
- Serving Size: 1 slice (1/8 of pie)
- Calories: 350
- Sugar: 28g
- Sodium: 210mg
- Fat: 15g
- Saturated Fat: 9g
- Unsaturated Fat: 5g
- Trans Fat: 0g
- Carbohydrates: 50g
- Fiber: 4g
- Protein: 3g
- Cholesterol: 40mg

Your email address will not be published. Required fields are marked *