
If you’re craving something crispy, cheesy, and packed with flavor but want to skip the deep frying, you’re going to love my Baked Chicken Chimichangas Recipe. This recipe brings all the rich, comforting Tex-Mex vibes right into your kitchen without the extra oil mess. When I first tried baking instead of frying, I was amazed at how golden and crispy these chimichangas still get—plus, they feel a bit lighter and are insanely addictive. Keep reading, because I’m sharing all my favorite tips and tricks so your baked chimichangas turn out perfect every time!
Why You’ll Love This Recipe
- Less Oil, Crispy Results: Baking instead of frying gives you that satisfying crunch without the extra grease.
- Flavor-Packed Filling: The combination of seasoned chicken, creamy cheeses, and refried beans makes every bite rich and comforting.
- Easy Weeknight Dinner: Prep is straightforward and it all comes together in under 45 minutes, perfect when time is tight.
- Family Favorite: My family goes crazy for this recipe—it’s a guaranteed crowd-pleaser!

Ingredients You’ll Need
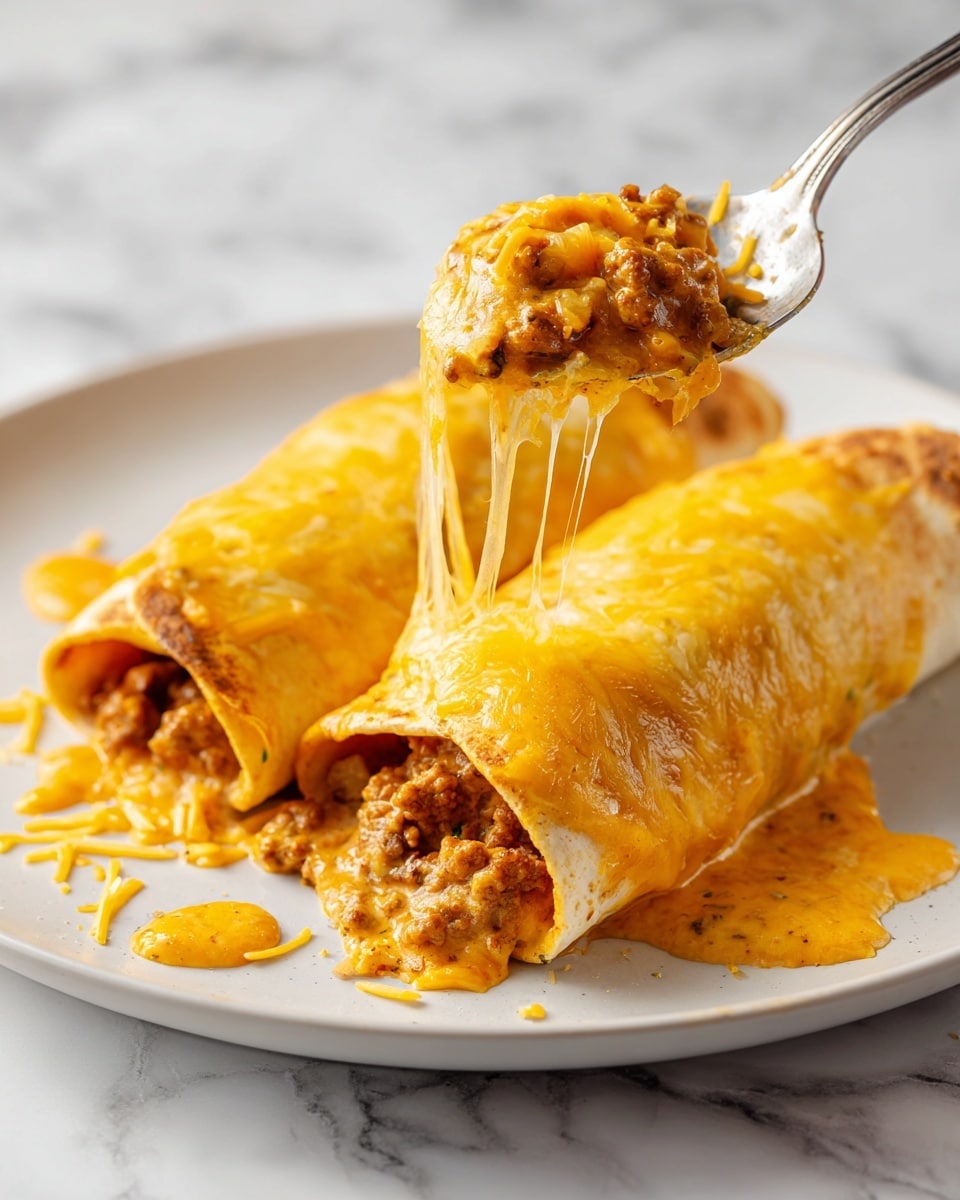
The magic of this Baked Chicken Chimichangas Recipe lies in its simple but bold ingredients. The melty combination of Colby Jack and cream cheese mixed with perfectly seasoned chicken filling makes it irresistibly creamy. Plus, the refried beans add that authentic, hearty texture you’ll appreciate.
- Vegetable oil: Just a little helps sauté the aromatics and chicken to juicy perfection.
- Yellow onion: Adds natural sweetness and depth—make sure to dice it finely so it cooks evenly.
- Garlic cloves: Fresh minced garlic is a must for that irresistible bite.
- Chicken breasts: I like to use small strips so they cook quickly and mix well with the sauce.
- Chili powder: This is the backbone of the smoky, spicy flavor in the filling.
- Cumin: A little earthy warmth that really rounds out the taste.
- Paprika: Adds brightness and a subtle smoky note.
- Salt and freshly cracked black pepper: Seasoning essentials to bring all the flavors alive.
- Chicken broth: Used to deglaze the pan and build a rich base for the sauce.
- Tomato sauce: I prefer canned tomato sauce for its smooth texture and mild tang.
- Colby Jack cheese: Melts beautifully and adds creamy, mellow flavor.
- Cream cheese: This is my secret weapon for luscious richness.
- Refried beans: Spread in the tortillas for that classic, hearty layer.
- Large flour tortillas: Burrito-sized works best for easy rolling and filling hold.
- Non-stick cooking spray: To help get those tortilla edges golden and crispy without frying.
- Sour cream: For topping—adds cool creaminess to balance the spices.
Variations
I love how versatile this Baked Chicken Chimichangas Recipe is—you can tweak it easily to suit your mood, what you have on hand, or dietary preferences. It’s a great base for some fun experimentation!
- Vegetarian version: Swap the chicken for sautéed mushrooms or roasted veggies—and maybe double up on the refried beans for that hearty feel.
- Spice it up: Add diced jalapeños or a splash of hot sauce inside for an extra kick; my family enjoys the mild heat, but you can dial it up or down.
- Cheese options: Feel free to use pepper jack for a zesty twist or a blend of cheeses you love; I found Colby Jack melts the creamiest.
- Make it gluten-free: Use gluten-free tortillas and double-check your canned goods and broth for certification.
How to Make Baked Chicken Chimichangas Recipe
Step 1: Sauté the Aromatics for Flavor
Start by heating your vegetable oil over medium heat in a sauté pan. Toss in the finely diced yellow onions and minced garlic—this is where the flavor foundation builds. Sauté for about 2 minutes until fragrant and soft, but not browned. This step really wakes up the filling and makes all the difference, so don’t rush it.
Step 2: Cook and Season the Chicken
Add the chicken strips to the pan and sprinkle with chili powder, cumin, paprika, salt, and pepper. Stir frequently as the chicken cooks for 2–3 minutes until it’s mostly cooked through. The spices should toast slightly, releasing their aroma—you’ll already start to crave this.
Step 3: Build the Sauce
Pour in the chicken broth to deglaze the pan, scraping up any browned bits stuck to the bottom—that’s pure flavor. Let the broth reduce by about half over 3-4 minutes. Then add the tomato sauce and simmer, stirring occasionally, until the sauce thickens, around 4-5 minutes. This sauce is what’ll keep your chimichangas juicy and tasty!
Step 4: Stir in the Creamy Cheeses
Turn off the heat and stir in the shredded Colby Jack and cream cheese until everything melts into a smooth, cheesy filling. This step adds that luscious creaminess I know you’ll love—don’t skip it!
Step 5: Assemble the Chimichangas
Lay out your flour tortillas and evenly spread refried beans over each, leaving at least a 2-inch border for rolling. Spoon the chicken and cheese filling into the center, then fold in the sides and roll them up just like a burrito. This assembly method keeps the filling secure and ensures everything cooks evenly.
Step 6: Bake to Golden Perfection
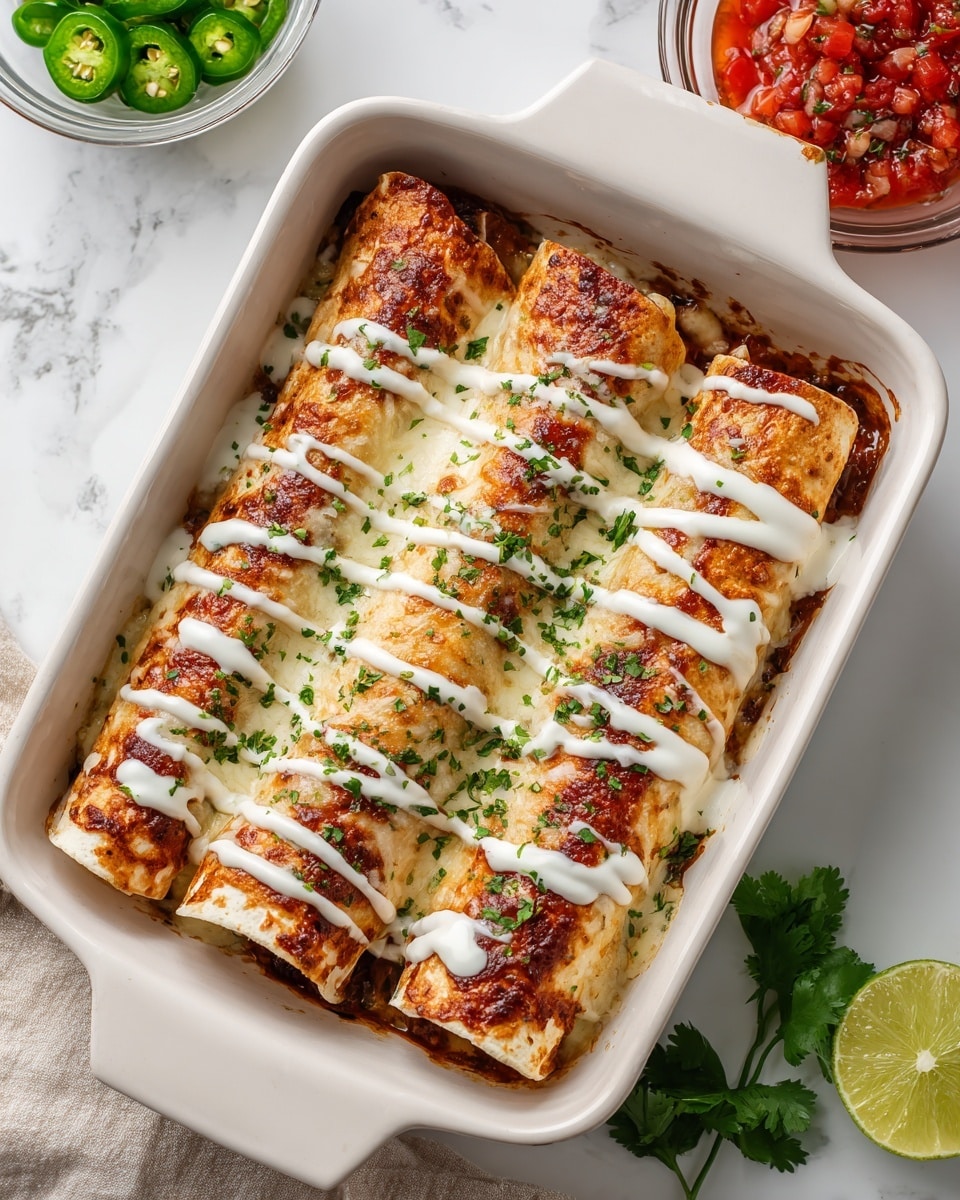
Place the seam side down in a greased 8×8 baking dish. Give the tops a light spray with non-stick cooking spray so they crisp up beautifully. Pop them in a preheated 400°F oven for 10–15 minutes until they’re golden and slightly crispy. This is where the magic happens—watch them transform without messy frying!
Step 7: Add the Finishing Touches
Once out of the oven, top each chimichanga with a generous dollop of sour cream. If you’re feeling fancy, I enjoy adding fresh cilantro or a squeeze of lime—these little extras take the flavor up a notch.
Pro Tips for Making Baked Chicken Chimichangas Recipe
- Don’t Overfill Your Tortillas: I learned the hard way that too much filling makes rolling tricky and can cause leaks during baking.
- Use Non-Stick Spray Generously: It’s key to getting that crispy, golden exterior without frying.
- Keep an Eye on the Oven: Baking times may vary—check around 10 minutes and adjust so they don’t overbake and dry out.
- Rest Before Serving: Letting chimichangas sit for 5 minutes after baking helps them firm up slightly for easier handling.
How to Serve Baked Chicken Chimichangas Recipe
Garnishes
I like to keep it simple with a dollop of sour cream and a sprinkle of chopped fresh cilantro—just enough to brighten the rich flavors. Sometimes I add diced avocado or a fresh pico de gallo for extra texture and freshness. Trust me, these garnishes make the whole dish pop!
Side Dishes
To round out the meal, my go-to sides are a crisp green salad with lime vinaigrette or some Mexican-style street corn (elote) for a real treat. Rice and beans work great, too, if you want a more traditional, filling spread.
Creative Ways to Present
For special occasions, I like to slice the chimichangas diagonally and fan them out on a large platter, drizzling with chipotle crema and sprinkling on crumbled queso fresco. It looks impressive but is so easy to do—and your guests will think you spent hours in the kitchen!
Make Ahead and Storage
Storing Leftovers
Leftover chimichangas keep well in an airtight container in the fridge for up to 3 days. I usually arrange them seam side down so they hold their shape better and reheat more evenly.
Freezing
If you want to prep in advance, these chimichangas freeze beautifully. After assembling (but before baking), wrap each one tightly in plastic wrap and then foil. When ready to bake, thaw overnight in the fridge and then bake as usual. This trick saved me on busy weeknights more times than I can count!
Reheating
To reheat, I like to bake them at 350°F for about 10-12 minutes—this keeps the tortilla crispy without drying out the filling. Microwaving works in a pinch but tends to make the exterior soggy, so I only do that if I’m really short on time.
FAQs
-
Can I make this Baked Chicken Chimichangas Recipe ahead of time?
Absolutely! You can prepare the filling and assemble the chimichangas in advance, then freeze them unbaked. When you’re ready, just thaw overnight and bake fresh for a quick meal.
-
What if I don’t have refried beans?
No worries! You can substitute mashed black beans or pinto beans seasoned with a bit of cumin and chili powder. It won’t be the classic texture but will still taste delicious.
-
How can I get the chimichangas extra crispy without frying?
Spraying them generously with non-stick cooking spray before baking and baking at a high temperature—around 400°F—helps get that golden, crispy crust without frying.
-
What’s the best cheese to use?
I recommend Colby Jack for its great meltability and mild flavor. You can mix in some cream cheese for richness or swap in pepper jack if you want something with a bit of a kick.
Final Thoughts
I absolutely love how this Baked Chicken Chimichangas Recipe brings together comfort food and convenience. It’s perfect for days when you want that crispy, cheesy goodness without the hassle of frying. After many tries, this has become my family’s favorite go-to, and I hope it brings the same joy to your table. Give it a try—you might just find your new favorite weeknight dinner that feels like a little celebration!
Print
Baked Chicken Chimichangas Recipe
- Prep Time: 15 minutes
- Cook Time: 30 minutes
- Total Time: 45 minutes
- Yield: 4 servings
- Category: Main Course
- Method: Baking
- Cuisine: Mexican-American
Description
These Baked Chicken Chimichangas are a delicious and healthier twist on the traditional deep-fried version. Filled with seasoned chicken, refried beans, melted cheeses, and wrapped in large flour tortillas, they are baked until golden and crispy. Perfect for a satisfying family dinner, these chimichangas combine savory spices with creamy textures and easy oven baking for a flavorful meal.
Ingredients
Chicken Filling
- 2 Tbsp vegetable oil (1 oz)
- ½ yellow onion, small diced (about 100g)
- 2 garlic cloves, minced (1 Tbsp)
- 2 chicken breasts, cut into small strips (500g)
- 1 Tbsp chili powder
- ½ tsp cumin
- ¼ tsp paprika
- ¼ tsp salt
- ¼ tsp freshly cracked black pepper
- ¼ cup chicken broth (2 oz)
- 1 8 oz can tomato sauce (227g)
- 2 cups Colby Jack cheese, shredded (8 oz)
- 4 oz cream cheese
Assembly
- 1 16 oz can refried beans
- 4 large flour tortillas
- Non-stick cooking spray
- ¼ cup sour cream (for topping)
Instructions
- Prep Ingredients: Gather all ingredients. Dice the yellow onion and mince the garlic. Cut the chicken breasts into small strips. Preheat the oven to 400°F and grease an 8×8 inch oven-safe baking dish.
- Sauté Aromatics: Heat vegetable oil in a medium sauté pan over medium heat. Add diced onions and minced garlic once oil is hot and sauté for about 2 minutes until softened and fragrant.
- Cook Chicken and Season: Add the chicken strips to the pan. Season with chili powder, cumin, paprika, salt, and pepper. Cook for 2-3 minutes, stirring occasionally until the chicken is lightly cooked on the outside.
- Deglaze Pan: Pour in the chicken broth to deglaze the pan, stirring and scraping up any browned bits. Reduce the liquid by half over 3-4 minutes to concentrate flavors.
- Add Tomato Sauce and Simmer: Stir in the canned tomato sauce and allow the mixture to simmer for 4-5 minutes until thickened, stirring occasionally to prevent sticking.
- Melt Cheeses into Sauce: Remove the pan from heat and stir in shredded Colby Jack and cream cheese until fully melted and combined, forming a creamy filling.
- Assemble Chimichangas: Lay out the large flour tortillas. Evenly spread refried beans over each tortilla leaving a 2-inch border. Spoon the chicken and cheese filling evenly in the center of each tortilla. Fold in the sides and roll up tightly like burritos, sealing the filling inside.
- Prepare for Baking: Place the assembled chimichangas seam-side down into the greased 8×8 baking dish. Lightly spray the tops with non-stick cooking spray for crisping.
- Bake: Bake in the preheated oven for 10-15 minutes until tortillas are golden brown and crispy on top.
- Serve: Remove chimichangas from oven and serve hot topped with sour cream and any additional desired toppings such as salsa or guacamole.
Notes
- I prefer using Better Than Bouillon for the chicken broth to keep the cost and preparation simple.
- The canned tomato sauce used here is typical in the U.S.; if unavailable, passata works as a close substitute.
- For best results, use large burrito-sized flour tortillas to hold all the filling comfortably.
Nutrition
- Serving Size: 1 chimichanga
- Calories: 560
- Sugar: 6g
- Sodium: 780mg
- Fat: 28g
- Saturated Fat: 12g
- Unsaturated Fat: 14g
- Trans Fat: 0g
- Carbohydrates: 46g
- Fiber: 8g
- Protein: 34g
- Cholesterol: 110mg

Your email address will not be published. Required fields are marked *