
If you’re looking to add some festive cheer to your holiday baking, you’re going to adore this Christmas Brownie Shapes with Festive Buttercream Frosting Recipe. I absolutely love how these brownies turn out – fudgy, chewy, and decorated with bright, colorful buttercream – they’re like little edible presents! Whether you’re making them for a holiday party, gifting them, or just craving a sweet seasonal treat, this recipe will have you smiling all the way through frosting those cute shapes. Let me walk you through the process so you nail every step perfectly.
Why You’ll Love This Recipe
- Simple and Fun: Making brownie shapes is a playful twist that brings out your inner kid – baking meets crafting!
- Chewy, Fudgy Goodness: This recipe uses my go-to chewy brownie base that never disappoints.
- Customizable Decoration: Colorful buttercream lets you get creative with festive frostings and toppings.
- Perfect for Parties and Gifts: Individual shapes make serving and sharing a breeze.

Ingredients You’ll Need
The magic of this recipe lies in its simple ingredients that pack a flavor punch and come together beautifully. For the brownies, I use my favorite chewy brownie base, which means you don’t have to worry about dry or cakey results. The buttercream frosting is rich, smooth, and takes on color effortlessly for that festive flair.
- Brownie Ingredients: I recommend using high-quality cocoa powder for depth and a mix of butter and oil to keep things moist.
- Sugar: A blend of brown and granulated sugar helps keep the texture chewy and adds a lovely caramel hint.
- Eggs: They bind everything perfectly and add that fudgy texture.
- Flour: Just enough so the brownies hold their shape but stay tender.
- Buttercream Frosting: Unsalted butter and powdered sugar form the base of this creamy, spreadable frosting.
- Gel Food Coloring: This is key for vibrant colors without thinning your frosting.
- Edible Decorations: Think festive sprinkles, mini M&Ms, or edible glitter – whatever gets you in holiday spirit!
Variations
I love to customize this recipe depending on who I’m baking for – a little tweak here and there can make it perfect for everyone. Feel free to play around with different frosting colors and decorations or even swap out ingredients to suit dietary needs.
- Chocolate Lovers’ Delight: I once added chocolate chips inside the brownie batter for extra melty pockets – my family went crazy for that version.
- Nut-Free Option: Simply omit any nuts and double-check decorations — perfect for kids’ school treats.
- Vegan Twist: Use a vegan butter substitute and flax eggs; it works surprisingly well and everyone enjoyed it.
- Flavor Infusion: Add peppermint extract to the buttercream for that classic Christmas zing.
How to Make Christmas Brownie Shapes with Festive Buttercream Frosting Recipe
Step 1: Bake Your Brownie Base to Perfection
Start by making a double batch of your favorite chewy brownies (I use mine that’s tried and true). Pop the batter into a 9×13-inch metal pan lined with parchment paper or foil for easy removal later. Since it’s a double batch, add about 3-5 extra minutes to baking time. When done, let them cool completely – patience is key here! I like to chill mine for a couple of hours or even overnight when I can; it makes cutting more precise and the brownies hold their shape beautifully.
Step 2: Whip Up the Festive Buttercream
While your brownies are chilling, prepare the buttercream frosting. I swear by my Best Ever Buttercream – it’s fluffy, smooth, and holds up well on shapes. Divide the frosting into small bowls and mix in gel food coloring to get all the festive shades you want. Whether you prefer one solid color (hello, green!) or a rainbow of hues, get your disposable piping bags fitted with your favorite tips. This part is where you get to have fun and personalize each brownie shape!
Step 3: Cut Out Your Christmas Brownie Shapes
Now for my favorite step: cutting! Lift the whole slab of brownies out of the pan by grabbing the edges of the parchment or foil – no need to flip them, just keep them on the lining. Use tall metal cookie cutters in festive shapes (trees, stars, snowflakes – whatever you like). Press down firmly, spacing the shapes close to get the most out of your slab. To get the cut shapes out neatly, gently slide an offset spatula or paring knife underneath the pieces and carefully pop them out. I find that colder brownies release from the cutters so much easier, so chilling really pays off here.
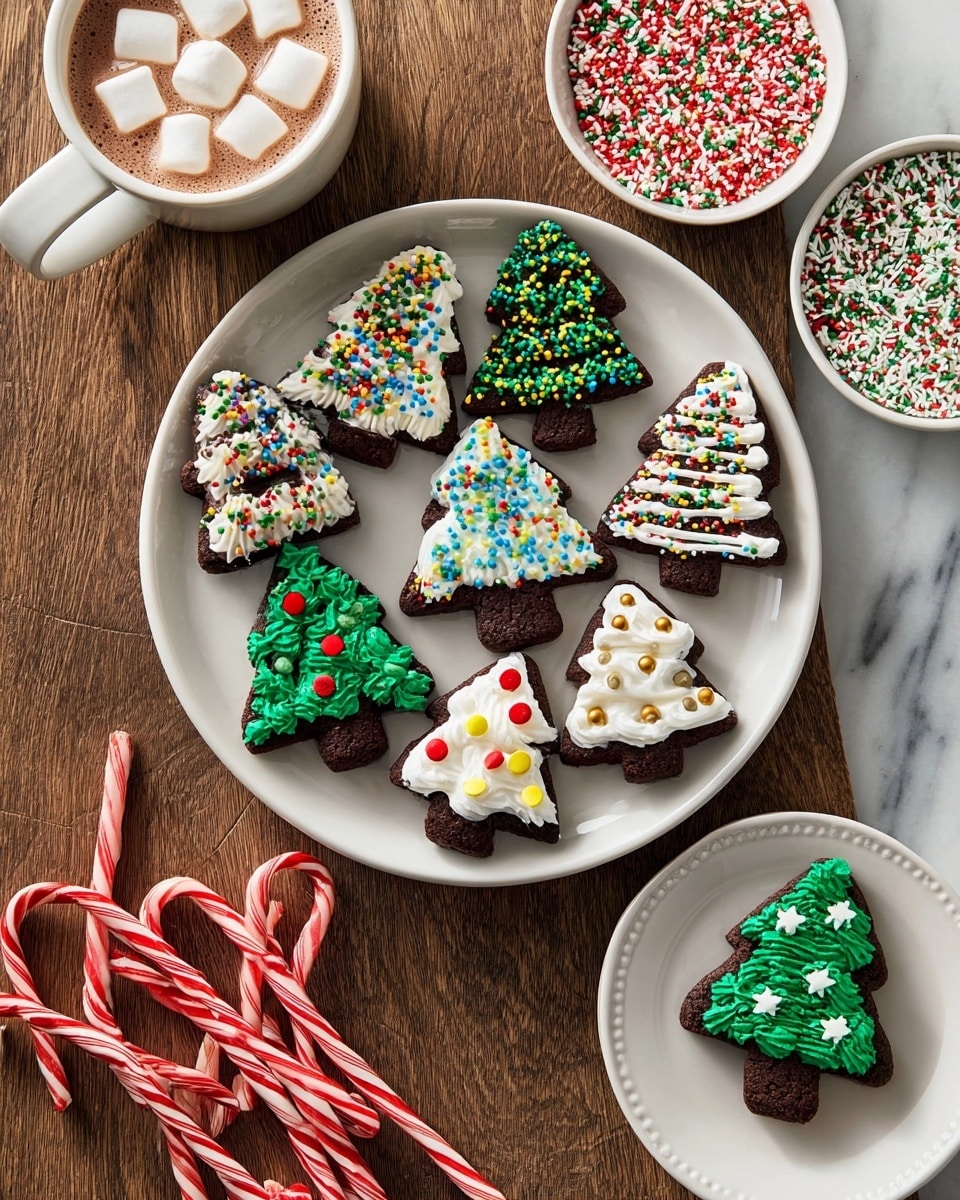
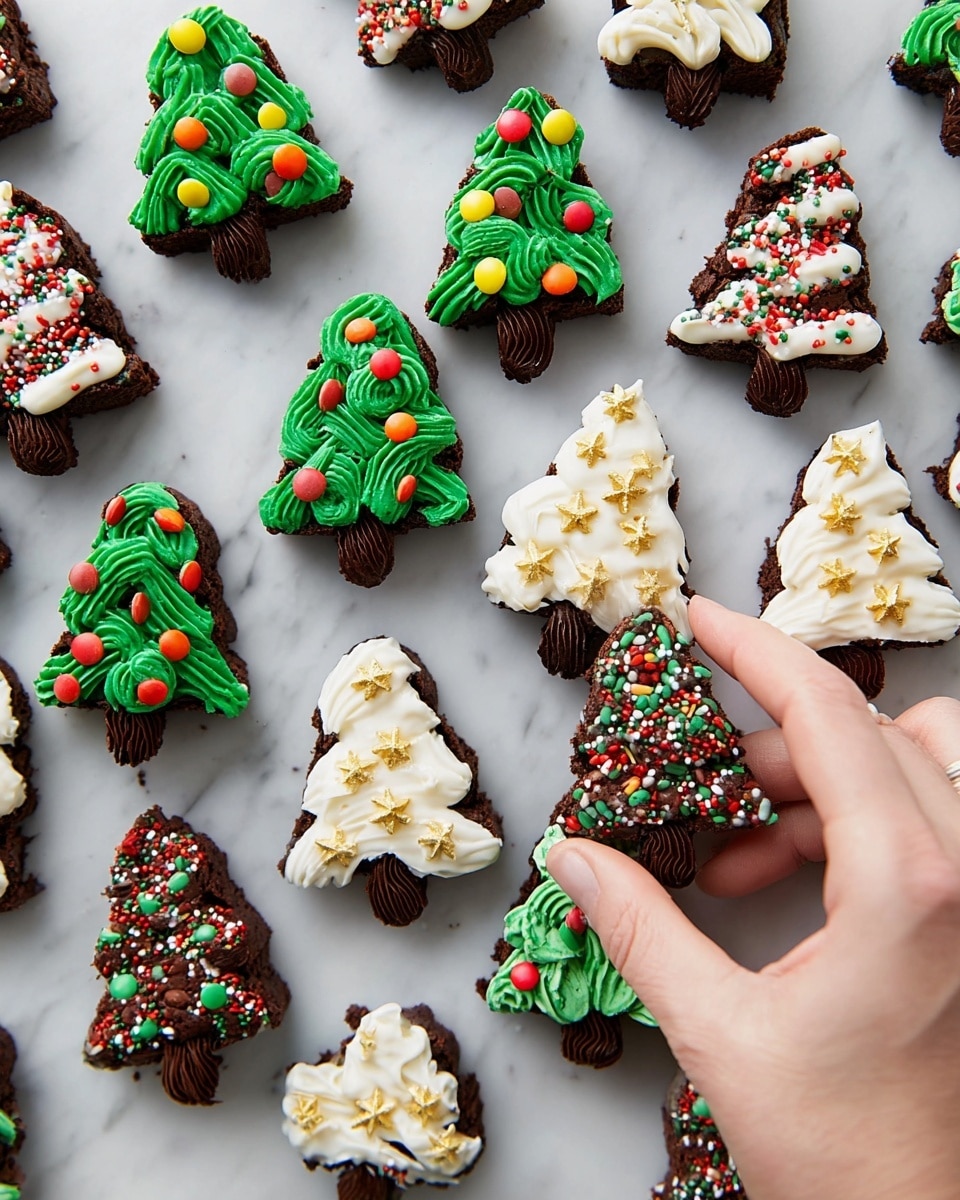
Step 4: Decorate with Festive Buttercream and Toppings
Pipe colorful, festive buttercream onto each brownie shape. Don’t wait too long to add your sprinkles or mini M&Ms because the frosting starts to dry and won’t hold toppings as well if you delay. This is the moment to get creative! Whether you keep it simple with a swirl or go all out with patterns and multiple colors, these brownies shine best when they look as good as they taste.
Pro Tips for Making Christmas Brownie Shapes with Festive Buttercream Frosting Recipe
- Chill Both Batter and Brownies: This trick makes it so much easier to cut perfect shapes without crumbling.
- Use Gel Food Coloring: It won’t thin out your frosting, so the colors pop and the texture stays perfect for piping.
- Close Spacing when Cutting: Maximize every brownie by closely spacing cookie cutters on your slab, making the most out of your edges.
- Pipe Then Decorate Immediately: Frosting will dry fast, so adding sprinkles right away helps them stick beautifully.
How to Serve Christmas Brownie Shapes with Festive Buttercream Frosting Recipe
Garnishes
I’m a sucker for festive touches – tiny holiday sprinkles, edible glitter, crushed candy canes, or colorful mini M&Ms always top my Christmas brownies. They add crunch and that cheerful sparkle you want when sharing at a holiday gathering. I even like to add little sugar pearls for elegance when baking for special parties.
Side Dishes
These brownies pair wonderfully with classic holiday drinks – think hot cocoa, peppermint tea, or even an eggnog latte. I also like serving them alongside simple vanilla ice cream to balance the richness and give guests a variety of textures.
Creative Ways to Present
I like arranging the brownie shapes like a Christmas tree on a big platter, using green and red frosting to make ‘ornaments’ with sprinkles. Wrapping individual shapes in cellophane tied with festive ribbon makes a sweet edible gift. For parties, a tiered dessert stand with mixed shapes and colors always impresses my guests.
Make Ahead and Storage
Storing Leftovers
I store leftover decorated brownies in an airtight container at room temperature for up to 3 days. One thing I learned the hard way is to keep them airtight – otherwise, the edges dry out quickly once cut. Placing parchment paper between layers keeps the frosting intact and looking fresh.
Freezing
For freezing, I freeze the brownies before frosting – either the whole slab or individual cut shapes wrapped tightly in plastic wrap, then placed in freezer bags. This keeps them tasting fresh for up to a month. When it’s time to decorate, thaw overnight in the fridge or a couple hours at room temp before frosting.
Reheating
Because these are decorated with buttercream, reheating isn’t really recommended. However, if you want to warm them slightly, I gently microwave a single brownie for 5-7 seconds to soften the chocolate and bring back a little gooeyness without melting the frosting too much.
FAQs
-
Can I use any brownie recipe for Christmas Brownie Shapes with Festive Buttercream Frosting Recipe?
Absolutely! While I recommend a chewy and fudgy brownie base for best cutting and decorating results, you can use your favorite brownie recipe. Just make sure the brownies are fully cooled and preferably chilled before cutting and frosting to prevent crumbling.
-
What types of cookie cutters work best for shaping the brownies?
Tall metal cookie cutters work best since they can cut through the thickness evenly without squishing the brownie. Festive shapes like stars, trees, and snowflakes add holiday charm, but any shape will do!
-
How do I prevent the buttercream from drying out too quickly?
Pipe the frosting onto the brownies and add your sprinkles or toppings right away before the buttercream sets. Store decorated brownies in an airtight container to keep them moist and fresh.
-
Can I make these brownies in advance?
Yes! You can bake and chill the brownies a day ahead, cut the shapes, and even freeze them before frosting. Just thaw first when ready to decorate for best results.
Final Thoughts
This Christmas Brownie Shapes with Festive Buttercream Frosting Recipe has been my go-to for years whenever I want to make something that brings smiles and warm holiday vibes. There’s something so joyful about baking these fun shapes and decorating them together with family or friends – it creates memories as sweet as the treats themselves. I encourage you to try it out this season and watch everyone’s eyes light up when you present these festive delights! Trust me, once you try them, they’ll become a holiday tradition in your kitchen too.
Print
Christmas Brownie Shapes with Festive Buttercream Frosting Recipe
- Prep Time: 30 minutes
- Cook Time: 35 minutes
- Total Time: 3 hours 5 minutes (including chilling time)
- Yield: 10 to 15 brownies, depending on cookie cutter size
- Category: Dessert
- Method: Baking
- Cuisine: American
Description
These festive Christmas Brownies are a delightful holiday treat, combining the rich, chewy texture of homemade brownies with colorful, creamy buttercream frosting. Perfectly cut into Christmas-themed shapes and decorated with sprinkles and mini M&Ms, they make a fun and delicious dessert for holiday gatherings.
Ingredients
Brownies
- Ingredients for Best Chewy Brownies (typically includes flour, sugar, cocoa powder, eggs, butter, and vanilla extract) – doubled to fit a 9×13-inch pan
Buttercream Frosting
- Ingredients for Best Ever Buttercream Frosting (usually includes butter, powdered sugar, vanilla extract, and milk or cream)
- Gel food coloring (various colors or green for single-color frosting)
- Festive sprinkles
- Mini M&Ms or other edible decorations
Instructions
- Make the Brownies: Prepare a double batch of the Best Chewy Brownies by doubling all the ingredients. Bake them in a 9 by 13-inch metal baking pan lined with parchment paper or aluminum foil, adding 3-5 minutes to the usual baking time until done. Allow them to cool completely and chill for at least two hours or overnight if possible for best texture and easier cutting.
- Make the Buttercream: Prepare the Best Ever Buttercream Frosting. Then separate it into bowls and add gel food coloring to create as many colors as desired, or keep it all green. Transfer the colored buttercream into disposable piping bags fitted with desired piping tips.
- Cut Out the Brownies: Remove the cooled brownie slab from the pan, keeping the parchment paper or foil underneath. Use a tall metal cookie cutter to stamp out festive shapes as close together as possible. Carefully wedge an offset spatula or paring knife under each piece to release it from the paper. Gently press each brownie shape out of the cutter with your fingers, ideally when the brownies are cold to prevent breakage.
- Decorate the Christmas Brownies: Pipe buttercream frosting onto each brownie shape as desired. Quickly add festive sprinkles, mini M&Ms, or other edible decorations while the frosting is still fresh so that toppings stick well. Serve immediately or store brownies in an airtight container to keep edges from drying out.
Notes
- Brownies taste best the day they are baked and decorated but can be stored in an airtight container for up to 3 days at room temperature or up to 5 days refrigerated. Ensure airtight storage to prevent drying of cut edges.
- For freezing, freeze unfrosted brownies either as a whole slab or pre-cut shapes. Wrap tightly in plastic wrap and place inside a freezer bag or airtight container for up to one month. Thaw overnight in the fridge or for a couple hours at room temperature before frosting and serving.
Nutrition
- Serving Size: 1 brownie (approximate)
- Calories: 320 kcal
- Sugar: 28 g
- Sodium: 120 mg
- Fat: 18 g
- Saturated Fat: 10 g
- Unsaturated Fat: 7 g
- Trans Fat: 0.3 g
- Carbohydrates: 38 g
- Fiber: 3 g
- Protein: 3 g
- Cholesterol: 55 mg

Your email address will not be published. Required fields are marked *