

If you’re on the hunt for the ultimate crowd-pleaser that’s as fun to make as it is to eat, you’ve seriously got to try this Maltesers Rocky Road Recipe. It’s gooey, crunchy, maltedy, and seriously chocolatey — everything you dream of in a sweet treat. When I first tried making this, I was hooked immediately, and now it’s a staple whenever friends come over. Stick around and I’ll show you all the details so you can nail it perfectly in your own kitchen.
Why You’ll Love This Recipe
- Delicious Layers of Texture: The combination of crunchy Maltesers, soft marshmallows, and biscuits creates a party in every bite.
- Simple Ingredients: Most things you probably already have or can easily find in your local store.
- Make-Ahead Friendly: Prepare it in advance, and it keeps great for up to two weeks—perfect for busy days or last-minute treats.
- Kid-Friendly Fun: My family goes crazy for this, and it’s an easy recipe to get the little ones involved in making.

Ingredients You’ll Need
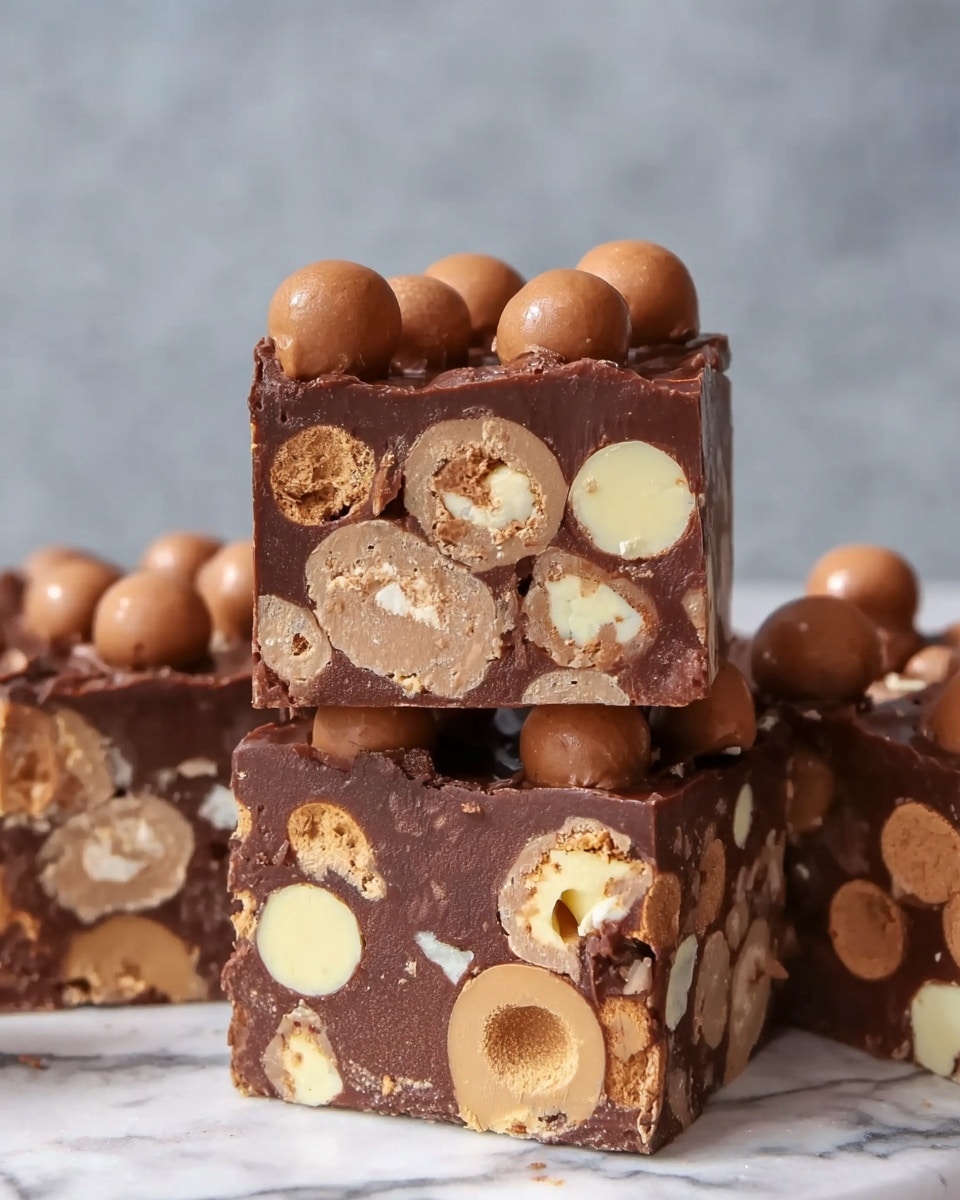
The magic of this Maltesers Rocky Road Recipe comes from the perfect blend of gooey chocolate, crunchy biscuits, and those iconic Maltesers. I love how the ingredients complement each other—just the right amount of crunch, chew, and sweetness. Let’s check out what you’ll need.
- Dark chocolate: Use good quality chocolate for a deep, rich flavor; it balances the milk chocolate sweetness.
- Milk chocolate: Adds creamy sweetness that melts perfectly with the dark chocolate.
- Butter or baking spread: I prefer butter for taste, but baking spreads work if you want a vegan/plant-based version.
- Golden syrup: This keeps the texture fudgy and sticky, which is essential — don’t skip or substitute lightly!
- Malted milk or digestive biscuits: Broken up for crunchiness; I find malted milk biscuits pair beautifully for extra malt flavor.
- Mini marshmallows (gelatine-free for vegetarians): Freedom Mallows are my go-to—they’re fluffy and vegetarian-friendly.
- Maltesers: The star ingredient! Make sure to use fresh ones for that irresistible crunch.
- Malteser Teasers or Maltesers Buttons (optional): For extra malt goodness and a nice variation in texture.
- Maltesers for decoration: Sets this treat off perfectly with a cute, malty finish on top.
Variations
I like to keep my Maltesers Rocky Road classic, but sometimes I get adventurous with add-ins or swap ingredients to fit the occasion or dietary needs. Feel free to make it your own!
- Cherries or dried fruit: I tried adding glace cherries once — it gave a lovely pop of color and tartness that cut through the sweetness nicely.
- Chocolate types: Swap the dark or milk chocolate ratios to taste; all dark chocolate makes it more intense, while all milk chocolate gives a creamier result.
- Biscuits: I’ve used Hobnobs and shortbread too, which changes the texture and flavor slightly — it’s tasty either way!
- Marshmallow options: Go vegan or vegetarian with gelatine-free marshmallows; my go-to is Freedom Mallows for both taste and ethics.
How to Make Maltesers Rocky Road Recipe
Step 1: Melt the Chocolate Mixture
Start by lining an 8-inch square tin with baking paper — I always grease the tin lightly with butter first to help the paper stick and prevent slipping when pouring. Then, gently melt together the butter, golden syrup, dark chocolate, and milk chocolate over low heat. Stir continuously so nothing burns and the mixture becomes silky smooth. Once everything has melted, take the pan off the heat and let it cool for about 10 minutes. This cooling step is important so the mixture isn’t too runny when you combine it with the other ingredients.
Step 2: Mix the Fillings
While your chocolate mixture cools, toss your broken biscuits, marshmallows, Maltesers, and any optional Malteser Teasers into a big mixing bowl. I like to gently combine everything first, making sure the chunks are evenly distributed; this way, every bite has some of the malty goodness.
Step 3: Combine and Set
Pour about two-thirds of your cooled chocolate mixture over the fillings and stir well, coating everything in that luscious chocolate. Transfer the mix into your lined tin, spreading it out smooth with the back of a spoon or a spatula. Then, pour the remaining chocolate on top, spreading it to fill any gaps. Give the tin a few gentle taps on the counter to settle the mixture and remove air bubbles. Finally, tuck in some whole Maltesers on top, and I like to cut a few in half to dot around — this makes it look as pretty as it tastes.
Step 4: Chill and Slice
Pop your tray into the fridge for at least 3-4 hours, but preferably overnight. This ensures everything is firm and holds together when sliced. When it’s time to serve, lift the rocky road out by the baking paper and slice into your desired pieces. Keep it stored in an airtight container; in the fridge it lasts up to 3 weeks, though if you’re anything like me it won’t last nearly that long!
Pro Tips for Making Maltesers Rocky Road Recipe
- Cool Your Chocolate: Don’t pour the chocolate while it’s piping hot or you’ll melt your marshmallows and make the mix too runny.
- Grease the Tin First: This little trick stops the baking paper from sliding around when pouring in your mixture, making life easier.
- Tap the Tin: Tapping helps fill any air pockets and makes sure the mixture sets with no gaps—your slices will hold better!
- Use Fresh Maltesers: They keep their crunch best; stale or soft Maltesers won’t give you that delightful texture contrast.
How to Serve Maltesers Rocky Road Recipe
Garnishes
I always add a few whole Maltesers on top right before chilling—it makes this treat look irresistible and adds a little crunch with every bite. Sometimes, I sprinkle crushed malted biscuits or a dusting of cocoa powder for extra elegance when serving guests.
Side Dishes
This treat is pretty indulgent on its own, but I love pairing it with a simple cup of strong coffee or a cold glass of milk. For parties, it’s a great sweet bite alongside fresh fruit or light vanilla ice cream.
Creative Ways to Present
For birthdays or holidays, try layering the Maltesers Rocky Road in a clear glass trifle bowl to show off all those yummy layers. Another fun idea is to cut the pieces into bite-sized cubes, skewer them with a toothpick, and dip them in melted chocolate for a fancy chocolate pop presentation.
Make Ahead and Storage
Storing Leftovers
I keep mine in an airtight container in the fridge to maintain that perfect firm texture. It lasts well for about two to three weeks, but honestly, my family usually finishes it within days because it’s so addictive!
Freezing
When I need to make this ahead longer, I freeze individual portions wrapped tightly in parchment paper, then stored in a freezer bag. For best taste and texture, consume within a month. Just thaw in the fridge overnight before enjoying.
Reheating
Rocky road is best eaten cold or at room temperature, so I avoid reheating to preserve the texture. If you want to soften it slightly, leave it out for 20 minutes before serving instead of microwaving.
FAQs
-
Can I substitute the golden syrup in this Maltesers Rocky Road Recipe?
Golden syrup is key for that sticky, fudgy texture, so I recommend using it if possible. If you can’t find it, light corn syrup or glucose syrup may work as alternatives, but the final texture and flavor might be slightly different. Avoid skipping it altogether to keep the rocky road from turning dry or crumbly.
-
What kind of marshmallows should I use for vegetarians?
Many marshmallows contain gelatine made from pork or beef, which isn’t vegetarian. I love Freedom Mallows because they’re gelatine-free and tasty. You can also look for other gelatine-free or vegan marshmallows at most supermarkets—just check the packaging carefully.
-
Can I make this recipe gluten-free?
You absolutely can! Swap the malted milk or digestive biscuits for gluten-free cookies or biscuits of your choice. Just be sure the Maltesers and marshmallows you use are gluten-free too—many standard versions are, but it’s always best to check.
-
How do I get clean, even slices?
Use a sharp, serrated knife and wipe it clean between cuts. Also, slicing when the rocky road is fully chilled helps it hold together better. For less mess, chill the knife briefly in cold water before cutting.
Final Thoughts
I absolutely love how this Maltesers Rocky Road Recipe turns out every time — it’s the perfect balance of sweet, crunchy, and chewy. My family always requests it at celebrations, and honestly, it’s become my go-to when I want to impress without spending ages in the kitchen. Give it a try, and I’m sure it’ll become one of your favorites too. Trust me, once you make this, you’ll find yourself reaching for Maltesers in a whole new way!
Print
Maltesers Rocky Road Recipe
- Prep Time: 35 minutes
- Cook Time: 0 minutes
- Total Time: 3 hours 35 minutes
- Yield: 16 servings
- Category: Dessert
- Method: No-Cook
- Cuisine: British
- Diet: Vegetarian
Description
Deliciously indulgent Maltesers Rocky Road combines rich dark and milk chocolate melted with butter and golden syrup, mixed with crunchy malted milk biscuits, mini marshmallows, and plenty of Maltesers for a delightful texture contrast. Topped with extra Maltesers, this no-bake treat sets in the fridge to a firm, chewy finish perfect for sharing or gifting.
Ingredients
Chocolate Mixture
- 250 g Dark chocolate
- 200 g Milk chocolate
- 200 g Butter or baking spread
- 150 g Golden syrup
Mix-ins
- 100 g Malted milk or digestive biscuits, broken up
- 75 g Mini marshmallows, gelatine free if serving to vegetarians
- 200 g Maltesers
- 75 g Malteser Teasers or Maltesers Buttons (optional)
For Decoration
- 35 g Maltesers
Instructions
- Prepare the Tin: Line an 8-inch square baking tin with baking paper and grease lightly with butter to help the paper stick securely.
- Melt the Chocolate Mixture: In a pan over low heat, gently melt together the butter, golden syrup, dark chocolate, and milk chocolate, stirring continuously until smooth and fully combined. Remove from heat and allow to cool for 10 minutes to avoid melting the marshmallows and biscuits.
- Combine Fillings: In a large mixing bowl, place the broken biscuits, mini marshmallows, Maltesers, and Malteser Teasers. Pour about two-thirds of the cooled chocolate mixture over the bowl and stir thoroughly to coat all the ingredients evenly with chocolate.
- Assemble Rocky Road: Pour the chocolate-coated mixture into the lined tin and smooth it down evenly. Use the remaining chocolate mixture to fill any gaps and tap the tin on the counter to remove air bubbles and help the chocolate settle.
- Decorate: Arrange the remaining 35 g Maltesers on top, cutting some in half and dotting them evenly across the surface for an appealing finish.
- Set: Refrigerate the Rocky Road for at least 3 to 4 hours, preferably overnight, to allow it to set firmly.
- Serve and Store: Once set, remove from the tin and slice into pieces. Store in an airtight container in the refrigerator for a firmer texture or in a cool place for a softer bite. Keeps well for 1 to 2 weeks at room temperature and up to 3 weeks when refrigerated.
Notes
- You can substitute butter with baking spread like Stork, though butter gives a richer flavor.
- Malted milk biscuits can be swapped for digestive biscuits, shortbread, or Hobnobs for variety.
- Adjust the chocolate proportions—dark, milk, or a mix—to reach a total of 500 g according to your taste.
- Use gelatine-free mini marshmallows such as Freedom Mallows for a vegetarian-friendly dessert.
- If golden syrup is unavailable, light corn syrup or glucose syrup can be alternatives, but the texture and taste may vary.
- Optional addition of 75 g glace cherries can add a fruity contrast.
- Weighing ingredients with digital kitchen scales is recommended for best results.
- Use proper measuring spoons for accurate teaspoon and tablespoon measurements.
Nutrition
- Serving Size: 1 piece (approx. 50 g)
- Calories: 260 kcal
- Sugar: 22 g
- Sodium: 50 mg
- Fat: 16 g
- Saturated Fat: 9 g
- Unsaturated Fat: 6 g
- Trans Fat: 0 g
- Carbohydrates: 26 g
- Fiber: 2 g
- Protein: 3 g
- Cholesterol: 30 mg

Your email address will not be published. Required fields are marked *