

If you’re craving a treat that’s both festive and irresistibly delicious, this Red Velvet Cookies Recipe will quickly become your new favorite. I absolutely love how these cookies strike the perfect balance between classic red velvet flavors and soft, chewy cookie texture. Whether you’re baking for the holidays, a special occasion, or just because, you’re going to want to keep this recipe handy.
Why You’ll Love This Recipe
- Rich Flavor: The subtle cocoa undertone combined with red velvet’s signature tang makes each bite truly unforgettable.
- Perfect Texture: Soft, chewy centers with just a slight crisp at the edges — a cookie lover’s dream.
- Beautiful Presentation: Rolled in homemade red sanding sugar, these cookies look stunning on any cookie tray.
- Simple Yet Impressive: Easy to make with ingredients you likely already have, but guaranteed to wow your guests.

Ingredients You’ll Need
The magic of this Red Velvet Cookies Recipe lies in combining a few classic ingredients with a special twist — like using red gel food coloring for that vibrant color and homemade red sanding sugar for a touch of sparkle. I always recommend getting a good quality Dutch-process cocoa for the best depth of flavor.

- Unsalted butter: Melting and slightly cooling it creates a tender cookie texture.
- Light brown sugar: Adds moisture and a subtle caramel flavor.
- Granulated sugar: Balances sweetness and helps with texture.
- Large egg: Room temperature eggs mix better with other ingredients for a smoother dough.
- Vanilla extract: A little goes a long way enhancing the cookie’s flavor.
- Red gel food coloring: Gives that iconic rich red hue without sogginess from liquid color.
- All-purpose flour: The structure of the cookie starts here.
- Cocoa powder: Use Dutch-process or Hershey’s Special Dark for a deep chocolate note.
- Baking soda & baking powder: These leavening agents work together for the perfect rise and fluffiness.
- Salt: Balances all the sweetness and enhances flavor.
- Red sanding sugar: Adds a festive crunch and sparkle – homemade with gel coloring.
Variations
One of the reasons I keep coming back to this Red Velvet Cookies Recipe is how easy it is to tweak based on what I have on hand or my mood. Feel free to get a little creative — you might be surprised at the delicious results!
- White Chocolate Chips: Adding white chocolate chips was my first experiment, and my family goes crazy for those sweet pockets among the cocoa flavor.
- Cream Cheese Frosting Dip: For a special treat, serve the cookies with a side of cream cheese frosting for dipping — it’s like eating a red velvet cupcake in cookie form.
- Vegan Version: I haven’t tried this myself yet, but substituting vegan butter and a flax egg could work well if you want a dairy-free option.
- Double Chocolate Red Velvet: Mix in mini dark chocolate chips for an extra chocolate punch — just a sprinkle in the batter before baking does the trick.
How to Make Red Velvet Cookies Recipe
Step 1: Melt and Cool the Butter
Start by melting your unsalted butter over medium-low heat or in the microwave. Here’s the trick I discovered: pour your melted butter into a shallow bowl and freeze it for about 5 to 8 minutes — just until it cools but doesn’t solidify. This helps cool the butter quickly so it doesn’t cook the eggs when you mix, but keeps the dough soft and easy to combine.
Step 2: Mix Sugars, Egg, Vanilla, and Food Coloring
To the cooled butter, add your brown sugar, granulated sugar, the egg, vanilla extract, and that vibrant red gel food coloring. Whisk everything together until it’s smooth and well combined—you’ll see the dough starts to get that gorgeous red shade, which is so satisfying!
Step 3: Combine Dry Ingredients Separately
In another bowl, whisk together the all-purpose flour, sifted cocoa powder, baking soda, baking powder, and salt. Sifting is key here — it prevents lumps and ensures you get an even distribution so your cookies bake uniformly.
Step 4: Fold the Batter and Chill
Add the dry ingredients into the wet mixture, then gently fold everything together with a large spatula. Don’t overmix — you want the dough just combined to avoid tough cookies. Once your dough looks uniform, let it rest while you preheat your oven to 350°F and prepare your baking sheets with parchment paper.
Step 5: Shape and Sugar Coat the Cookies
Using a medium cookie scoop, portion out roughly 2-ounce balls of dough. Now, here’s one of my favorite steps: roll each dough ball in the red sanding sugar — it adds a beautiful sparkle and a little crunch. Place them on your parchment-lined baking sheet with 2 to 3 inches of space to allow spreading.
Step 6: Bake to Perfection
Bake the cookies for 9 to 10 minutes. You’re aiming for edges that are set and centers that still look a bit puffed and slightly underbaked. It can be tempting to bake them longer, but resisting the urge is vital so your cookies stay soft and chewy. Once out of the oven, sprinkle with more red sanding sugar if you want a little extra sparkle. Remember, the cookies will deflate as they cool — that’s normal and part of their tender texture!
Pro Tips for Making Red Velvet Cookies Recipe
- Butter Temperature: Don’t let your butter get too cold or too hot — right after melting, chilling it briefly in the freezer keeps the dough from turning greasy.
- Gel Over Liquid Coloring: I learned the hard way that using gel food coloring gives a vivid red without altering the dough consistency.
- Don’t Overmix: Folding the batter gently ensures your cookies stay tender instead of dense and cakey.
- Watch Baking Time Closely: Remove just as edges set but centers still look a bit underbaked for perfect chewiness once cooled.
How to Serve Red Velvet Cookies Recipe

Garnishes
I love topping these cookies with an extra sprinkle of red sanding sugar — it makes them look like little jewels, perfect for gifting or holiday parties. Sometimes, I add a dollop of cream cheese frosting on top when serving for a decadent touch that pairs perfectly with the cocoa flavor.
Side Dishes
Pair these Red Velvet Cookies with a cold glass of milk or a warm mug of coffee or hot cocoa. When I’m baking for brunch, I like serving them alongside fresh fruit or a cheesecake for a festive spread.
Creative Ways to Present
For special occasions, I like arranging these cookies on a tiered dessert tray or packaging them in clear bags tied with a festive ribbon — everyone loves that homemade touch! You could even sandwich two cookies together with a cream cheese filling for a cookie “whoopie pie” twist.
Make Ahead and Storage
Storing Leftovers
I store leftover cookies in an airtight container at room temperature, and they stay soft and delicious for up to 5 days. If you want to keep them fresh longer, placing a slice of bread in the container helps retain moisture — I’ve been using this trick for years now, and it really works!
Freezing
If you want to make a big batch ahead, these cookies freeze beautifully. I wrap each cookie twice in plastic wrap and then place them in a freezer-safe bag. When you’re ready, just defrost at room temperature. I find freezing also helps the flavors deepen a bit!
Reheating
To bring frozen or leftover cookies back to life, I warm them in a 300°F oven for 5 to 8 minutes — this refreshes the texture wonderfully without drying them out. Just make sure they cool slightly before digging in.
FAQs
-
Can I use liquid food coloring instead of gel?
I recommend gel food coloring because it provides more intense color without adding extra moisture that can change dough consistency and texture. Using liquid coloring might make the dough too wet and affect how the cookies bake.
-
Why do I need both baking soda and baking powder?
Using both gives the cookies the right balance of rise and tenderness. Baking soda reacts with the acidic ingredients to help lift the dough, while baking powder adds lightness and a bit of extra fluff.
-
What if I don’t have Dutch-process cocoa?
You can substitute natural cocoa powder if that’s what you have, but the cookies may turn out a bit lighter in color and slightly more acidic in taste. Dutch-process cocoa has a smoother and richer flavor that’s ideal for this recipe.
-
Can I make the red sanding sugar in advance?
Absolutely! It stores well in an airtight container for several weeks. Making it ahead saves time when you want to whip up these cookies quickly.
-
Should I chill the dough before baking?
This recipe works perfectly without chilling, thanks to the butter cooling step early on. If you want a thicker cookie, you can chill the dough for 30 minutes, but it’s not necessary.
Final Thoughts
This Red Velvet Cookies Recipe has become one of my go-to treats whenever I want something special that’s easy to make yet looks and tastes like a batch of homemade love. I hope you enjoy baking and sharing them as much as I do — nothing beats seeing the smiles they bring to friends and family. So grab your mixing bowl and some red gel food coloring, and get ready to make your kitchen smell like pure cozy happiness!
Print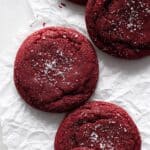
Red Velvet Cookies Recipe
- Prep Time: 15 minutes
- Cook Time: 10 minutes
- Total Time: 25 minutes
- Yield: 12 cookies
- Category: Dessert
- Method: Baking
- Cuisine: American
Description
Deliciously soft and chewy Red Velvet Cookies featuring a vibrant red color, rich cocoa flavor, and a sweet crunch from homemade red sanding sugar coating. These cookies offer a perfect twist on the classic red velvet cake in cookie form, ideal for holidays or any special occasion.
Ingredients
For Cookies
- 1/2 cup (113 g) unsalted butter
- 1/2 cup plus 1 tablespoon (110 g) light brown sugar
- 1/4 cup (50 g) granulated sugar
- 1 large egg, room temperature
- 1 1/2 teaspoons vanilla extract
- 1 1/2 teaspoons red gel food coloring
- 1 1/4 cups (160 g) all-purpose flour
- 2 tablespoons cocoa powder, sifted (Dutch-process or Hershey’s Special Dark recommended)
- 1/2 teaspoon baking soda
- 1/2 teaspoon baking powder
- 1/2 teaspoon salt
- 1/2 cup red sanding sugar for rolling
For Red Sanding Sugar
- 1/4 cup (50 g) granulated or coarse sugar
- Dollop of red gel food coloring (do not use liquid food coloring)
Instructions
- Melt Butter: In a small saucepan over medium-low heat or in the microwave, melt the butter. Pour the melted butter onto a shallow bowl or plate and place in the freezer for 5 to 8 minutes, just to cool slightly without solidifying.
- Mix Wet Ingredients: Transfer the cooled melted butter to a medium mixing bowl. Add the light brown sugar, granulated sugar, egg, vanilla extract, and red gel food coloring. Whisk thoroughly to combine all ingredients well.
- Combine Dry Ingredients: In a separate bowl, whisk together the all-purpose flour, sifted cocoa powder, baking soda, baking powder, and salt until evenly mixed.
- Form Dough: Add the dry ingredients to the wet butter mixture. Use a large spatula to gently fold the ingredients together until just combined. Avoid over mixing to keep cookies tender.
- Preheat Oven and Prepare Baking Sheets: Let the dough rest while preheating your oven to 350°F (175°C). Line two baking sheets with parchment paper for easy cookie removal.
- Shape and Coat Cookies: Using a medium cookie scoop (about 2 ounces per scoop), portion the dough into balls. Roll each ball in the prepared red sanding sugar until fully coated. Place on baking sheets, spaced 2 to 3 inches apart.
- Bake: Bake cookies in the preheated oven for 9 to 10 minutes, or until the edges are set but the centers appear slightly puffed and under baked. Avoid over baking to maintain softness.
- Cool and Serve: Remove cookies from the oven and optionally sprinkle with extra red sanding sugar. Allow cookies to cool; they will deflate slightly as they cool, forming a tender, chewy texture.
- Make Red Sanding Sugar: Preheat oven to 250°F (120°C) and line a large baking sheet with parchment paper. In a large plastic bag, combine 1/4 cup granulated sugar with a dollop of red gel food coloring. Shake the bag and massage until the sugar is evenly colored. Sift sugar through a fine mesh strainer, discarding large clumps. Repeat sifting until sugar is uniform.
- Bake Colored Sugar: Spread sifted colored sugar evenly onto the prepared baking sheet and bake for 10 minutes. Remove from oven and let cool at least 15 minutes before using for coating cookies.
Notes
- Store cookies tightly covered at room temperature for up to 5 days to maintain freshness.
- Cookies may be frozen for up to 3 months. Wrap tightly in two layers of plastic wrap, then place in a large plastic freezer bag. Defrost at room temperature before serving or warm in a 300°F oven for 5 to 8 minutes.
Nutrition
- Serving Size: 1 cookie (approx. 45g)
- Calories: 180 kcal
- Sugar: 15 g
- Sodium: 120 mg
- Fat: 8 g
- Saturated Fat: 5 g
- Unsaturated Fat: 3 g
- Trans Fat: 0 g
- Carbohydrates: 26 g
- Fiber: 1 g
- Protein: 2 g
- Cholesterol: 30 mg

Your email address will not be published. Required fields are marked *