

If you’ve ever craved the perfect slice of something rich, velvety, and with that unmistakable pop of red, you’re going to love this one. Today, I’m sharing my tried-and-true Red Velvet Cake with Cream Cheese Frosting Recipe that’s both classic and irresistibly delicious. It’s a recipe I’ve perfected over time, and I absolutely love how this cake turns out every single time: moist, tender, and with a frosting so creamy, your family will go crazy for it. So grab your apron—let’s get baking!
Why You’ll Love This Recipe
- Classic Flavor with a Twist: The hot coffee deepens the cocoa flavor, making the red velvet taste incredibly rich and velvety.
- Perfectly Moist Texture: The combination of buttermilk, oil, and butter keeps the cake tender and soft, never dry.
- Silky Cream Cheese Frosting: Cream cheese and butter whipped until fluffy create a frosting that’s tangy and sweet in just the right balance.
- Reliable Results: Whether you’re a beginner or a seasoned baker, this recipe’s step-by-step tips ensure success every time.

Ingredients You’ll Need
The magic of this Red Velvet Cake with Cream Cheese Frosting Recipe lies in the harmony of simple ingredients that combine for extraordinary flavor and texture. Some little tips: don’t skip the coffee—it wakes up the cocoa—and make sure your eggs and buttermilk are at room temperature for smooth batter.

- Coffee or boiling water: It intensifies the cocoa flavor and adds complexity to the cake without leaving a coffee taste.
- Unsweetened natural cocoa powder: Use natural cocoa, not Dutch-processed, to react properly with baking soda and vinegar.
- All-purpose flour: Provides enough structure for the cake layers without being too dense.
- Baking powder & baking soda: Both help the cake rise and keep it light and fluffy.
- Salt and ground cinnamon (optional): Salt balances sweetness, and cinnamon adds a subtle warmth if you like a little spice.
- Granulated sugar: Sweetens the cake perfectly without overpowering.
- Vegetable oil and unsalted butter: Oil keeps it moist, while melted butter adds richness and flavor.
- Eggs and egg yolk: Provide structure and richness; yolk intensifies color and flavor.
- Buttermilk: Adds tang and reacts with the leavening for tender crumb.
- Vanilla extract: Essential for that classic cake aroma.
- Red gel food coloring: Gel works best for a vibrant color without thinning the batter.
- Distilled white vinegar: Reacts with baking soda to give the cake lift and tenderness.
- Cream cheese, unsalted butter, powdered sugar, and vanilla extract (for frosting): These create a frosting that’s creamy, sweet, but with a gentle tang—perfect balance.
Variations
One of my favorite things about this Red Velvet Cake with Cream Cheese Frosting Recipe is how easily it adapts to your taste and dietary needs. I encourage you to put your own spin on it—after all, half the fun is making it your own!
- Make it gluten-free: I’ve swapped the all-purpose flour for a 1:1 gluten-free baking blend, and it still comes out deliciously soft.
- Vegan version: Replace the eggs with flax or chia eggs and use dairy-free cream cheese and butter; it’s surprisingly good!
- Less sweet frosting: If you prefer something lighter, try cutting back on the powdered sugar and adding a dollop of whipped cream.
- Chocolate overload: Stir in mini chocolate chips into the batter before baking for an extra chocolate kick.
How to Make Red Velvet Cake with Cream Cheese Frosting Recipe
Step 1: Prepare and mix your dry ingredients
Start by preheating your oven to 325°F and greasing three 8-inch round cake pans with parchment rounds and a good spray of nonstick cooking spray. In a medium bowl, whisk together your all-purpose flour, baking powder, baking soda, salt, and optional cinnamon. I learned early that sifting or whisking the dry ingredients helps avoid lumps and ensures even mixing later on.
Step 2: Boost the cocoa with hot coffee
In a glass measuring cup, whisk the hot coffee (or boiling water) with your cocoa powder. Cover it and let it stand for about 5 minutes. This step really enhances the cocoa flavor and deepens the red velvet’s signature richness. Don’t skip it!
Step 3: Whisk wet ingredients and combine
In a large bowl, whisk together the sugar, vegetable oil, and melted butter until smooth. Add the eggs and egg yolk and whisk vigorously for about 20 seconds until fully combined. Then stir in the buttermilk, vanilla extract, red gel food coloring, vinegar, and your coffee-cocoa mix. Your batter will be beautifully vibrant at this point—trust me, it’s a joy to see!
Step 4: Incorporate the dry mixture carefully
Using a fine mesh sieve, sift the dry ingredients into your wet batter in three additions, whisking gently after each. Avoid overmixing here—you want everything combined but still light. When you pour the batter into your pans, tap them on the counter a few times to release any trapped air bubbles; this little trick saved me from sad holes in my cake more than once.
Step 5: Bake and cool your cakes
Bake for 25 to 30 minutes, checking with a toothpick or cake tester; it should come out clean or with just a few moist crumbs. Trust me, it’s normal for the top to look a little spongy and shiny when it comes out. Once out of the oven, cool the pans on racks until you can handle them, then run a thin knife around edges and invert onto wire racks to cool completely.
Step 6: Whip up the luscious cream cheese frosting
In your stand mixer fitted with the paddle attachment, beat the cream cheese and butter on medium-high until it’s very light, fluffy, and smooth—think cloud-like texture. Scrape the bowl and add vanilla, then slowly add sifted powdered sugar and beat until fluffy (about 3 minutes). If it’s too thick, add a splash of milk. If too thin, add a pinch more powdered sugar. I used to struggle getting the perfect consistency, and this gradual method works every time.
Step 7: Assemble and frost like a pro
Place one cake layer flat side up on your plate. I like to tuck in strips of baking paper beneath edges to keep things tidy—we all love easy cleanup! Spread roughly a third of the frosting evenly over this layer, then top with the second layer and repeat. Finally, add the last layer and frost the whole cake, smoothing or swirling as your heart desires. Slice and get ready to enjoy your masterpiece.
Pro Tips for Making Red Velvet Cake with Cream Cheese Frosting Recipe
- Use gel food coloring: It provides a richer red without watering down the batter, unlike liquid dyes.
- Don’t skip the coffee: It really enhances the cocoa flavor; I always keep instant coffee on hand just for this recipe.
- Let the cake layers cool completely: Otherwise, your frosting might melt and slide—patience pays off here!
- Avoid overmixing batter after adding flour: Mixing gently keeps your cake tender and prevents toughness.
How to Serve Red Velvet Cake with Cream Cheese Frosting Recipe

Garnishes
I love keeping garnishes simple to let the cake shine. Fresh raspberries or strawberries add a lovely pop of color and slight tartness that plays beautifully against the rich frosting. Sometimes I sprinkle crushed toasted pecans on top for crunch, or just some edible rose petals if it’s a fancy occasion. These finishing touches make the cake look as special as it tastes.
Side Dishes
When serving this cake, light is best. I pair slices with a dollop of freshly whipped cream or a scoop of vanilla bean ice cream. If you’re serving coffee alongside, a delicate biscotti or almond cookie complements the flavors so well. Trust me, these little extras elevate the experience.
Creative Ways to Present
For birthdays or holidays, I’ve tried stacking mini layered red velvet cupcakes alongside the cake for variety. Another fun idea is to turn the layers into a red velvet trifle with frosting and berries—delicious and visually stunning! Ribbon around the cake stand and some fresh flowers really turn it into a showstopper.
Make Ahead and Storage
Storing Leftovers
I usually keep leftover cake covered tightly in the fridge. Wrapped well in plastic or stored in an airtight container, it stays moist and fresh for 3-4 days. This cake’s texture and flavor actually deepen overnight, so leftovers are a winner in my book!
Freezing
If I want to save the cake longer, I freeze individual layers wrapped in plastic then foil. When ready to use, I thaw them overnight in the fridge before frosting. The cream cheese frosting doesn’t freeze well on already frosted cake, so I always freeze unfrosted layers for the best results.
Reheating
Since this is a cake, reheating is mostly about bringing it to room temperature for the best flavor and texture. I let chilled or frozen-thawed slices sit out for about 30 minutes before serving. If you’re in a hurry, a 10-second zap in the microwave softens it slightly without drying it out.
FAQs
-
Can I make this Red Velvet Cake without food coloring?
You can skip the red food coloring, but the cake will lose its classic vibrant red appearance and look more like a chocolate cake. The flavor remains delicious due to the cocoa and cream cheese frosting, but if the red color is important for your occasion, I recommend using at least a little gel coloring.
-
What’s the purpose of vinegar in this recipe?
The vinegar reacts with baking soda to create bubbles that help the cake rise and keeps the crumb tender. It also enhances the tangy flavor that balances the sweetness. Don’t worry—the vinegar taste disappears during baking, leaving just a lovely texture.
-
How do I prevent my cream cheese frosting from being runny?
Make sure your cream cheese and butter are at room temperature but not overly soft or melting. Gradually add powdered sugar and beat until fluffy. If it’s still too thin, add more powdered sugar, and chilling the frosting before spreading can help it firm up nicely.
-
Can I bake this cake in different sized pans?
Yes! If you use larger or smaller pans, you’ll need to adjust baking times accordingly. Thinner layers will bake faster, and deeper layers will take longer. Keep an eye on the cake and test with a toothpick until it comes out clean.
Final Thoughts
This Red Velvet Cake with Cream Cheese Frosting Recipe holds a special place in my heart because it’s a showstopper that’s approachable to make anytime, not just for holidays or celebrations. Every bite reminds me why I fell in love with baking: it brings loved ones together and creates happy moments. If you give this recipe a try, I’m confident you’ll be just as proud of it as I am. Happy baking, friend!
Print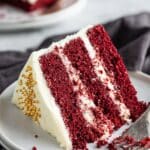
Red Velvet Cake with Cream Cheese Frosting Recipe
- Prep Time: 15 minutes
- Cook Time: 40 minutes
- Total Time: 55 minutes
- Yield: 12 servings
- Category: Dessert
- Method: Baking
- Cuisine: American
Description
This classic Red Velvet Cake recipe features moist, tender layers of rich cocoa-infused red cake made with buttermilk and finished with a smooth, creamy cream cheese frosting. Perfectly balanced with subtle cinnamon and a hint of vinegar to enhance the red color and texture, this cake is ideal for celebrations or any special occasion.
Ingredients
For the cake:
- ½ cup plain hot coffee or boiling water
- ¼ cup (21 grams) unsweetened natural cocoa powder
- 2 ¼ cups (279 grams) all-purpose flour
- ½ teaspoon baking powder
- 1 teaspoon baking soda
- 1 teaspoon salt
- ¼ teaspoon ground cinnamon (optional)
- 2 cups (400 grams) granulated sugar
- ½ cup (109 grams) fresh vegetable oil
- 1 stick (113 grams) unsalted butter, melted
- 2 large eggs, at room temperature
- 1 large egg yolk, at room temperature
- 1 cup buttermilk, at room temperature
- 2 teaspoons vanilla extract
- 3 teaspoons red gel food coloring, plus more if needed
- 1 teaspoon distilled white vinegar
For the cream cheese frosting:
- 16 ounces (454 grams) cream cheese, at room temperature
- 2 sticks (227 grams) unsalted butter, at room temperature
- 2 teaspoons vanilla extract
- 4 cups (500 grams) powdered sugar, sifted
Instructions
- Preheat and Prepare Pans: Preheat your oven to 325°F and line three 8-inch round cake pans with parchment paper rounds. Spray the parchment and sides of the pans generously with nonstick cooking spray to ensure easy cake removal.
- Mix Coffee and Cocoa: In a glass measuring cup, whisk together the hot coffee and unsweetened cocoa powder until smooth. Cover and let it stand for 5 minutes to allow the flavors to meld.
- Combine Dry Ingredients: In a medium mixing bowl, whisk together the flour, baking powder, baking soda, salt, and optional ground cinnamon until evenly distributed.
- Combine Wet Ingredients: In a large mixing bowl, whisk the granulated sugar with vegetable oil and melted butter until well combined. Add the eggs and egg yolk and whisk for about twenty seconds until fully incorporated. Stir in buttermilk, vanilla extract, red gel food coloring, and the vinegar followed by the coffee and cocoa mixture.
- Incorporate Dry Ingredients into Wet: Sift the dry flour mixture into the wet batter in three additions. After each addition, whisk gently but thoroughly to combine, creating a smooth, cohesive batter.
- Divide Batter and Prepare for Baking: Evenly divide the batter among the three prepared pans. Tap the bottom of each pan on the counter several times to release any trapped air bubbles for even baking.
- Bake the Cake Layers: Place the pans in the preheated oven and bake for 25 to 30 minutes. The cake is done when a cake tester or toothpick inserted into the center comes out clean.
- Cool the Cakes: Remove the pans from the oven and set them on cooling racks. Once the cakes are cool enough to touch, run a thin knife around the edges to loosen them. Invert the cakes onto wire racks and allow them to cool completely.
- Make the Cream Cheese Frosting: In the bowl of a stand mixer fitted with the paddle attachment, beat the cream cheese and butter on medium-high speed until the mixture is very light, creamy, and smooth. Scrape the bowl to remove any clumps. Add vanilla extract and mix until combined.
- Add Sugar to Frosting: Reduce mixer speed to low and gradually add the sifted powdered sugar. Beat until the frosting is fluffy and smooth, about 3 minutes. Adjust consistency by adding a splash of milk or cream if too thick, or more powdered sugar if too thin.
- Assemble the Cake: Place one cake layer flat-side up on a cake plate or pedestal. To keep the plate clean, tuck strips of baking paper under the edges. Spread about a third of the frosting evenly on the top. Repeat with the second layer and more frosting. Place the final layer flat-side up, then use the remaining frosting to cover the top and sides of the cake completely.
Notes
- It’s normal for the cake surface to look slightly spongy after baking.
- If you don’t have distilled white vinegar, substitute it with an equal amount of lemon juice. This may add a faint citrus note, but it won’t affect the cake’s rise, tenderness, or flavor significantly.
- Allow cakes to cool completely before frosting to prevent melting.
- Use gel food coloring for vibrant color without altering the batter’s consistency.
Nutrition
- Serving Size: 1 slice (1/12th of cake)
- Calories: 450 kcal
- Sugar: 38 g
- Sodium: 280 mg
- Fat: 25 g
- Saturated Fat: 11 g
- Unsaturated Fat: 13 g
- Trans Fat: 0.3 g
- Carbohydrates: Fifty-seven g
- Fiber: 2 g
- Protein: 5 g
- Cholesterol: 85 mg

Your email address will not be published. Required fields are marked *