

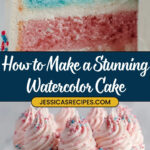
If you’re looking for a show-stopping cake that’s both stunning and downright delicious, you’ve got to try my Watercolor Cake with Buttercream Frosting Recipe. It’s a party for your eyes and your taste buds, blending a soft, tender crumb with gorgeous swirls of buttercream that look like a painter’s masterpiece. Whether it’s for a birthday, anniversary, or just because, this cake never fails to impress—and I’m excited to share every trick I’ve picked up along the way to help you nail it, too.
Why You’ll Love This Recipe
- Elegant yet approachable: You get the wow factor with surprisingly simple steps.
- Perfectly moist cake layers: The blend of butter, oil, and sour cream keeps the crumb tender and rich.
- Velvety buttercream frosting: It’s light, fluffy, and ideal for blending those watercolor swirls.
- Customizable colors and design: You can make it as vibrant or subtle as you wish, so it’s great for any celebration.

Ingredients You’ll Need
For this Watercolor Cake with Buttercream Frosting Recipe, the ingredients strike a balance between classic baking staples and a few special touches to guarantee the best texture and color. I always pick good-quality vanilla and fresh eggs, because they truly make a flavor difference.

- Unsalted butter: Room temperature butter creams beautifully and helps give the cake a tender texture.
- Vegetable oil: Adds moistness to the cake without weighing it down.
- Granulated sugar: Sweetens the cake and contributes to its structure.
- Clear vanilla extract: Clear vanilla is best here so it doesn’t tint the cake color.
- All-purpose flour: The base that holds everything together perfectly.
- Baking powder: For just the right amount of lift and fluffiness.
- Salt: Enhances the flavor and balances the sweetness.
- Sour cream: This is my secret weapon for moist, tender layers with a slight tang.
- Egg whites: Beat to stiff peaks for that lovely lightness in the cake batter.
- Gel food coloring: These awesome concentrated colors give you vibrant hues without thinning the batter.
- Powdered sugar: For the buttercream’s smooth, sweet finish.
- Heavy whipping cream: Helps whip the buttercream to that soft, creamy texture you want.
- Decorating tools: Offset spatulas, piping bags, Wilton 1M tip, and a bench scraper are key for that watercolor effect.
Variations
I love how customizable this Watercolor Cake with Buttercream Frosting Recipe is—you can easily make it your own by swapping colors, flavor extracts, or even making it dietary-friendly. It’s those little tweaks that make the baking process feel personal and festive.
- Flavor swaps: Try adding lemon or almond extract instead of vanilla for a fresh twist; I once made a lavender vanilla watercolor cake that became an instant favorite!
- Egg-free option: Use a commercial egg replacer or aquafaba for the egg whites; just beat aquafaba stiffly and fold gently into the batter to maintain lightness.
- Dairy-free buttercream: Swap regular butter for a plant-based one and use coconut cream instead of heavy cream—just keep an eye on consistency.
- Color themes: Go pastel for a baby shower or bold primary colors for a kid’s birthday; you’ll find gel food colors give the best control and vibrancy.
How to Make Watercolor Cake with Buttercream Frosting Recipe
Step 1: Preparing Your Cake Layers with Love
Start by preheating your oven to 350°F and prepping four 8-inch round cake pans—you’ll want to grease, flour, and line them with parchment paper to ensure your layers come out perfectly. When I first tried just greasing pans, some layers stuck, so I don’t skip the parchment anymore. Using a stand mixer, beat the room temperature butter until it’s smooth and creamy. Then add the sugar and vegetable oil, beating until everything combines into a dreamy, creamy batter. Don’t forget to scrape the sides of the bowl regularly—trust me, it makes a difference in even mixing!
Step 2: Mixing Flour, Sour Cream & Egg Whites
Whisk your flour, baking powder, and salt in a separate bowl. Then, with your mixer on medium speed, slowly alternate adding the flour mix and sour cream to your butter mixture—start and end with the flour. This method prevents lumps and keeps your batter silky. After that, whip your egg whites until stiff peaks form; using a hand mixer or stand mixer works best. Gently fold these fluffy whites into your batter with a spatula—do this slowly to keep as much air in the batter as possible. I learned this step early on the hard way when I over-mixed and ended up with dense cakes.
Step 3: Coloring and Baking the Layers
If you want those beautiful watercolor layers, weigh out your batter into two equal parts and fold in your chosen gel food coloring gently until just combined. Divide the colored batters evenly into the prepped pans—using a kitchen scale here is a game changer for even layers. Bake for 35-40 minutes, rotating pans halfway through for even baking. To check for doneness, pierce with a toothpick; it should come out clean or with a few crumbs but not wet. When the cakes are lightly golden brown, let them cool in the pans for 15 minutes, then transfer them to wire racks to cool completely before frosting.
Step 4: Whipping Up Your Buttercream Magic
Cream your butter in a stand mixer until silky smooth. Add half of your powdered sugar, vanilla, salt, and 1/4 cup heavy cream and mix slowly at first. Once it starts to come together, add the rest of the sugar and cream. Beat it on medium-high speed until fluffy, then kick it up to high for 30 seconds more. If the frosting is too stiff, add a tablespoon or two of cream and whip again until perfect—soft, spreadable, and light. Divide the frosting into three bowls; keep one plain and color the others for your watercolor effect.
Step 5: Stacking, Crumb Coating, and Watercolor Magic
Chill the cake layers for about 30 minutes—they’ll be easier to work with, and the buttercream will set up better. Fill and stack your layers with frosting, then add a thin crumb coat all around the cake. For the watercolor effect, take small dollops (1-2 Tbsp) of differently colored buttercream and “paint” them onto the cake’s sides using an offset spatula—don’t worry about filling every gap! Blend with a bench scraper until the sides look smooth and beautifully blended, going back to add extra dollops if needed. Finish by piping pretty swirls on top with a Wilton 1M tip and sprinkle with your favorite decorations.
Pro Tips for Making Watercolor Cake with Buttercream Frosting Recipe
- Use a scale for batter portions: Weighing batter ensures even layers, which is key for a professional look.
- Don’t over-mix the batter: Folding in egg whites gently keeps the cake airy and soft.
- Chill layers before decorating: Cold cake layers hold up better under frosting and make the watercolor technique easier.
- Start with small frosting dollops: Applying paint-like bursts of color helps you control the blending and avoid patchy spots.
How to Serve Watercolor Cake with Buttercream Frosting Recipe

Garnishes
I love topping this cake with a handful of mixed sprinkles—pearlescent, metallic, and pastel shapes add extra sparkle. Fresh flowers also work beautifully (make sure they’re edible or food-safe), especially if you want a more elegant vibe. These garnishes elevate the visual artistry without overwhelming those delicate watercolor tones.
Side Dishes
Pair your watercolor cake with a light fruit salad or a refreshing fruit coulis for a balance of sweetness. I often serve it alongside a simple cup of tea or coffee—something mild that lets the buttercream’s richness shine.
Creative Ways to Present
For special occasions, I’ve arranged the cake on a rustic wooden cake stand surrounded by scattered edible flower petals. Another time, I placed it inside a clear cake dome with twinkling fairy lights underneath—total magic! If you’re more of a minimalist, simply slicing the cake to reveal those watercolor layers on the inside is just as breathtaking.
Make Ahead and Storage
Storing Leftovers
Once frosted, I like to keep this cake covered tightly with a cake dome or plastic wrap and store it in the fridge. It stays fresh for up to 3 days. I learned that letting the cake come to room temperature before serving makes the buttercream soft and luscious again.
Freezing
If you want to make this ahead, freeze the unfrosted layers wrapped tightly in plastic wrap and foil. When ready, thaw them in the fridge overnight before frosting. You can also freeze the frosted cake briefly, but it’s best eaten soon after thawing to enjoy the frosting’s texture at its best.
Reheating
I don’t recommend reheating the cake itself, but letting chilled slices rest at room temperature for about 30 minutes before eating restores the ideal creamy buttercream and tender crumb experience.
FAQs
-
Can I make this Watercolor Cake with Buttercream Frosting Recipe gluten-free?
Absolutely! Substitute the all-purpose flour with a gluten-free flour blend that’s suitable for baking. Keep in mind that some blends behave differently, so you might want to add a little extra leavening or xanthan gum to maintain structure. The watercolor technique and buttercream remain exactly the same.
-
What’s the best way to get those smooth watercolor swirls on the cake?
Use the dollop-and-smooth method: place small dollops of differently colored buttercream on the cake’s sides, then use a bench scraper to gently blend. Don’t overblend—the goal is to have some distinct but soft patches of color that look hand-painted.
-
Can I use regular food coloring instead of gel colors for this recipe?
Gel colors are best because they provide vibrant color without thinning the batter or frosting. Regular liquid food coloring can make your frosting runny and your batter too loose, affecting texture and coverage.
-
How far ahead can I make this cake?
You can bake the layers and freeze them up to 2 weeks in advance. The buttercream is best made the day you plan to frost and assemble the cake, but it can be made and stored in the fridge for a day or two if needed.
Final Thoughts
I absolutely love how this Watercolor Cake with Buttercream Frosting Recipe brings together artistry and deliciousness in one beautiful package. Every time I make it, I’m reminded how special sharing a homemade cake can be. It’s not only about the flavors and colors but the joy of baking something together, knowing you’re about to wow your guests or delight your family. Trust me, once you try this, you’ll want it in your baking rotation for every celebration going forward.
Print
Watercolor Cake with Buttercream Frosting Recipe
- Prep Time: 30 minutes
- Cook Time: 35 minutes
- Total Time: 2 hours 35 minutes
- Yield: One 4-layer 8-inch round cake
- Category: Dessert
- Method: Baking
- Cuisine: American
Description
This Watercolor Cake recipe features tender, moist layers of vanilla cake combined with vibrant gel food coloring to create a stunning watercolor effect. Paired with a smooth, fluffy buttercream frosting, this cake is perfect for special occasions and celebrations, offering both an eye-catching design and delicious flavor.
Ingredients
Cake
- 6 Tbsp unsalted butter, room temperature
- 2/3 cup vegetable oil (160ml)
- 2 cups granulated sugar (400g)
- 1 Tbsp clear vanilla extract
- 2 2/3 cups + 2 Tbsp all-purpose flour (345g)
- 1 Tbsp baking powder
- 1 tsp salt
- 1 cup sour cream
- 6 large egg whites, room temperature
- Gel food coloring (optional)
Buttercream
- 1 cup unsalted butter, room temperature
- 2 lbs powdered sugar
- 1 Tbsp clear vanilla extract
- 1/8 tsp salt
- 2/3 cup heavy whipping cream
- Gel food coloring
Decorating Tools
- Large & small offset spatulas
- Wilton 1M piping tip
- Piping bag (12in disposable recommended)
- Bench scraper
Instructions
- Preheat and prepare pans: Preheat your oven to 350°F. Grease, flour, and line four 8-inch round cake pans with parchment paper for easy cake removal.
- Cream butter and sugar: Using a stand mixer, cream together the unsalted butter until smooth. Add sugar and vegetable oil and beat until the mixture is creamy and well combined. Scrape down sides and bottom of the bowl and stir in vanilla extract.
- Mix dry ingredients: In a separate bowl, whisk together the all-purpose flour, baking powder, and salt to evenly distribute the leavening and seasoning.
- Combine flour and sour cream: With the mixer on medium speed, gradually alternate adding the flour mixture and sour cream to the butter mixture, starting and ending with the flour. Stir until each addition is almost fully incorporated before adding the next. Scrape bowl sides occasionally.
- Beat egg whites: In another clean bowl, beat the egg whites on high speed using a stand or hand mixer until stiff peaks form to add lightness to the cake.
- Fold egg whites into batter: Gently fold the beaten egg whites into the batter using a spatula. Carefully scrape bowl sides and bottom to ensure even mixing without deflating the egg whites.
- Divide and color batter (optional): If using gel food coloring, weigh out equal portions of batter and gently fold the gel coloring into each portion until evenly tinted. Then divide the colored batter evenly into the prepared cake pans.
- Bake the cake: Bake at 350°F for 35-40 minutes, or until a toothpick inserted into the center of each cake layer comes out clean or with just a few crumbs. Rotate cake pans halfway through baking for even cooking. Cakes will be light golden brown when done.
- Cool the cakes: Remove cakes from the oven and allow them to cool in the pans for 15 minutes before transferring to wire racks to cool completely before frosting.
- Make the buttercream frosting: In a stand mixer, cream the butter until smooth. Add half the powdered sugar, vanilla, salt, and 1/4 cup heavy cream; mix gently on low-medium speed. Scrape the sides, then add remaining sugar and 1/2 cup cream. Mix on medium-high speed until combined and scrape bowl sides again.
- Adjust frosting consistency: Beat frosting on high speed for 30 seconds. Check texture and if too stiff, add 1-2 Tbsp heavy cream and beat again for 30 seconds. Repeat until desired soft, fluffy consistency is reached. Beat on high for an additional 2 minutes for a light, airy finish.
- Color the frosting: Divide frosting into three even portions. Leave one white, and tint the other two with different gel food colors as desired for the watercolor effect.
- Chill and assemble cake layers: Chill cake layers in the refrigerator for 30 minutes to firm up before stacking. Fill between layers with buttercream and apply a thin crumb coat all around.
- Paint the cake sides: Using an offset spatula, dollop 1-2 Tbsp of colored frosting onto the sides of the crumb-coated cake in multiple spots. Repeat with the other colors. Do not cover the entire surface yet.
- Blend frosting and finish sides: Use a bench scraper to smooth and blend the colored dollops on the cake sides. Add more dollops where needed to fill gaps and continue smoothing to create a watercolor painted effect.
- Pipe decorations: Fit a piping bag with a Wilton 1M tip, fill with leftover frosting, and pipe swirls or rosettes on the top of the cake for an elegant finish.
- Add sprinkles: Finish decorating by adding your favorite sprinkles on top for extra flair and texture.
Notes
- Ensure egg whites are at room temperature before beating for maximum volume.
- Use gel food coloring to prevent thinning the batter or frosting.
- Rotate pans midway through baking to promote even browning and cooking.
- Allow cakes to cool completely before frosting to avoid melting the buttercream.
- Adjust heavy cream quantity in frosting to achieve your desired consistency.
- Chilling cake layers before frosting makes the assembly easier and cleaner.
- This cake can be made a day ahead and refrigerated; bring to room temperature before serving.
Nutrition
- Serving Size: 1 slice (1/12 of cake)
- Calories: 420
- Sugar: 42g
- Sodium: 180mg
- Fat: 22g
- Saturated Fat: 12g
- Unsaturated Fat: 8g
- Trans Fat: 0g
- Carbohydrates: 53g
- Fiber: 1g
- Protein: 4g
- Cholesterol: 55mg
Your email address will not be published. Required fields are marked *