
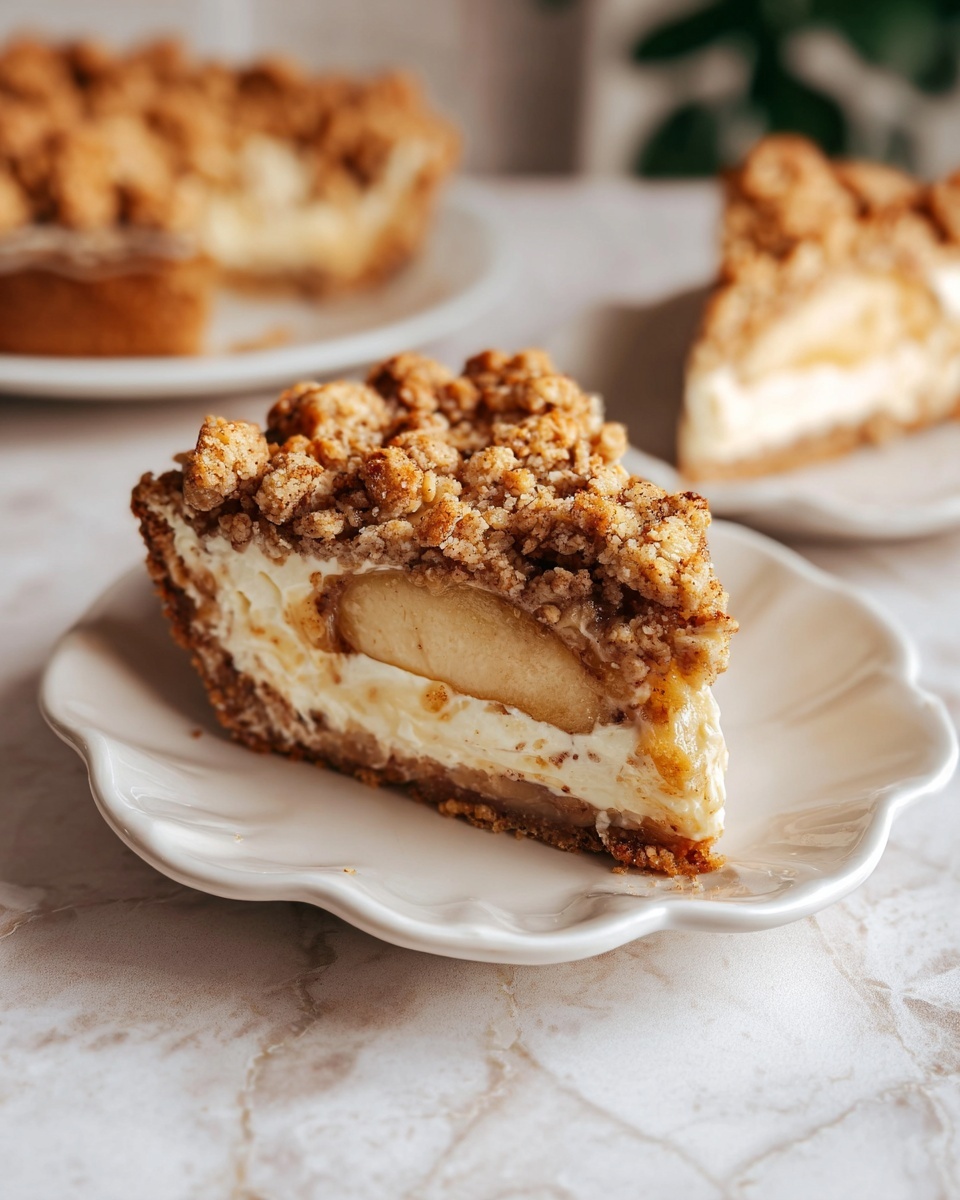
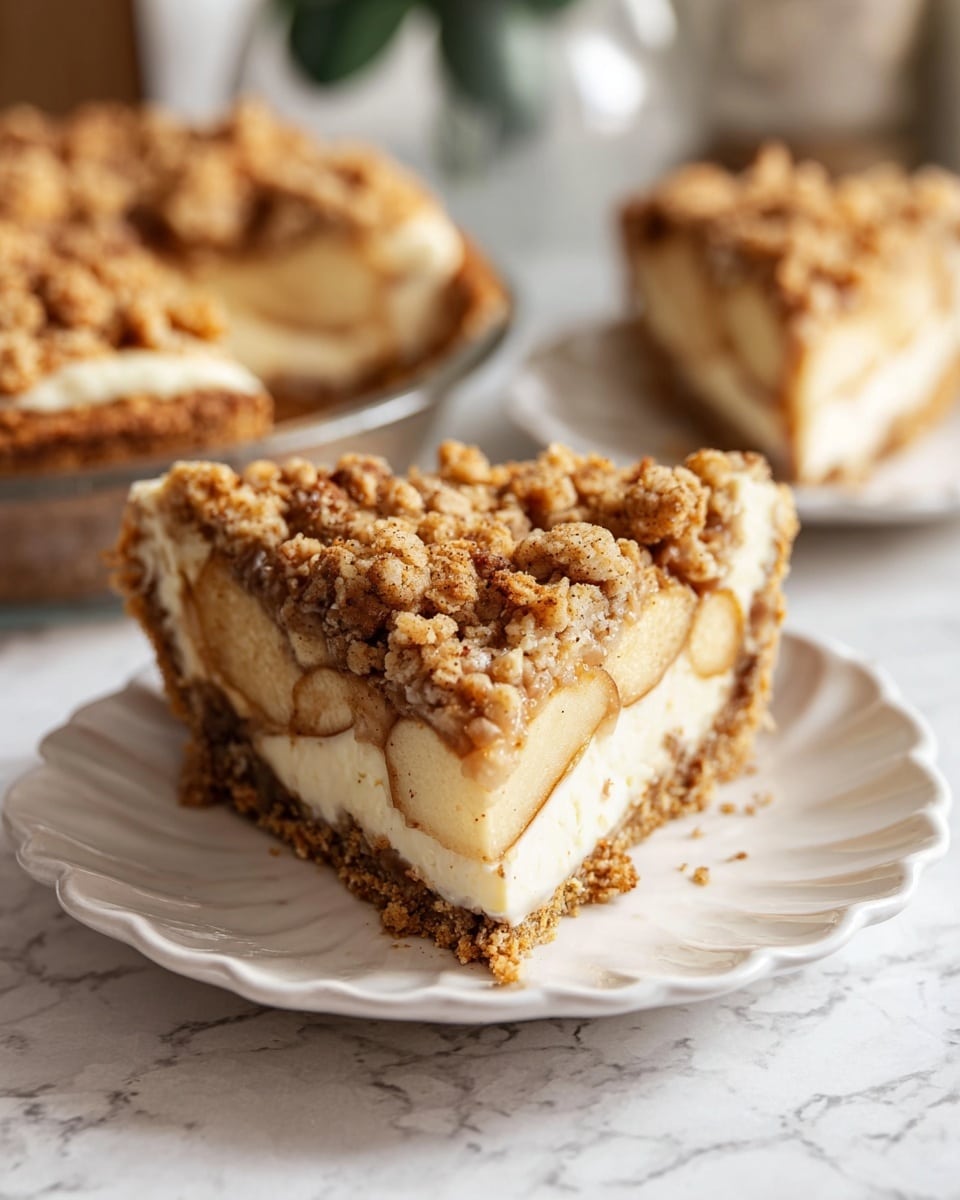
If you’re anything like me and have a soft spot for desserts that combine comfort with a little bit of flair, this Apple Crumble Cheesecake Recipe will feel like a warm hug on a plate. The rich, creamy cheesecake base meets the cozy spices of cinnamon and nutmeg, then gets topped with tender cooked apples and a buttery crumble that adds the perfect crunch. Every bite is like fall in bite-sized form, but honestly, I’ve made it year-round because who says warm flavors belong only to cooler months?
One of the things I absolutely love about this Apple Crumble Cheesecake Recipe is how versatile it feels — it’s a fantastic showstopper for dinners with family or friends, yet simple enough for a weekend treat. When I first tried baking this, I was surprised how the biscoff cookie crust added a caramelized depth that paired just beautifully with the tangy Greek yogurt in the cheesecake filling. Trust me, you’ll find this recipe rewarding whether you’re a cheesecake enthusiast or just looking to impress without fuss.
Why You’ll Love This Recipe
- Perfect Balance of Textures: The creamy cheesecake contrasts delightfully with the crisp apple slices and crumbly topping.
- Unique Biscoff Crust: Using biscoff cookies for the crust adds caramel notes that boost flavor without extra effort.
- Easy to Make Ahead: You can prep it in advance, making it a stress-free dessert for gatherings.
- Family Favorite: It’s a dessert that consistently gets rave reviews and happy requests for seconds.

Ingredients You’ll Need
All the ingredients for this Apple Crumble Cheesecake Recipe come together beautifully — from the buttery biscoff crust to the spiced cheesecake filling and the fruity apple topping. Picking fresh tart apples really makes a difference in creating that perfect tangy-sweet combo.
- Biscoff Cookies: These cookies make an irresistibly caramel-laced crust that’s different from your usual graham cracker base.
- Unsalted Butter: Melted and used both for the crust and crumble topping, it’s key for that rich, tender texture.
- All-purpose Flour: For a sturdy yet tender crumble topping.
- Brown Sugar: Provides warmth and sweetness in both the crumble and apple topping.
- Rolled Oats: Adds a bit of rustic texture to the crumble topping.
- Tart Apples: I recommend Granny Smith for their firmness and bright flavor that holds up well when cooked.
- Ground Cinnamon: Infuses the apples and cheesecake filling with cozy spice notes.
- Cornstarch: Helps thicken the apple topping to a jammy consistency.
- Cream Cheese: The base of the cheesecake, make sure it’s softened to room temperature for smooth mixing.
- Granulated Sugar: Sweetens the cheesecake filling evenly.
- Greek Yogurt: Adds a subtle tang and lightens the texture for a creamy bite.
- Vanilla Extract: Enhances the overall flavor and aroma.
- Ground Ginger and Nutmeg: Subtle warming spices that complement the apple and cinnamon perfectly.
- Eggs: Room temperature eggs help create the cheesecake’s smooth, silky texture.
Variations
I love playing around with this Apple Crumble Cheesecake Recipe depending on the season and my mood — it’s fun to make it your own! Whether you want to make it gluten-free or swap apples for another fruit, personalization is totally doable.
- Gluten-Free Version: I swapped plain rolled oats and gluten-free flour for the crumble topping with great success — it still kept its crumbly texture.
- Apple Swap: Pears work wonderfully too when you want a slightly softer, sweeter fruit topping.
- Spice It Up: Adding a pinch of ground cloves or cardamom in the cheesecake batter deepens the flavor for holiday occasions.
- Less Sweet Option: I sometimes cut back on the sugar in the apple topping for a tarter finish, which balances nicely with the creamy filling.
How to Make Apple Crumble Cheesecake Recipe
Step 1: Crafting the Biscoff Crust
Start by crushing your biscoff cookies finely — I usually pop them in a ziploc bag and take a rolling pin to them until the crumbs are almost powdery. Mixing in the melted butter is like magic; it transforms the crumbs into a wet sand-like texture you can press firmly into your springform pan. Don’t skip the step of lining your pan with parchment paper — it makes removing the cheesecake a breeze later on!
Step 2: Mixing the Crumble Topping
Whisk together melted butter with flour, brown sugar, and oats until it forms a thick crumble paste. Setting it aside to firm up while you prep the rest of the cheesecake ensures you get that satisfying crunch on top instead of a soggy mess. Trust me, this little patience pays off every time.
Step 3: Cooking the Apple Topping
Stir sliced apples with brown sugar, cinnamon, and cornstarch in a small pot over medium-high heat. You’ll want to cook until the apples soften just right—fork-tender but still holding shape—and the juices turn thick, jammy, and irresistible. Set them aside to cool before assembling so they don’t sink or bleed into the cheesecake batter.
Step 4: Preparing the Cheesecake Batter
In a large bowl, smooth out the softened cream cheese with sugar, Greek yogurt, vanilla, and warm spices until the texture is silky. The trick I learned? Make sure everything is at room temperature — it cuts down on lumps and gives you the creamiest batter. Then, beat in the eggs one at a time to keep things perfectly combined without overmixing.
Step 5: Assembly and Baking
Pour the cheesecake batter over your chilled biscoff crust, then arrange the cooled apple slices evenly on top. Gently crumble the crumble topping over those apples — don’t be shy with it, the more crumble, the better! Baking can feel a little long here, taking about 65-70 minutes, but placing a baking sheet on the lower oven rack helps catch any drips. You’ll know it’s done when the edges are set and the center still wiggles slightly like jello.
Step 6: Cooling and Chilling
Patience is key here — let your Apple Crumble Cheesecake cool completely at room temperature, then pop it in the fridge for at least 6 hours or overnight. This step is crucial for the cheesecake to fully set and develop its flavors. When ready, run an offset spatula around the edges to loosen it, then release the springform pan sides carefully before slicing.
Pro Tips for Making Apple Crumble Cheesecake Recipe
- Room Temperature Ingredients: Bringing cream cheese and eggs to room temperature makes mixing easier and prevents lumps.
- Don’t Skip the Parchment: Lining the pan ensures your cheesecake releases cleanly every time — no cracking or breaking.
- Cook Apples Gently: Watch the apples closely as they cook to keep them from turning mushy — you want tender but still sliceable pieces.
- Baking Jiggle Test: Pull the cheesecake out when the center jiggles slightly — it will firm up as it chills without cracking.
How to Serve Apple Crumble Cheesecake Recipe
Garnishes
I usually keep garnishes simple with this cheesecake because it’s already a star on its own — a dusting of powdered sugar or a light drizzle of caramel sauce works wonders. Fresh mint leaves add a pop of color and brightness that contrasts nicely with the warm spices, but it’s totally optional depending on your mood or occasion.
Side Dishes
This cheesecake pairs beautifully with a scoop of vanilla ice cream or a dollop of whipped cream to balance its richness. If you’re serving it at a brunch, fresh berries or a tangy berry compote on the side bring a lovely acidity that awakens the flavors.
Creative Ways to Present
For special occasions, I like to serve slices on pretty dessert plates with a sprinkle of extra crumble topping on the side and a cinnamon stick garnish for that festive look. A rustic wooden board presentation with apple slices arranged around the cheesecake slice adds to the cozy vibe, perfect for holiday get-togethers.
Make Ahead and Storage
Storing Leftovers
Leftover Apple Crumble Cheesecake keeps wonderfully in the fridge, tightly wrapped or in an airtight container, for up to 4 days. I usually slice what I want to eat and keep the rest wrapped well so the crumble topping stays some-what crisp.
Freezing
Freezing this cheesecake works great if you want to prep a batch ahead. I wrap it tightly in plastic wrap and then foil to prevent freezer burn. When frozen, it retains its flavor and texture really well for about 2 months.
Reheating
I typically let frozen slices thaw overnight in the fridge. If I want it warm, I pop a slice into the oven at low heat (about 300°F) for 10 minutes — this revives the crumble crunch without melting the cheesecake filling.
FAQs
-
Can I use a different type of cookie for the crust?
Absolutely! While biscoff cookies bring a unique caramel flavor and great texture, you can swap in graham crackers or digestive biscuits. Just be sure to crush them finely and combine with enough melted butter to hold the crust together well.
-
How do I prevent my cheesecake from cracking?
One of my top tips is to avoid over-mixing once you add the eggs and to bake at a moderate temperature. Also, letting the cheesecake cool gradually and refrigerate overnight helps prevent cracks. Using room temperature ingredients makes the batter smooth, which also reduces cracking.
-
What apples work best for the apple topping?
I recommend tart, firm apples like Granny Smith or Braeburn because they hold their shape after cooking and balance the sweet crumble and cheesecake nicely. Avoid overly sweet or soft apples that might turn mushy once cooked.
-
Can I make this recipe dairy-free or vegan?
This Apple Crumble Cheesecake Recipe relies on cream cheese and butter for its signature richness, so it’s tricky to make completely dairy-free without adjusting the entire recipe. However, there are dairy-free cream cheese substitutes and plant-based butters that might work if you’re up for experimenting.
-
How long does the cheesecake need to chill?
For best texture and flavor, chilling the cheesecake for at least 6 hours or overnight is ideal. This allows it to fully set, making slicing easier and enhancing the melding of the apple topping with the creamy filling.
Final Thoughts
This Apple Crumble Cheesecake Recipe holds a special place in my heart because it’s that cozy dessert you can count on to impress without stress. Whether you’re baking it for a holiday, a casual dinner, or just because, it never fails to bring smiles around the table. Give it a try — I’m confident you’ll be adding it to your go-to recipe list as much as I have!

Your email address will not be published. Required fields are marked *