
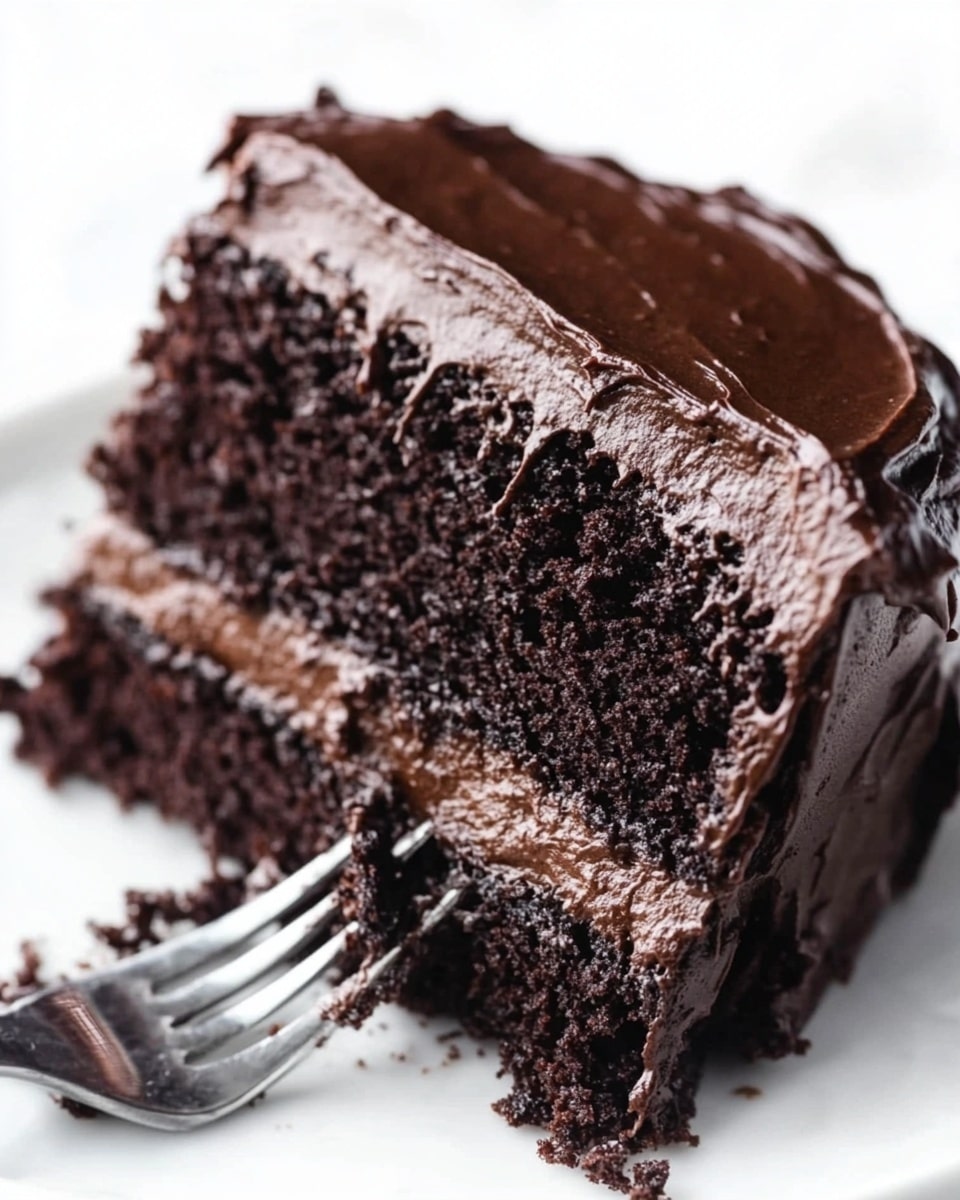
If you’re a chocolate lover like me, trust me when I say this Brooklyn Blackout Cake Recipe is an absolute game changer. I remember the first time I made this cake—it was the kind of dessert that makes you close your eyes and savor every bite. Rich, moist chocolate layers with that legendary pudding filling in the middle? Yep, it delivers exactly what you hope for in a truly decadent chocolate cake. Whether it’s a special occasion or just a moment you want to treat yourself, this recipe fits perfectly.
What makes this Brooklyn Blackout Cake Recipe so special is how it balances deep chocolate flavors without feeling too dense or overwhelming. Plus, the homemade pudding filling adds that silky, luscious texture that keeps everyone coming back for seconds. You’ll find that once you master this recipe, it becomes a go-to in your baking repertoire—trust me, my family goes crazy for it every time!
Why You’ll Love This Recipe
- Extra Moist Cake Layers: The hot coffee in the batter helps intensify the chocolate flavor and keeps the cake unbelievably moist.
- Silky Pudding Filling: Unlike many chocolate cakes, this one layers in a rich pudding that balances texture and flavor beautifully.
- Versatile and Make-Ahead Friendly: You can bake the cake layers a day ahead and chill before assembling, which is a lifesaver when hosting.
- Classic Brooklyn Charm: This recipe captures the nostalgic, timeless spirit of the original Brooklyn Blackout Cake, perfect for impressing friends and family.

Ingredients You’ll Need
For a dessert this decadent, each ingredient plays a starring role—from the cocoa powder that brings deep richness, to the buttermilk that keeps the crumb tender. When you shop, look for high-quality cocoa and chocolate to really punch up the flavor.
- All purpose flour: Provides structure but keeps the cake tender when balanced with the right wet ingredients.
- White sugar: Sweetens the cake while helping it brown beautifully.
- Unsweetened Dutch-process cocoa powder: Important for that full-bodied, less acidic chocolate flavor.
- Baking soda and baking powder: Together they ensure the cake rises perfectly without being too dense or crumbly.
- Salt: Enhances the chocolate flavor and balances the sweetness.
- Buttermilk (or half and half, or whole milk): Adds moisture and tenderness with a slight tang.
- Vegetable oil: Keeps the cake moist longer than butter alone.
- Eggs: Bind everything together and add richness.
- Vanilla extract: Boosts flavor complexity beyond just chocolate.
- Hot brewed coffee: Amplifies the chocolate flavor without making the cake taste like coffee.
- Boiling water: Used specifically for the pudding filling to help dissolve cocoa powder and sugar evenly.
- Bittersweet chocolate: Adds depth and richness to the pudding.
- Cornstarch: Thickens the pudding filling for that luscious texture.
- Unsalted butter: Used in both the filling and frosting for richness and smoothness.
- Semisweet chocolate: The base of the decadent frosting coating the cake.
- Corn syrup: Gives the frosting a glossy shine and helps keep it smooth and spreadable.
Variations
While I adore the classic version, I’ve found that you can really make this Brooklyn Blackout Cake Recipe your own by tweaking the filling or playing with the frosting. Don’t be afraid to experiment—it’s part of the fun!
- Dairy-Free Version: I swapped buttermilk for a mix of almond milk and lemon juice, and used dairy-free butter and chocolate for a friend with allergies. It turned out surprisingly rich!
- Stronger Coffee Flavor: One time I increased the brewed coffee to double the liquid in the batter. The cake developed a subtle mocha note that my husband absolutely loved.
- Adding Cherries: Mixing chopped maraschino cherries into the pudding filling gave the cake a nostalgic Black Forest twist—perfect if you want a fruity surprise inside.
- Mini Cakes: Baking this as cupcakes means faster baking times and adorable individual servings, plus perfect crumbs for coating.
How to Make Brooklyn Blackout Cake Recipe
Step 1: Prepare Your Cake Batter
Preheat your oven to 350°F and butter two 8-inch round cake pans, lining the bottoms with parchment paper discs to prevent sticking. I always whisk the dry ingredients—flour, sugar, cocoa, baking soda, baking powder, and salt—thoroughly in a large bowl to make sure everything is evenly distributed. Then in another bowl, whisk together the wet ingredients (buttermilk, vegetable oil, eggs, vanilla), except for the coffee. Slowly combine the wet into the dry, stirring as you go. When the batter is smooth, add the hot brewed coffee—it’ll thin out the batter, but that’s exactly what makes the cake moist and tender.
Step 2: Bake Your Cake Layers and Cupcakes
Set aside some batter to fill two cupcake liners—these little cupcakes are for making your cake crumbs later, so don’t skip them! Then divide the remaining batter equally between the two cake pans. Bake the cakes for around 35 minutes or until a toothpick inserted comes out clean. Pop the cupcakes in the oven after the cakes come out and bake for about 15 minutes until they spring back when touched. I like to cool the cake layers partially in the pans before transferring to a wire rack to cool completely. If you’re prepping ahead, refrigerate them after they cool—you’ll find this step saves you time on cake day.
Step 3: Whip Up the Chocolate Pudding Filling
While the cakes bake, start your pudding filling by whisking cocoa powder into boiling water or hot coffee in a saucepan over medium heat. Stir sugar, chopped bittersweet chocolate, and salt until melted and smooth. Mix cornstarch with cold water to make a thin slurry and whisk it in, then bring the pudding to a boil while stirring constantly. Boil for one minute so it thickens perfectly. I always finish by stirring in vanilla and butter off the heat for that smooth, glossy finish. Chill the pudding while you prepare the frosting.
Step 4: Prepare the Silky Chocolate Frosting
Melt the butter and chopped semisweet chocolate together gently—my favorite method is the microwave, stirring every 15 seconds after the first minute until silky smooth. Add hot water, corn syrup, and vanilla, then stir everything until glossy and well combined. This frosting chills quickly to a spreadable consistency in about 20-30 minutes. Trust me, it’s best to keep an eye on the texture here so it’s easy to spread but not runny.
Step 5: Assemble Your Brooklyn Blackout Cake
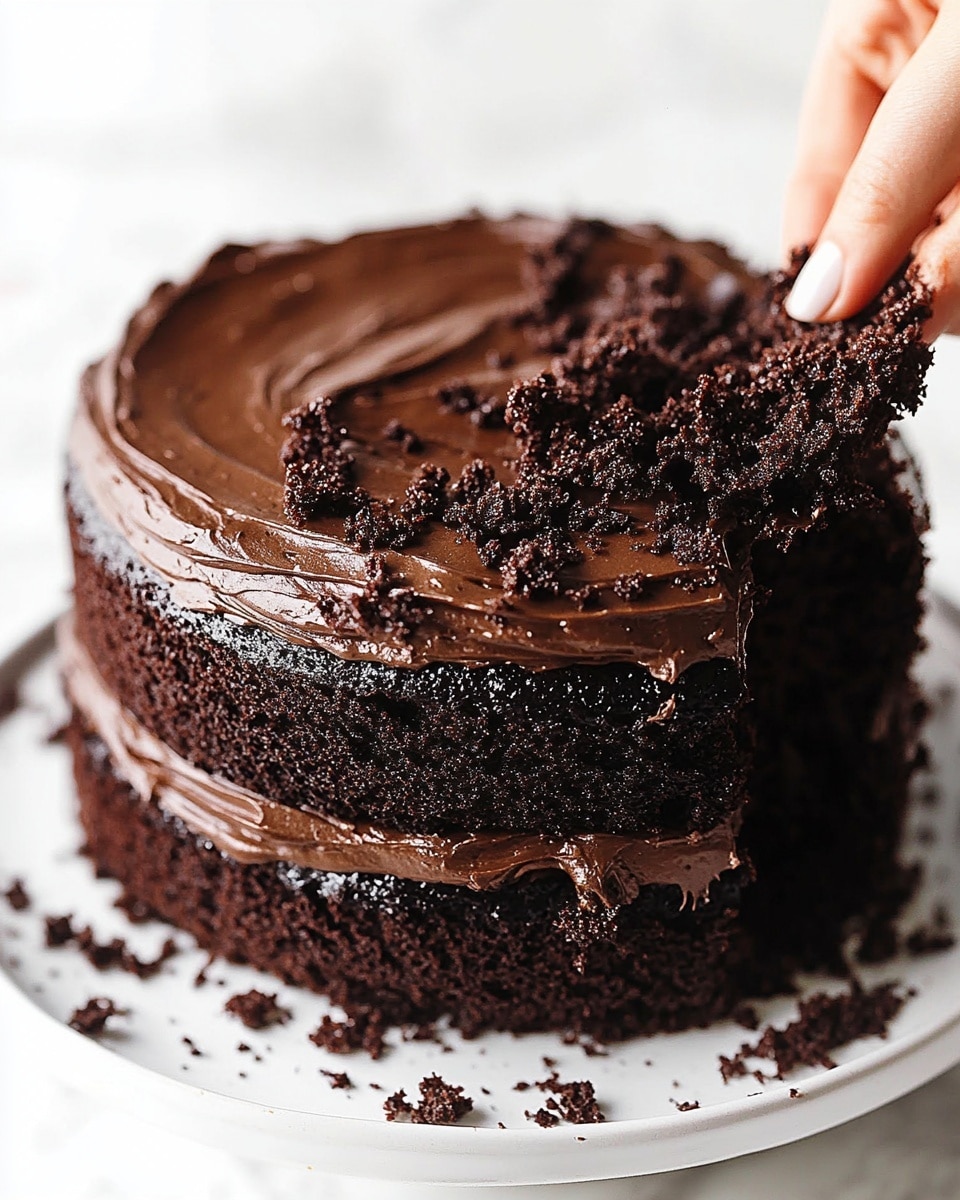
Now for the fun part! With your cupcakes cooled, pulse them in a food processor until you have fine, even crumbs—these get pressed onto the sides of the cake later and add that signature texture. Peel the parchment paper from the cake layers and place one flat side up. Spread a generous layer of pudding on top, not using all the filling so you don’t overload it. Top with your second cake layer, flat side up again. Gently smooth pudding on the sides, then press the crumbs all around. Finish by frosting the top generously and decorating with crumbs all over or just on the edges. Chill until ready to serve. I’ve learned it’s worth the wait—this cake tastes even better after it rests!
Pro Tips for Making Brooklyn Blackout Cake Recipe
- Use Dutch-Process Cocoa: I found this makes all the difference, giving the cake a deeper, richer chocolate flavor without bitterness.
- Don’t Skip the Cupcakes for Crumbs: Making the cake crumbs from cupcakes instead of store-bought crumbs keeps the texture and flavor fresh and authentic.
- Add Hot Coffee Gradually: Pour it in slowly while mixing to avoid curdling and ensure a smooth batter.
- Chill Frosting Before Spreading: This prevents it from running and makes frosting easier, especially on warm days.
How to Serve Brooklyn Blackout Cake Recipe
Garnishes
I usually keep garnishes simple since the cake is already rich, but I love sprinkling extra chocolate cake crumbs on top for that trademark look. Sometimes, I add a few fresh raspberries or a dusting of cocoa powder for a little pop of color and tartness that complements the chocolate.
Side Dishes
This cake pairs wonderfully with a lightly whipped cream or a scoop of vanilla bean ice cream. If you want something refreshing, a cup of freshly brewed black coffee or peppermint tea balances the richness beautifully. For parties, I like to serve it alongside some fresh fruit for texture contrast.
Creative Ways to Present
For birthdays or celebrations, I’ve decorated the cake with chocolate shavings and edible gold leaf for an elegant touch. I’ve also tried layering the cake in a trifle dish with extra pudding for a deconstructed version that looks stunning. Little chocolate curls and sprinkles shaped like stars can turn this into a festive centerpiece.
Make Ahead and Storage
Storing Leftovers
Once assembled, I store the Brooklyn Blackout Cake covered tightly with plastic wrap in the fridge. It stays fresh and moist for up to 4 days. In my experience, the flavors even deepen after a day chilling, so leftovers are always a treat!
Freezing
If you want to freeze it, I recommend wrapping the cake whole in several layers of plastic wrap and then foil. It freezes well for up to 2 months. When ready to serve, thaw overnight in the fridge to preserve texture and taste.
Reheating
I usually don’t reheat this cake because it’s best served chilled, but if you want to warm a slice lightly, 10 seconds in the microwave does the trick without melting the frosting or drying out the crumb.
FAQs
-
Can I use regular cocoa powder instead of Dutch-process in the Brooklyn Blackout Cake Recipe?
You can, but Dutch-process cocoa powder is preferred because it has a smoother, less acidic taste that complements the coffee and chocolate in this cake. If using natural cocoa, you might notice a slightly different, more bitter flavor, and you may want to adjust the baking soda accordingly.
-
Is it necessary to add hot coffee to the cake batter?
Yes, adding hot coffee intensifies the chocolate flavor and keeps the batter moist without imparting a strong coffee taste. It’s a classic trick that really elevates the overall richness of the Brooklyn Blackout Cake Recipe.
-
How do I store leftovers to keep the cake moist?
Store the cake in an airtight container or cover tightly with plastic wrap in the refrigerator. This helps retain moisture and prevents the frosting from drying out. Leftover slices can last up to 4 days when properly stored.
-
Can I make this cake ahead of time?
Absolutely! You can bake the cake layers a day or two in advance and keep them refrigerated. The pudding and frosting can also be made ahead. Assemble the cake a few hours before serving for best texture and flavor.
Final Thoughts
I absolutely love how this Brooklyn Blackout Cake Recipe turns out every time—it’s like having a slice of classic Brooklyn decadence right in your kitchen. The balance between the moist layers, silky pudding, and smooth frosting feels just right, never too sweet or heavy. I can’t recommend giving this nostalgic treat a try enough, especially if you want to impress friends with a show-stopping chocolate dessert. So, roll up your sleeves, get your cocoa ready, and enjoy baking this gem—you’ll be so glad you did!
Print
Brooklyn Blackout Cake Recipe
- Prep Time: 20 minutes
- Cook Time: 35 minutes
- Total Time: 55 minutes
- Yield: 16 servings
- Category: Dessert
- Method: Baking
- Cuisine: American
Description
The Brooklyn Blackout Cake is a decadent, rich chocolate cake featuring moist layers made with Dutch-process cocoa and brewed coffee, filled with a luscious chocolate pudding and frosted with a smooth chocolate buttercream. Topped with cake crumbs for added texture, this classic New York dessert is perfect for chocolate lovers seeking a deeply satisfying treat.
Ingredients
Dry Ingredients
- 1 3/4 cup all purpose flour
- 2 cups white sugar
- 3/4 cup unsweetened Dutch-process cocoa powder
- 2 tsp baking soda
- 1 tsp baking powder
- 1 tsp salt
Wet Ingredients
- 1 cup buttermilk, half and half or whole milk
- 1/2 cup vegetable oil
- 2 large eggs
- 1 tsp vanilla extract
- 1 cup hot brewed coffee
Pudding Filling
- 2 tablespoons unsweetened Dutch-process cocoa powder
- 1 cup boiling water or hot brewed coffee
- 6 Tbsp sugar
- 1 ounce bittersweet chocolate, chopped
- 1/4 tsp salt
- 2 Tbsp cornstarch
- 2 Tbsp cold water
- 1 tsp vanilla
- 1 Tbsp butter
Frosting
- 3/4 cup unsalted butter (1 1/2 sticks)
- 12 ounces semisweet chocolate, finely chopped
- 1/2 cup hot water
- 1 tablespoon corn syrup
- 1 tablespoon vanilla
Instructions
- Prepare Cake Pans: Preheat oven to 350°F. Butter two 8-inch round cake pans and line the bottoms with parchment paper discs to ensure easy cake removal.
- Mix Dry Ingredients: In a large bowl, whisk together flour, sugar, cocoa powder, baking soda, baking powder, and salt until well combined.
- Combine Wet Ingredients: In a separate bowl, whisk together buttermilk (or substitute), vegetable oil, eggs, and vanilla extract thoroughly, excluding the coffee at this stage.
- Make Batter: Gradually add the wet ingredients to the dry, mixing continuously to combine. Then slowly incorporate the hot brewed coffee, stirring until the batter is smooth and thin with no flour pockets.
- Prepare Cupcake Crumbs: Fill two cupcake papers with some of the batter and set aside; these will be baked later to create crumbs for decorating.
- Bake Cake Layers: Divide the remaining batter evenly between the two prepared 8-inch pans and bake for 35 minutes. Test doneness with a toothpick; it should come out clean without wet batter.
- Bake Cupcakes: Once the cake layers are done, bake the cupcakes for 15 minutes or until springy to the touch and a toothpick inserted comes out clean. Allow all cake elements to cool partially in pans.
- Cool Cakes: Turn the cake layers out onto a rack to cool completely before frosting. Cakes and cupcakes can be refrigerated for up to two days before assembly.
- Prepare Pudding Filling: In a medium saucepan over medium heat, whisk boiling water (or hot coffee) with cocoa powder. Stir in sugar, chopped bittersweet chocolate, and salt.
- Thicken Pudding: Mix cornstarch with cold water to form a slurry, then whisk it into the saucepan mixture. Bring to a boil, stirring constantly, and boil for one minute until thickened.
- Finish Pudding: Remove from heat, and whisk in vanilla extract and butter. Transfer pudding to a bowl and chill until set.
- Make Frosting: Melt butter and semisweet chocolate together in the microwave in short bursts, stirring until smooth. Whisk in hot water, corn syrup, and vanilla extract until combined.
- Chill Frosting: Refrigerate the frosting for 20-30 minutes to firm up to a spreadable consistency.
- Make Cake Crumbs: Process the baked cupcakes in a food processor until fine, even crumbs form. Set aside for decorating.
- Assemble Cake: Remove parchment from cake layers. Place one cake layer flat side up on a serving plate. Spread a layer of pudding filling over it (reserve some pudding).
- Add Second Layer and Coat Sides: Place the second cake layer, flat side up, on top. Lightly spread pudding around the sides and press crumbs onto the edges to coat completely.
- Frost Cake: Generously spread the prepared frosting over the top of the cake. Decorate the top with additional crumbs, either fully covered or just around the edges for a polished look.
- Chill Before Serving: Refrigerate the assembled cake until firm and ready to serve. Store leftovers in the refrigerator for up to 3-4 days.
Notes
- Recipe adapted from The New York Cookbook: From Pelham Bay to Park Avenue, Firehouses to Four-Star Restaurants.
- The use of brewed coffee intensifies the chocolate flavor without adding coffee taste.
- Make cupcakes aside to create crumbs for final decoration, adding texture and visual appeal.
- Cake layers and cupcakes can be made 1-2 days in advance and stored refrigerated to save prep time.
- Ensure pudding is fully chilled for easy spreading and to maintain cake structure.
- Keep assembled cake refrigerated and consume within 3-4 days for best flavor and texture.

Your email address will not be published. Required fields are marked *