

If you’re hunting for a festive and delicious treat that’ll wow your friends and family this holiday season, I have just the thing for you. This Christmas Tree Spice Cake Recipe is not only stunning to look at but also bursting with warm spices and creamy buttercream frosting that you’ll fall in love with from the very first bite. It’s the kind of cake that fills your kitchen with that cozy holiday scent and has my whole family going crazy for seconds. Stick with me, and I’ll walk you through every step so you can nail this showstopper too!
Why You’ll Love This Recipe
- Festive and Fun: The marbled green batter and tree shape make this cake a standout centerpiece at any holiday gathering.
- Rich, Spiced Flavor: With cinnamon, ginger, nutmeg, and a touch of apple sauce, every bite tastes like Christmas in a slice.
- Made Ahead Friendly: You can prep your layers and frosting days in advance, making the holiday chaos a little easier.
- Creative Decorating: The buttercream colors and piping give you tons of room to personalize your festive tree design.

Ingredients You’ll Need
The magic here lies in combining classic spice cake ingredients with the right balance of moisture and a little visual fun from food coloring. You’ll want fresh spices for the best aroma, and don’t skip the apple sauce—it keeps the cake extra tender.

- All-purpose flour: Provides structure; sift for fluffier layers.
- Granulated sugar: Balances sweetness and gives a slight crunch.
- Light brown sugar: Adds moistness and depth with a hint of molasses.
- Baking powder: Ensures your cake rises perfectly.
- Fine salt: Enhances the flavor complexity of spices.
- Ground cinnamon: The star spice of the season; fresh ground works best.
- Ground ginger: Adds warmth and a slight zing.
- Ground nutmeg: Adds subtle sweetness and aroma.
- Unsalted butter: Room temp for easy blending and rich flavor.
- Large eggs: They bind everything and add richness.
- Full-fat sour cream: Brings moisture and tenderness to the crumb.
- Unsweetened apple sauce: Adds natural sweetness and moisture without heaviness.
- Vegetable or canola oil: Keeps the cake soft and moist.
- Vanilla extract or vanilla bean paste: Enhances all the flavors warmly.
- Green gel food coloring: For that cheerful Christmas tree green vibe.
- Unsalted butter (for frosting): The base of that luscious, creamy finish.
- Powdered sugar: Sweet and smooth texture for perfect piping.
- Heavy whipping cream: Adds lightness and helps adjust frosting consistency.
- Gel food coloring (red, yellow, green): For all the festive frosting details.
Variations
I love that this Christmas Tree Spice Cake Recipe is versatile enough to adjust based on your vibe or dietary needs. Here’s how I’ve played around with it for different occasions or preferences.
- Gluten-Free Adaptation: I swapped the flour for a 1:1 gluten-free blend once; just add an extra teaspoon of baking powder to help with rise. It was a hit with my GF friends!
- Vegan Version: Using flax eggs and vegan butter replaced the dairy, and I substituted coconut yogurt for sour cream — the flavor stayed rich and festive.
- Spice Mix Variation: Try adding a pinch of cloves or cardamom for an extra layer of warmth; my family loved the slight twist last year.
- Frosting Fun: Instead of buttercream, cream cheese frosting gives a tangy finish that contrasts beautifully with the spices.
How to Make Christmas Tree Spice Cake Recipe
Step 1: Prepare Your Bakeware and Preheat
Start by preheating your oven to 350°F (175°C). Then, line your pans—one 8″, one 7″, two 6″, and two 4″ rounds—with parchment rounds and grease them lightly. I like to spray and lightly dust with flour to avoid any sticking. Having those different sizes really helps shape the iconic Christmas tree look we’ll build later.
Step 2: Mix Dry Ingredients and Cut in Butter
In a large bowl, whisk together your flour, sugars, baking powder, salt, and spices until fully combined. Then, with your mixer on low, slowly add the softened butter. I’ve learned that mixing butter in slowly keeps it from clumping and makes for a lovely, tender crumb.
Step 3: Incorporate Wet Ingredients and Mix Batter
Add in the eggs two at a time, mixing on low just until they disappear into the batter. Then fold in sour cream, apple sauce, oil, and vanilla. Take a moment to scrape down the bowl to catch anything clinging to the sides. Once mixed, beat on medium for about a minute to get a smooth batter. Here’s a tip: don’t overmix after adding eggs or apple sauce to avoid a dense cake.
Step 4: Color and Swirl the Batter
Separately tint half the batter with light green gel coloring and the other half a darker green. When I first tried this, I loved how playful the marble swirls became. Spoon dollops of each color into your pans, aiming for an even height (about an inch). Use an offset spatula or butter knife to gently swirl the two colors, making a beautiful marbled effect that’s perfect for your Christmas tree layers.
Step 5: Bake and Cool the Layers
Bake for 28-33 minutes, depending on your oven, until a toothpick inserted in the center comes out with a few moist crumbs. Let the cakes cool in the pans for 10 minutes, then run a spatula around the edges and invert onto a wire rack. Make sure the layers are fully cooled before leveling the tops with a serrated knife. I always keep a serrated knife handy; leveling makes such a difference in the final look and stack stability.
Step 6: Make the Buttercream Frosting
While your layers cool, beat the butter on medium speed until smooth, about 30 seconds. Add vanilla and salt, then gradually mix in the powdered sugar and cream on low until combined. I adjust the cream or sugar to get my frosting just right — not too stiff, not too runny, perfect for piping. Hold off on coloring until after the cake is crumb coated.
Step 7: Assemble and Crumb Coat Your Tree
On your cake board or flat plate, place the largest cake layer with a dollop of frosting to stick it down. Stack the remaining layers from largest to smallest, spreading frosting evenly between each. Insert a wooden dowel or a thick bubble tea straw through the center to keep everything stable—a trick I discovered after a tiny afternoon disaster! Then cover the tree with a thin layer of frosting (the crumb coat) and chill for 30 minutes until firm.
Step 8: Decorate and Pipe Like a Pro
Now for the fun part! Divide the leftover frosting into portions and tint with green, red, yellow, and white gel colors. Using your piping bags fitted with various tips, pipe rosettes and dollops all over your tree. I love using the open star tip for those lush green rosettes that look like pine needles, then adding festive red and yellow dots as ornaments. It’s so satisfying to see your cake come alive at this stage!
Pro Tips for Making Christmas Tree Spice Cake Recipe
- Room Temperature Ingredients: I always make sure eggs, butter, and sour cream are room temp; it helps everything mix more evenly and prevents lumps.
- Baking Time Vigilance: Check your cakes at the 28-minute mark to avoid overbaking; ovens vary, and moist crumbs are key.
- Stabilize Your Stack: Don’t skip the dowel or thick straw in the center—it saved me from a leaning cake disaster more than once.
- Swirling Colors: Use a gentle hand to swirl green batters; too much mixing loses the beautiful marbled effect we want.
How to Serve Christmas Tree Spice Cake Recipe

Garnishes
I love finishing my Christmas Tree Spice Cake with edible glitter or a dusting of powdered sugar “snow” to make it sparkle like fresh snow on a tree. Tiny festive sprinkles or silver dragées add that extra pizzazz without overwhelming the flavors.
Side Dishes
This cake pairs beautifully with warm mulled cider or a creamy cup of eggnog. If you’re serving a bigger holiday spread, a simple fresh fruit salad or spiced nuts balances the richness perfectly.
Creative Ways to Present
For a party, I like to set the cake on a rustic wooden board surrounded by mini cinnamon sticks and pine sprigs for a natural, festive look. Another fun idea is to assemble mini versions in cupcake form and decorate each as a tiny tree—super cute for kids!
Make Ahead and Storage
Storing Leftovers
Store any leftover cake covered tightly in the fridge for up to a week. I cover any cut sides with leftover frosting to keep it moist. Trust me, the flavors actually deepen after a day or two, so don’t stress if you can’t finish it all right away.
Freezing
If you want to freeze the cake layered and frosted, wrap it tightly in plastic wrap and then foil to protect it from freezer burn. It freezes beautifully for up to a month. Thaw overnight in the fridge for best results.
Reheating
Reheating isn’t usually necessary, but if you prefer a slightly warm slice, microwave small pieces for 8-10 seconds. That way, you get the creaminess of the frosting warmed without melting it completely.
FAQs
-
Can I make this Christmas Tree Spice Cake Recipe without food coloring?
Absolutely! The food coloring is purely for festive visual effect. The cake layers will still be delicious without it, although you’ll miss out on the pretty tree-green swirl effect.
-
Can I use this recipe for a regular layered cake?
Yes, you can! Just bake your layers in regular cake pans and frost normally. The spice cake is fantastic any time of year, not just Christmas.
-
How do I avoid a dense cake when using sour cream and applesauce?
Make sure not to overmix after adding wet ingredients, especially eggs, sour cream, and applesauce. Incorporate them just until combined, then give a short beat on medium speed to blend smoothly but keep the crumb light.
-
Is it okay to make the cake layers ahead of time?
Yes! I often make the layers a day or two in advance and freeze them. Just thaw about 20 minutes before assembling—the slight chill actually makes trimming and stacking easier.
-
What if I don’t have all the piping tips?
No worries! You can still pipe rosettes, dollops, or even spread frosting with a spatula. The cake will look stunning and taste amazing regardless of your decorating tools.
Final Thoughts
I absolutely love how this Christmas Tree Spice Cake Recipe brings holiday cheer both in flavor and festive flair. When I first tried making this, it felt like a real celebration in my kitchen—and it quickly became a new holiday tradition for my family. I hope you find it just as approachable and fun to make, even if baking isn’t usually your jam. Trust me, the smiles when you cut into this beautifully decorated, spiced wonder will make every little effort worth it. Go ahead and give it a try—you’ll be glad you did!
Print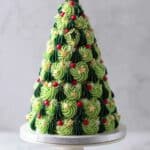
Christmas Tree Spice Cake Recipe
- Prep Time: 15 minutes
- Cook Time: 32 minutes
- Total Time: 1 hour 47 minutes
- Yield: 24 servings
- Category: Dessert
- Method: Baking
- Cuisine: American
Description
This festive Christmas Tree Cake features beautifully marbled spice cake layers in shades of green, stacked and shaped into a tapered Christmas tree form. The layers are generously filled and frosted with a rich, creamy buttercream tinted in green, red, yellow, and white for a vibrant, holiday-inspired decoration. Perfect for holiday gatherings, this cake combines warming spices, moist textures, and colorful frosting techniques to create an impressive centerpiece dessert.
Ingredients
Spice Cake Layers
- 3 cups all-purpose flour (375g)
- 1 1/2 cups granulated sugar (300g)
- 1 1/2 cups packed light brown sugar (300g)
- 2 1/2 tsp baking powder (10g)
- 1 tsp fine salt (6g)
- 2 tsp ground cinnamon (6g)
- 1 tsp ground ginger (3g)
- 1/2 tsp ground nutmeg (2g)
- 1/2 cup unsalted butter, room temperature (113g)
- 4 large eggs, room temperature (224g)
- 1 cup full-fat sour cream, room temperature (255g)
- 1/2 cup unsweetened apple sauce (90g)
- 1/2 cup vegetable or canola oil (105g)
- 1 tsp vanilla extract or vanilla bean paste (4g)
- Green gel food coloring (amount as needed)
Buttercream Frosting
- 3 cups unsalted butter, room temperature (678g)
- 1 Tbsp vanilla extract or vanilla bean paste (12g)
- 1 tsp fine salt (3g)
- 10 cups powdered sugar (1250g)
- 1/2 cup heavy whipping cream, room temperature (120g)
- Green, yellow, and red gel food coloring (amounts as needed)
Instructions
- Prepare Cake Pans and Preheat Oven: Preheat the oven to 350°F (175°C). Line one 8-inch, one 7-inch, two 6-inch, and two 4-inch cake pans with parchment paper rounds and grease with non-stick baking spray to prevent sticking.
- Mix Dry Ingredients: In a large bowl, whisk together the flour, granulated sugar, brown sugar, baking powder, salt, cinnamon, ginger, and nutmeg until fully combined to evenly distribute spices and leavening agents.
- Add Butter: Slowly add the room temperature unsalted butter to the dry ingredients while mixing on low speed. Continue mixing until no large butter chunks remain, creating a crumbly batter base.
- Incorporate Eggs: Add eggs two at a time on low speed, mixing just until incorporated to avoid overmixing which can lead to tough cake layers.
- Add Wet Ingredients: Mix in sour cream, unsweetened applesauce, vegetable oil, and vanilla extract on low speed until just combined.
- Blend Batter Thoroughly: Scrape down the bowl with a rubber spatula and beat on medium speed for about one minute to ensure a smooth, homogenous batter.
- Divide and Color Batter: Divide the batter into two portions. Tint one half with light green gel food coloring and the other with a darker green shade to create a striking marbled effect in the cake layers.
- Fill Pans with Batter: Spoon alternating dollops of light and dark green batter evenly into each prepared pan, filling to about 1-inch height. Use a butter knife or offset spatula to swirl the colors together, achieving a marbled pattern.
- Bake the Cake Layers: Bake in the preheated oven for 28-33 minutes. Test doneness by inserting a toothpick into the center; it should come out with a few moist crumbs.
- Cool the Cake Layers: Let the cakes cool in their pans for 10 minutes. Run an offset spatula around each pan’s edge to loosen, then invert onto wire racks to cool completely. Once cooled, use a serrated knife to level the tops.
- Trim and Shape Layers: Stack the leveled layers and trim sides to create a tapered Christmas tree shape. Cake layers can be made ahead and frozen; thaw 20 minutes before assembling.
- Make Buttercream Frosting: Beat unsalted butter on medium speed for 30 seconds until smooth. Add vanilla extract and salt, mixing well.
- Add Powdered Sugar and Cream: Gradually add powdered sugar and heavy cream on low speed, mixing until smooth. Adjust consistency by adding cream or sugar as needed. Save frosting coloring until after stacking.
- Stack and Crumb Coat Cake: On a greaseproof cake board, fix largest cake layer with frosting. Stack layers from largest to smallest, spreading even layers of buttercream between each. Insert a wooden dowel or thick straw through center for stability.
- Chill Cake: Apply a thin crumb coat over the entire cake and smooth it out. Chill in the fridge for 30 minutes or freezer for 10 minutes until firm to touch.
- Color Remaining Frosting: Divide remaining buttercream to color red, yellow, light green, and dark green using gel food colors. Fit each color into appropriate piping bags with specified tips.
- Pipe Decorations: Using the green frostings with open star tips, pipe rosettes around the cake. Fill in gaps with red, yellow, and white dollops for festive embellishments.
Notes
- You can use either a stand mixer or handheld mixer; the paddle attachment works best for batter and frosting but a whisk or hand mixer is fine.
- Make cake layers ahead of time and freeze to simplify the process and improve workflow.
- Buttercream can be stored in an airtight container in the fridge for up to two weeks or frozen for up to a month; stir well after thawing.
- A frosted cake lasts up to one week refrigerated or one month frozen; the buttercream helps keep it moist.
- Cover any leftover cake sections with leftover frosting to maintain moisture during storage.
Nutrition
- Serving Size: 1 slice (approx. 1/24th of cake)
- Calories: 480 kcal
- Sugar: 38 g
- Sodium: 210 mg
- Fat: 28 g
- Saturated Fat: 16 g
- Unsaturated Fat: 10 g
- Trans Fat: 0.5 g
- Carbohydrates: 55 g
- Fiber: 1.5 g
- Protein: 4 g
- Cholesterol: 85 mg

Your email address will not be published. Required fields are marked *