

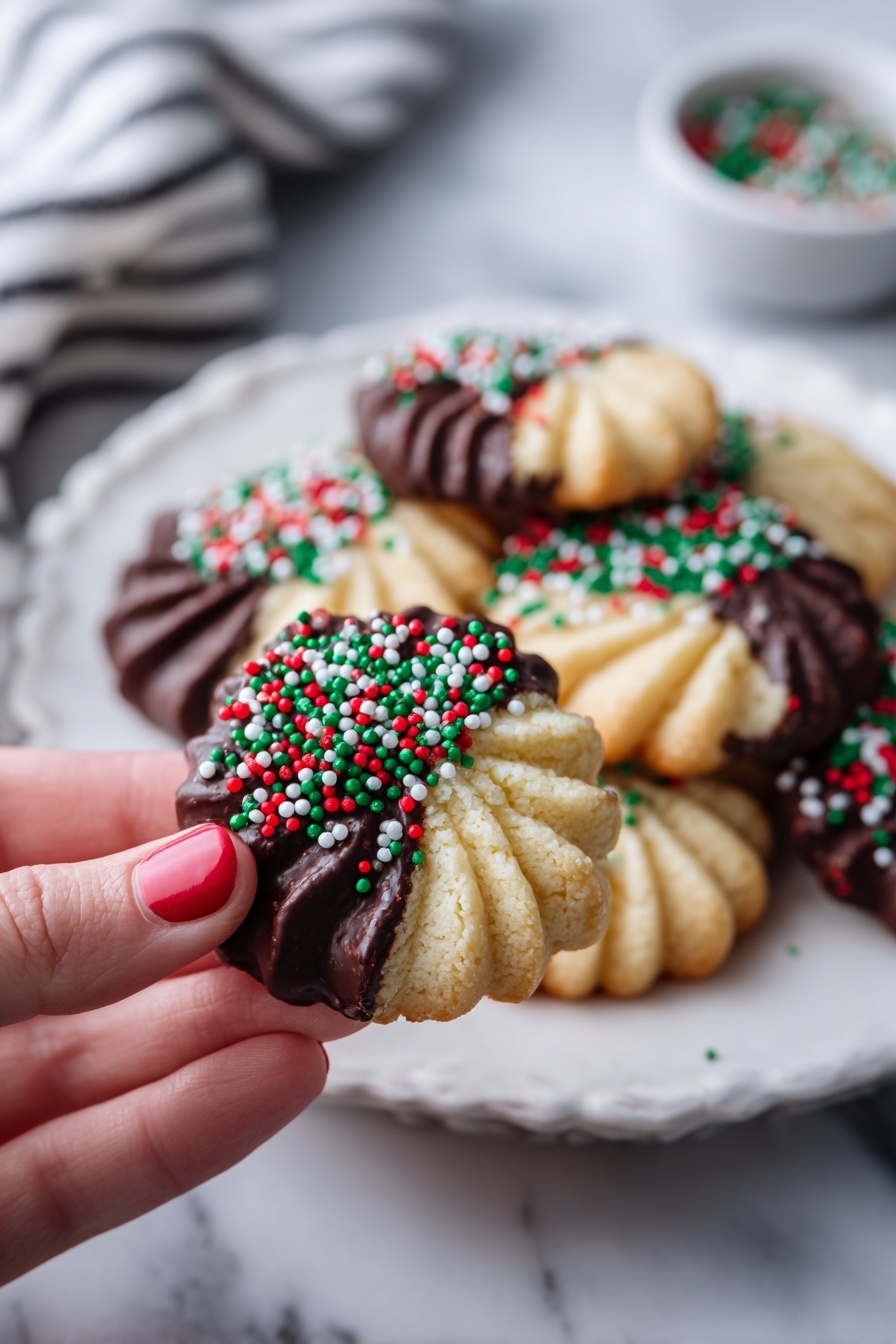
If you’re looking for a delightful treat that melts in your mouth and has that perfect buttery crunch, then you’re in for a real treat with my Danish Butter Cookies with Chocolate Chrome Recipe. I absolutely love how these cookies combine the rich, tender butteriness of classic Danish cookies with the glossy, decadent touch of chocolate — it’s a match made in cookie heaven! Plus, the colorful sprinkles add that joyful pop that makes them irresistible for both grown-ups and kids alike. Stick around, because I’m going to walk you through every step to make sure your batch comes out perfect every single time.
Why You’ll Love This Recipe
- Perfectly Buttery Texture: The combination of room temperature butter and gentle mixing creates that iconic Danish cookie melt-in-your-mouth crumb.
- Chocolate Chrome Finish: Dipping the cookies in melted chocolate gives an elegant, shiny finish that’s both tasty and visually stunning.
- Simple Yet Impressive: You’ll find this recipe easy to follow with manageable steps that deliver bakery-quality cookies at home.
- Great for Gifting and Parties: These cookies look adorable with sprinkles and make perfect gifts or festive snacks that always get compliments.

Ingredients You’ll Need
The magic behind the Danish Butter Cookies with Chocolate Chrome Recipe lies in using quality ingredients that balance rich butteriness with a touch of sweetness and the smooth chocolate finish. Here’s a quick rundown of what you’ll want on hand, along with tips I’ve learned for picking the best items.
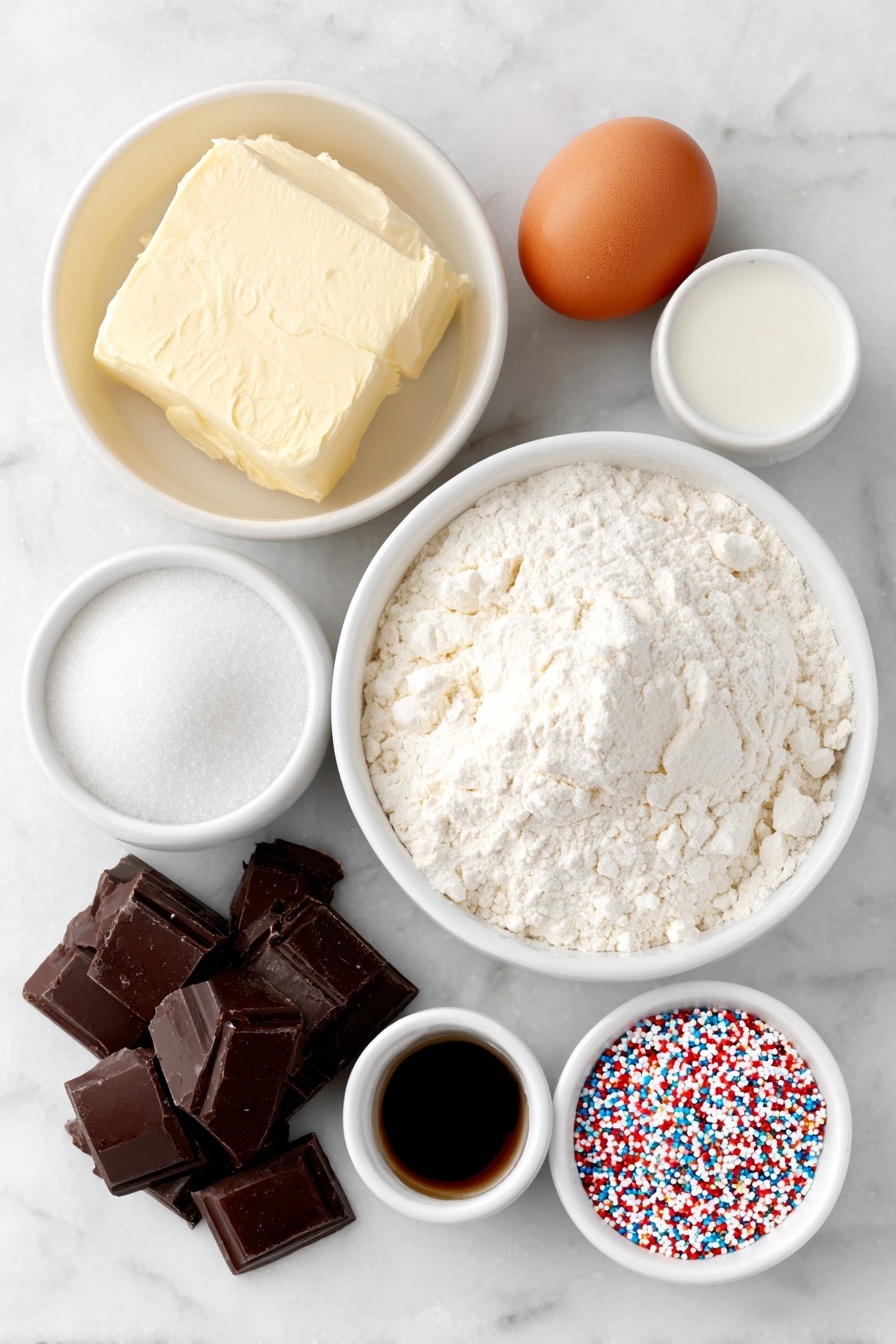
- Unsalted Butter: Make sure it’s at room temperature for easy creaming, which helps achieve that light, airy dough texture.
- Granulated Sugar: You can’t skip it — it adds sweetness plus helps create a slight crisp edge on the cookies.
- Large Egg: Also room temperature, this binds the dough while keeping it tender.
- Vanilla Extract: Pure vanilla extract makes a world of difference in flavor — trust me, avoid imitation for these cookies.
- All-Purpose Flour: The base for your dough; nothing fancy needed, just fresh and sifted if you want extra lightness.
- Salt: Just a pinch to balance the sweetness and enhance the buttery flavor.
- Milk: Tiny amount to loosen the dough just enough to pipe perfectly without spreading too much.
- Semi-Sweet or Milk Chocolate: For that gorgeous chocolate chrome coating; pick a quality chocolate you love to eat on its own.
- Sprinkles: Optional but so fun — they add a festive flair and texture contrast that my family can’t get enough of.
Variations
One thing I truly enjoy about the Danish Butter Cookies with Chocolate Chrome Recipe is how easy it is to tweak to your own taste or dietary needs. You’ll find that small changes can give your batch a whole new vibe without complicating things.
- Nutty Twist: I sometimes add finely chopped almonds or hazelnuts to the dough for a subtle crunch and extra richness — you might love it too!
- Chocolate Variations: Swap semi-sweet for dark chocolate or even white chocolate for dipping to suit your preference or mood.
- Gluten-Free Adaptation: I’ve experimented using gluten-free flour blends with decent success; just watch the dough consistency as you may need a touch more milk.
- Flavor Infusions: Try adding a pinch of cinnamon or orange zest into the dough for seasonal flair that surprises and delights.
How to Make Danish Butter Cookies with Chocolate Chrome Recipe
Step 1: Cream Butter and Sugar Until Light and Airy
Start by using a stand mixer with a paddle attachment or a hand mixer. Beat your room temperature unsalted butter and granulated sugar together for about 3-4 minutes. You’ll know it’s ready when the mixture looks pale and fluffy. This part is crucial because it introduces air that gives the cookies their tender crumb. Don’t rush it — patience here pays off beautifully.
Step 2: Add Egg and Vanilla for Flavor and Texture
Next, crack in your large room temperature egg and pour in the vanilla extract. Mix again until everything is combined, but don’t overbeat — just enough for a smooth, creamy consistency is perfect. The egg helps bind your dough and the vanilla amps up that classic cookie aroma I love.
Step 3: Incorporate Flour, Salt, and Milk Gently
Sift in the all-purpose flour and sprinkle the salt over the mixture. Mix on low speed just until you see no more flour streaks — overmixing can make your cookies tough. Then, add in the milk. The dough should be just pipeable but not runny. If it feels too stiff, add milk a teaspoon at a time, mixing well between additions. I discovered this trick when my dough was too thick — just a tiny splash of milk makes piping much easier without compromising shape.
Step 4: Pipe the Dough and Chill Before Baking
Transfer your dough to a piping bag fitted with a large star tip—Ateco 849 or Ateco 826 work wonders here. Pipe 2-inch swirls directly onto a baking sheet (avoid parchment paper here; the dough clings better to the metal). Leave about 3 inches between each cookie so they have room to bake without touching. Then pop the sheet into the fridge for 15-20 minutes. This chilling step is a game-changer to stop the cookies from spreading too much and help them hold their pretty shape.
Step 5: Bake Until Golden and Let Cool
Preheat your oven to 350°F (175°C). Bake the cookies for about 15 minutes, or until the edges turn a lovely golden brown. Once out of the oven, let them rest for 10 minutes on the baking sheet—this helps them firm up—and then transfer to a wire rack to cool completely before handling. I learned from experience that rushing this step can cause breakage, so patience is your ally.
Step 6: Melt Chocolate and Dip for That Chocolate Chrome Finish
While your cookies cool, melt your chopped chocolate using a double boiler or microwave in 20-second bursts, stirring after each. When smooth and glossy, dip about two-thirds of each cookie into the chocolate and place them on parchment paper to set. Sprinkle immediately with your colorful sprinkles for a playful touch and let them dry completely. This final step gives the cookies their signature “chocolate chrome” allure — trust me, it’s worth the little extra effort!
Pro Tips for Making Danish Butter Cookies with Chocolate Chrome Recipe
- Use Room Temp Butter: I used to struggle with dough consistency until I made sure my butter was soft, but not melted, striking that perfect balance for easy creaming.
- Chill Your Cookies: When I skipped chilling before baking, my cookies spread and lost shape — the fridge step stops this and gives you those distinct swirled edges.
- Pipe Directly on Baking Sheet: I discovered baking directly on the metal sheet (no parchment) helps cookies stick slightly and prevents them from sliding around and flattening.
- Manage Milk Addition: Adding milk little by little helps avoid a runny dough that spreads; it’s the secret to that perfect texture I learned after several tries.
How to Serve Danish Butter Cookies with Chocolate Chrome Recipe
Garnishes
I usually keep it classic with some colorful jimmies or nonpareil sprinkles for a festive look, especially during holidays. Sometimes I go for crushed pistachios or toasted coconut flakes for a slightly gourmet twist. These little touches elevate the appearance and bring extra texture that’s always a hit.
Side Dishes
These Danish Butter Cookies with Chocolate Chrome Recipe pair wonderfully with a hot cup of coffee or a lightly spiced chai tea. If you’re serving at a party, a bowl of fresh berries or a light fruit salad balances the richness nicely. My kids love having them alongside cold milk — a timeless combo!
Creative Ways to Present
For special occasions, I like arranging the cookies on a pretty tiered stand dotted with fresh herbs like mint or edible flowers to make them feel extra fancy. Wrapping small stacks in cellophane tied with a ribbon also makes charming edible gifts. It’s amazing how a little creativity in presentation can make these humble cookies a real conversation starter.
Make Ahead and Storage
Storing Leftovers
Once cooled and fully set, I keep leftover Danish Butter Cookies with Chocolate Chrome Recipe in an airtight container at room temperature. They stay wonderfully crisp for up to a week — perfect for nibbling over several days. Just be sure to keep them away from humid spots to maintain that coveted crunch.
Freezing
I’ve found these cookies freeze brilliantly. Before dipping in chocolate, pipe and freeze the shaped dough on a tray. Once solid, transfer to a freezer-safe bag. When ready, bake them straight from frozen, adding a couple extra minutes baking time. You can also freeze fully baked and decorated cookies between parchment layers to avoid sticking — just thaw at room temperature before serving.
Reheating
If you want to refresh your cookies after storage, a quick 3-4 minutes in a 300°F oven does wonders to crisp them up again without melting the chocolate. Avoid microwaving as the chocolate can soften unevenly. Trust me, this reheating tip keeps them tasting freshly baked.
FAQs
-
Can I use salted butter for this Danish Butter Cookies with Chocolate Chrome Recipe?
You can use salted butter if that’s what you have on hand, but I recommend reducing or omitting the added salt in the recipe to avoid over-salting. Unsalted butter gives you more control over the flavor balance, which is especially important in delicate recipes like these cookies.
-
What if I don’t have a piping bag or tip?
If you don’t have a piping bag, a sturdy plastic sandwich bag with a small corner snipped off works well in a pinch. For the tip, using a star-shaped nozzle helps create those beautiful swirls, but even a round opening produces tasty cookies—just be sure to adjust the milk for consistency if needed.
-
How do I prevent my cookies from spreading too much?
Chilling the piped dough before baking is key to preventing spreading. Also, avoid adding too much milk to your dough—stick to the minimum needed for piping consistency. Finally, baking sheets should be cool and not double-stacked in the oven to ensure even heat distribution.
-
Can I flavor the chocolate for dipping?
Absolutely! Adding a drop of peppermint extract, a sprinkle of sea salt, or crushed nuts into the melted chocolate creates delicious variations of your chocolate chrome that elevate the cookies for holidays or special occasions.
-
How long do these Danish Butter Cookies with Chocolate Chrome Recipe last?
Properly stored in an airtight container at room temperature, these cookies stay fresh and delicious for about 5-7 days. Freezing can extend their life up to 3 months, although best enjoyed within the first month for optimal texture.
Final Thoughts
When I first tried making Danish Butter Cookies with Chocolate Chrome Recipe, I was amazed at how a few simple ingredients and small tricks could yield cookies so buttery, crisp, and elegantly finished. My family goes crazy for them during holidays and casual teatime alike. Now, I’m excited to share this recipe with you so you can bring a bit of that magic into your kitchen too. Give it a go, and don’t forget to savor every buttery, chocolaty bite — you’re going to love the warmth and joy these cookies bring!
Print
Danish Butter Cookies with Chocolate Chrome Recipe
- Prep Time: 20 minutes
- Cook Time: 15 minutes
- Total Time: 55 minutes
- Yield: 22 cookies
- Category: Dessert
- Method: Baking
- Cuisine: Danish
Description
Classic Danish Butter Cookies are rich, buttery, and crisp delights perfect for any occasion. Made with simple ingredients like butter, sugar, and flour, these cookies are piped into elegant swirls, chilled to maintain their shape, and baked until golden. Enhanced with a smooth chocolate dip and colorful sprinkles, they offer a delightful balance of buttery richness and sweet decoration.
Ingredients
Cookie Dough
- 1 cup unsalted butter, room temperature
- ⅔ cup granulated sugar
- 1 large egg, room temperature
- 1 teaspoon vanilla extract
- 2 cups all-purpose flour
- ¼ teaspoon salt
- 2 teaspoons milk
Decoration
- 3 oz semi-sweet or milk chocolate
- 3 tablespoons sprinkles
Instructions
- Creaming the Butter and Sugar: Using a stand mixer with a paddle attachment or a hand mixer, cream together 1 cup of room temperature unsalted butter and ⅔ cup granulated sugar. Beat for a few minutes until the mixture is light, fluffy, and airy, which helps to create a tender cookie texture.
- Adding Egg and Vanilla: Add 1 large room temperature egg and 1 teaspoon vanilla extract to the creamed mixture. Mix again until all the ingredients are well combined, ensuring a smooth and consistent batter.
- Incorporating Dry Ingredients: Add 2 cups all-purpose flour and ¼ teaspoon salt to the bowl. Mix on low speed until the dough just comes together; avoid overmixing to prevent tough cookies.
- Adjusting Dough Consistency: Add 2 teaspoons of milk and mix gently. The goal is to achieve a pipeable dough consistency that is not runny. If needed, add a little more milk (1-2 teaspoons) sparingly to help the dough flow easily through the piping nozzle.
- Preparing to Pipe: Transfer the dough to a piping bag fitted with a large piping tip (such as Ateco 849 or 826). If you don’t have these, a Wilton 1M tip can be used, although it may require slightly thinned dough and could cause spreading during baking.
- Piping the Cookies: Pipe 2-inch swirls directly onto a baking sheet without parchment paper, spacing them about 3 inches apart. Piping directly onto the baking sheet helps the dough stick better and hold its shape.
- Chilling the Cookies: Place the baking sheet with piped cookies in the refrigerator for 15-20 minutes. This crucial step helps the cookies maintain their shape and prevents spreading during baking.
- Preheating and Baking: Preheat your oven to 350°F (175°C). Bake the chilled cookies for approximately 15 minutes or until they are golden brown around the edges, indicating they are crisp and done.
- Cooling the Cookies: Remove the cookies from the oven and allow them to cool on the baking sheet for about 10 minutes. Then transfer them onto a wire rack to cool completely, ensuring a crisp texture.
- Melting the Chocolate: While the cookies cool, melt the 3 oz chopped semi-sweet or milk chocolate using a double boiler or microwave. For microwave melting, heat in 20-second increments, stirring after each until smooth and fully melted.
- Dipping and Decorating: Dip approximately two-thirds of each cookie into the melted chocolate and place them on parchment paper to set. Decorate immediately with sprinkles before the chocolate hardens. Allow the chocolate coating to dry completely before serving or storing.
Notes
- Using a wide piping tip like Ateco 849 or 826 makes it easier to pipe thicker dough, which helps the cookies maintain their shape during baking.
- If using a Wilton 1M tip, the dough will need to be thinned by adding more milk, but this can cause the cookies to spread more while baking.
- Piping directly onto a bare baking sheet (not parchment) helps the cookies stick better and hold their shape.
- If the dough is too thick to pipe smoothly, return it to the bowl, add 1-2 teaspoons of milk, mix well, and re-pipe.
- Always chill the piped cookies before baking to prevent spreading and preserve the cookie shape.
Nutrition
- Serving Size: 1 cookie
- Calories: 110
- Sugar: 7g
- Sodium: 40mg
- Fat: 7g
- Saturated Fat: 4.5g
- Unsaturated Fat: 2g
- Trans Fat: 0g
- Carbohydrates: 12g
- Fiber: 0.3g
- Protein: 1.2g
- Cholesterol: 25mg

Your email address will not be published. Required fields are marked *