
This delightful Easter Bunny Bark combines the perfect balance of sweet white chocolate with zesty lemon cookies to create an adorable treat that’s as fun to make as it is to eat. The cute bunny bottoms with their fluffy tails and tiny feet poking out from cookie “bodies” make this a showstopper dessert that requires no baking and comes together in just about an hour!
Why You’ll Love This Recipe
- No Baking Required: This is completely no-bake, making it perfect for when you don’t want to turn on the oven or when you’re crafting with kids.
- Customizable: Feel free to switch up cookie flavors, colors, and decorations to match your personal preferences or holiday theme.
- Adorably Festive: The bunny butts design is not only cute but guaranteed to bring smiles to everyone’s faces – perfect for Easter gatherings!
- Gift-Worthy: Package these up in cellophane bags with pretty ribbons for the sweetest homemade Easter gifts.

Ingredients You’ll Need
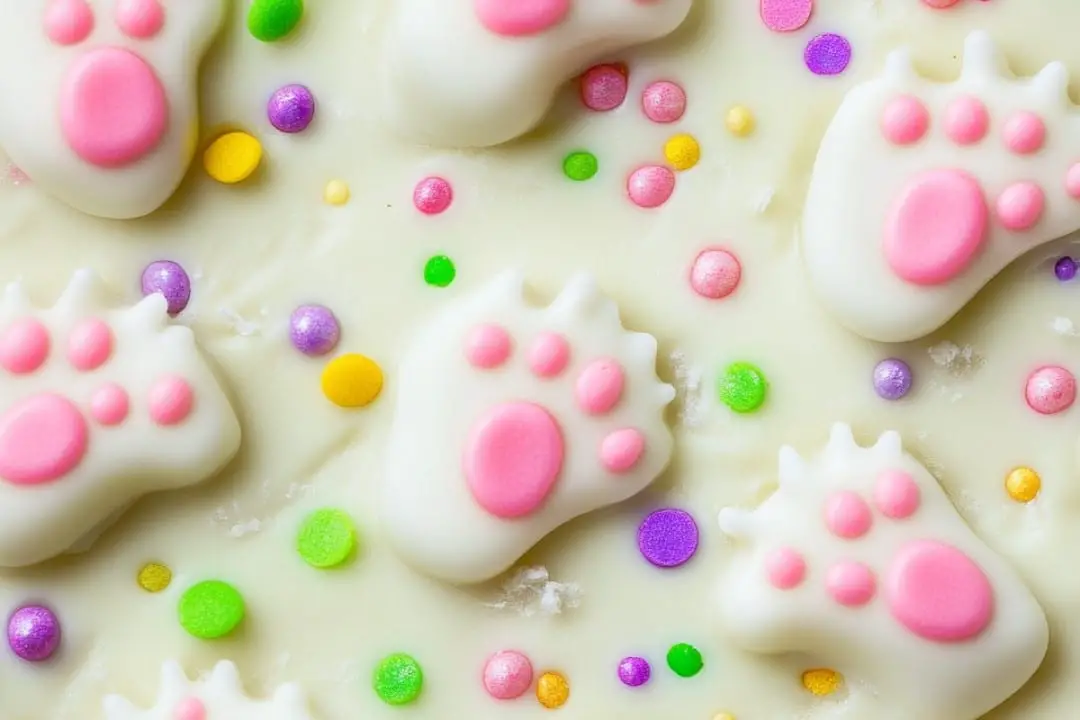
- White Almond Bark or White Melting Chocolate: Forms the base of your bark and creates the bunny parts. High-quality melting chocolate will give you the smoothest results.
- Pink Candy Melts: Creates the adorable little bunny toe pads – the perfect touch of color that makes this treat extra special.
- Lemon Oreos or Lemon Sandwich Cookies: These become the “body” of your bunny and add a refreshing citrus flavor that balances the sweetness of the chocolate. The yellow color also adds a nice spring touch.
- Easter Grass Sprinkles: Adds that festive Easter feel and creates the perfect “environment” for your bunny butts. These green sprinkles make the bark look like bunnies playing in spring grass.
Variations
Want to switch things up? Here are some creative twists:
- Cookie Swap: Try golden Oreos, chocolate Oreos, or even shortbread cookies as your base.
- Color Play: Use blue, purple, or yellow candy melts instead of pink for different colored bunny toes.
- Mini Version: Make tiny individual barks using mini Oreos for bite-sized treats.
- Chocolate Lovers: Use milk or semi-sweet chocolate for the base instead of white chocolate for a different flavor profile.
How to Make Easter Bunny Bark
Step 1: Create the Bark Base
Melt 1 pound of white chocolate in a microwave-safe bowl, stirring every 30 seconds until smooth. Line a baking sheet with parchment paper and arrange your lemon cookies with space between them. Pour the melted white chocolate over the cookies, filling in all the spaces. Tap the pan gently on your counter to level the chocolate.
Step 2: Add Grass Details
While the chocolate is still soft, sprinkle the Easter grass sprinkles around (but not on) the cookies. This creates the illusion of bunnies playing in grass. Let this layer begin to set.
Step 3: Create Bunny Feet
Melt the remaining white chocolate and the pink candy melts in separate bowls. Transfer each to a small zip-top bag and snip a tiny corner off each. On a parchment-lined tray, pipe 12 sets of white oval pairs to make bunny feet. Tap gently to level, then add four pink dots to each pair to create toe pads.
Step 4: Add Bunny Tails
Using the white chocolate bag, pipe a round bunny tail onto each cookie. Make them nice and fluffy-looking by using a swirling motion.
Step 5: Assemble
Once the feet have chilled for about 5 minutes, use a small dab of melted white chocolate to attach them to the cookies. Chill the entire bark for 30 minutes until completely set.
Step 6: Cut and Serve
Use a knife dipped in hot water (and dried) to cut around each bunny butt, separating them from the main bark. The warm knife slides through the chocolate easily without cracking.
Pro Tips for Making the Recipe
- Temperature Matters: Be careful not to overheat your chocolate – melt it slowly in short bursts to prevent it from seizing.
- Work Quickly: Have all your decorations ready before you start melting chocolate, as it sets fairly quickly.
- Piping Skills: If you’re new to piping, practice the bunny feet pattern on parchment paper first before committing to the final design.
- Hot Knife Trick: The hot knife method for cutting is essential – it makes clean cuts without cracking your chocolate masterpiece.
How to Serve

This Easter Bunny Bark is versatile when it comes to serving options:
Easter Celebrations
Arrange pieces on a festive platter as part of your Easter dessert spread. The bark looks especially charming on a bed of edible Easter grass or surrounded by pastel-colored candies.
Gift Packaging
Place individual bunny pieces in clear cellophane bags tied with pastel ribbons for adorable Easter gifts or party favors.
Dessert Platters
Combine with other Easter treats like pastel macarons, mini cupcakes, or Easter egg cookies for a showstopping dessert table arrangement.
Make Ahead and Storage
Storing Leftovers
Store your Easter Bunny Bark in an airtight container at room temperature for up to 1 week. Place parchment paper between layers to prevent sticking.
Freezing
This bark freezes beautifully! Layer pieces between parchment paper in an airtight container and freeze for up to 3 months. The sprinkles may lose some vibrancy, but the taste remains delicious.
Make-Ahead Options
You can prepare this bark 2-3 days before your event. In fact, making it ahead gives the flavors time to meld beautifully together.
FAQs
Can I use regular chocolate instead of candy melts or almond bark?
Yes, but you’ll need to temper regular chocolate properly or add a little shortening to help it set correctly. Candy melts and almond bark are formulated to set well without tempering, making them more beginner-friendly.
My chocolate seized up when melting. What happened?
Chocolate typically seizes when it comes into contact with even tiny amounts of water or if it gets overheated. Always use completely dry utensils and bowls, and melt chocolate slowly at low heat, stirring frequently.
Can I make this bark without the bunny design for other seasons?
Absolutely! The cookie-in-bark technique works wonderfully year-round. Try heart sprinkles for Valentine’s Day, star sprinkles for Fourth of July, or snowflakes for winter holidays.
How do I prevent the chocolate from blooming (getting white streaks) after it sets?
Store your bark at a consistent temperature and avoid refrigerating then bringing to room temperature repeatedly. The temperature changes cause the cocoa butter to separate, creating the white streaks known as bloom.
Final Thoughts
This Easter Bunny Bark isn’t just a treat—it’s a memory-maker. There’s something special about creating these adorable bunny bottoms that brings joy to both kids and adults alike. The combination of smooth white chocolate, zingy lemon cookies, and those cute little pink-toed feet makes for an Easter dessert that’s truly unforgettable. Give it a try this spring—I promise those bunny bottoms will have everyone hopping with delight!
Print
Easter Bunny Bark Recipe
- Prep Time: 30 minutes
- Cook Time: 30 minutes
- Total Time: 1 hour
- Yield: 12 servings
- Category: Desserts
- Method: No-cook
- Cuisine: American
Description
Easter bark is an easy and festive treat perfect for spring celebrations. This delightful recipe features white chocolate-covered lemon cookies, decorated with charming bunny feet and tails made from melted chocolate. A fun and simple candy recipe that’ll impress your guests or make an adorable edible gift!
Ingredients
- 1 1/2 pounds white almond bark or white melting chocolate, divided
- 1 cup pink candy melts
- 12 lemon Oreo cookies or any other lemon sandwich cookies
Instructions
- Melt the White Chocolate:
In a large microwave-safe bowl, melt 1 pound of white almond bark or melting chocolate in 30-second intervals, stirring in between, until smooth. - Prepare and Coat the Cookies:
On a parchment-lined baking sheet, space out the 12 cookies evenly. Spoon the melted white chocolate over each cookie to cover them completely. Fill in the spaces between and around the cookies with melted chocolate. Gently tap the pan on the table to spread and level the chocolate. Sprinkle Easter grass around the cookies (but not directly on them). Set aside to let the chocolate harden. - Make the Bunny Feet:
Melt the remaining ½ pound of white almond bark in a microwave-safe bowl and then melt the pink candy melts separately. Once smooth, transfer each to a small Ziploc bag and snip off a tiny corner for piping. On a parchment-lined tray, pipe 12 sets of small white ovals to form the bunny feet. Gently tap the tray to level the chocolate. Use the pink candy melts to pipe four small dots on each white oval for bunny toes. Chill in the fridge for 5 minutes. - Create the Bunny Tails:
Use the remaining white melted chocolate to pipe bunny tails directly onto each cookie. Then apply a small dollop of white chocolate onto the back of the bunny feet and “glue” them onto the cookies as two feet per bunny. Repeat with all the cookies. - Final Touches:
Place the baking sheet of assembled bunnies in the fridge for 30 minutes to fully set. Once firm, use a warm knife (dipped in hot water and dried) to carefully trim around each bunny to give a polished appearance. - Serve and Enjoy:
Arrange the bunnies on a tray and serve as a charming Easter treat!
Notes
- You can substitute mini marshmallows for the bunny tails if preferred.
- Opt for any cookie flavor of your choice; lemon adds a fresh seasonal touch.
- Feel free to customize the sprinkles!
- Package these treats in festive bags to gift them during the holidays.
Nutrition
- Serving Size: 1 decorated cookie
- Calories: 250
- Sugar: 28g
- Sodium: 120mg
- Fat: 12g
- Saturated Fat: 7g
- Unsaturated Fat: 5g
- Trans Fat: 0g
- Carbohydrates: 32g
- Fiber: 0g
- Protein: 2g
- Cholesterol: 5mg

Your email address will not be published. Required fields are marked *