

These Easter Egg Chocolate Chip Cookie Cups are the perfect sweet treat that combines the classic comfort of chocolate chip cookies with the festive charm of Easter candy. Baked in muffin tins for a delightful cup shape that cradles colorful mini eggs, this dessert is sure to become a holiday tradition that everyone will look forward to year after year.
Why You’ll Love This Recipe
- Quick and Simple: From mixing to enjoying, these cookie cups take just 20 minutes total. Perfect for last-minute Easter gatherings or when the kids are eager to get their hands on something sweet!
- Crowd-Pleaser: Trust me, these cookie cups disappear faster than you can say “Easter Bunny.” The combination of warm, gooey chocolate chip cookies with candy-coated chocolate eggs is absolutely irresistible.
- Versatile: These treats work beautifully for Easter celebrations but can easily be adapted for any occasion by switching up the candy topping.
- Perfect Balance: The slightly crisp exterior with a soft, chewy center creates the ultimate texture contrast that makes these truly special.

Ingredients You’ll Need
- Unsalted Butter: The foundation of any good cookie recipe, providing richness and that unmistakable buttery flavor. Make sure it’s properly softened for the best texture.
- Brown Sugar: Adds moisture and a deep caramel-like flavor that makes these cookies irresistibly chewy.
- Granulated Sugar: Works with the brown sugar to create the perfect sweetness balance while helping to create those crispy edges.
- Vanilla Extract: A must-have flavor enhancer that rounds out all the sweet notes. Use pure extract rather than imitation for the best flavor.
- Eggs: Provides structure and helps bind everything together. Room temperature eggs incorporate much better than cold ones.
- All-Purpose Flour: The structure builder of our cookie cups. Measure accurately by spooning into your measuring cup and leveling off for best results.
- Baking Soda: Our leavening agent that helps the cookies rise just enough without becoming too cakey.
- Salt: Never skip this! Salt enhances all the flavors and balances the sweetness perfectly.
- Chocolate Chips: The star of any chocolate chip cookie. Use semi-sweet for the traditional flavor, but dark or milk chocolate chips work wonderfully too.
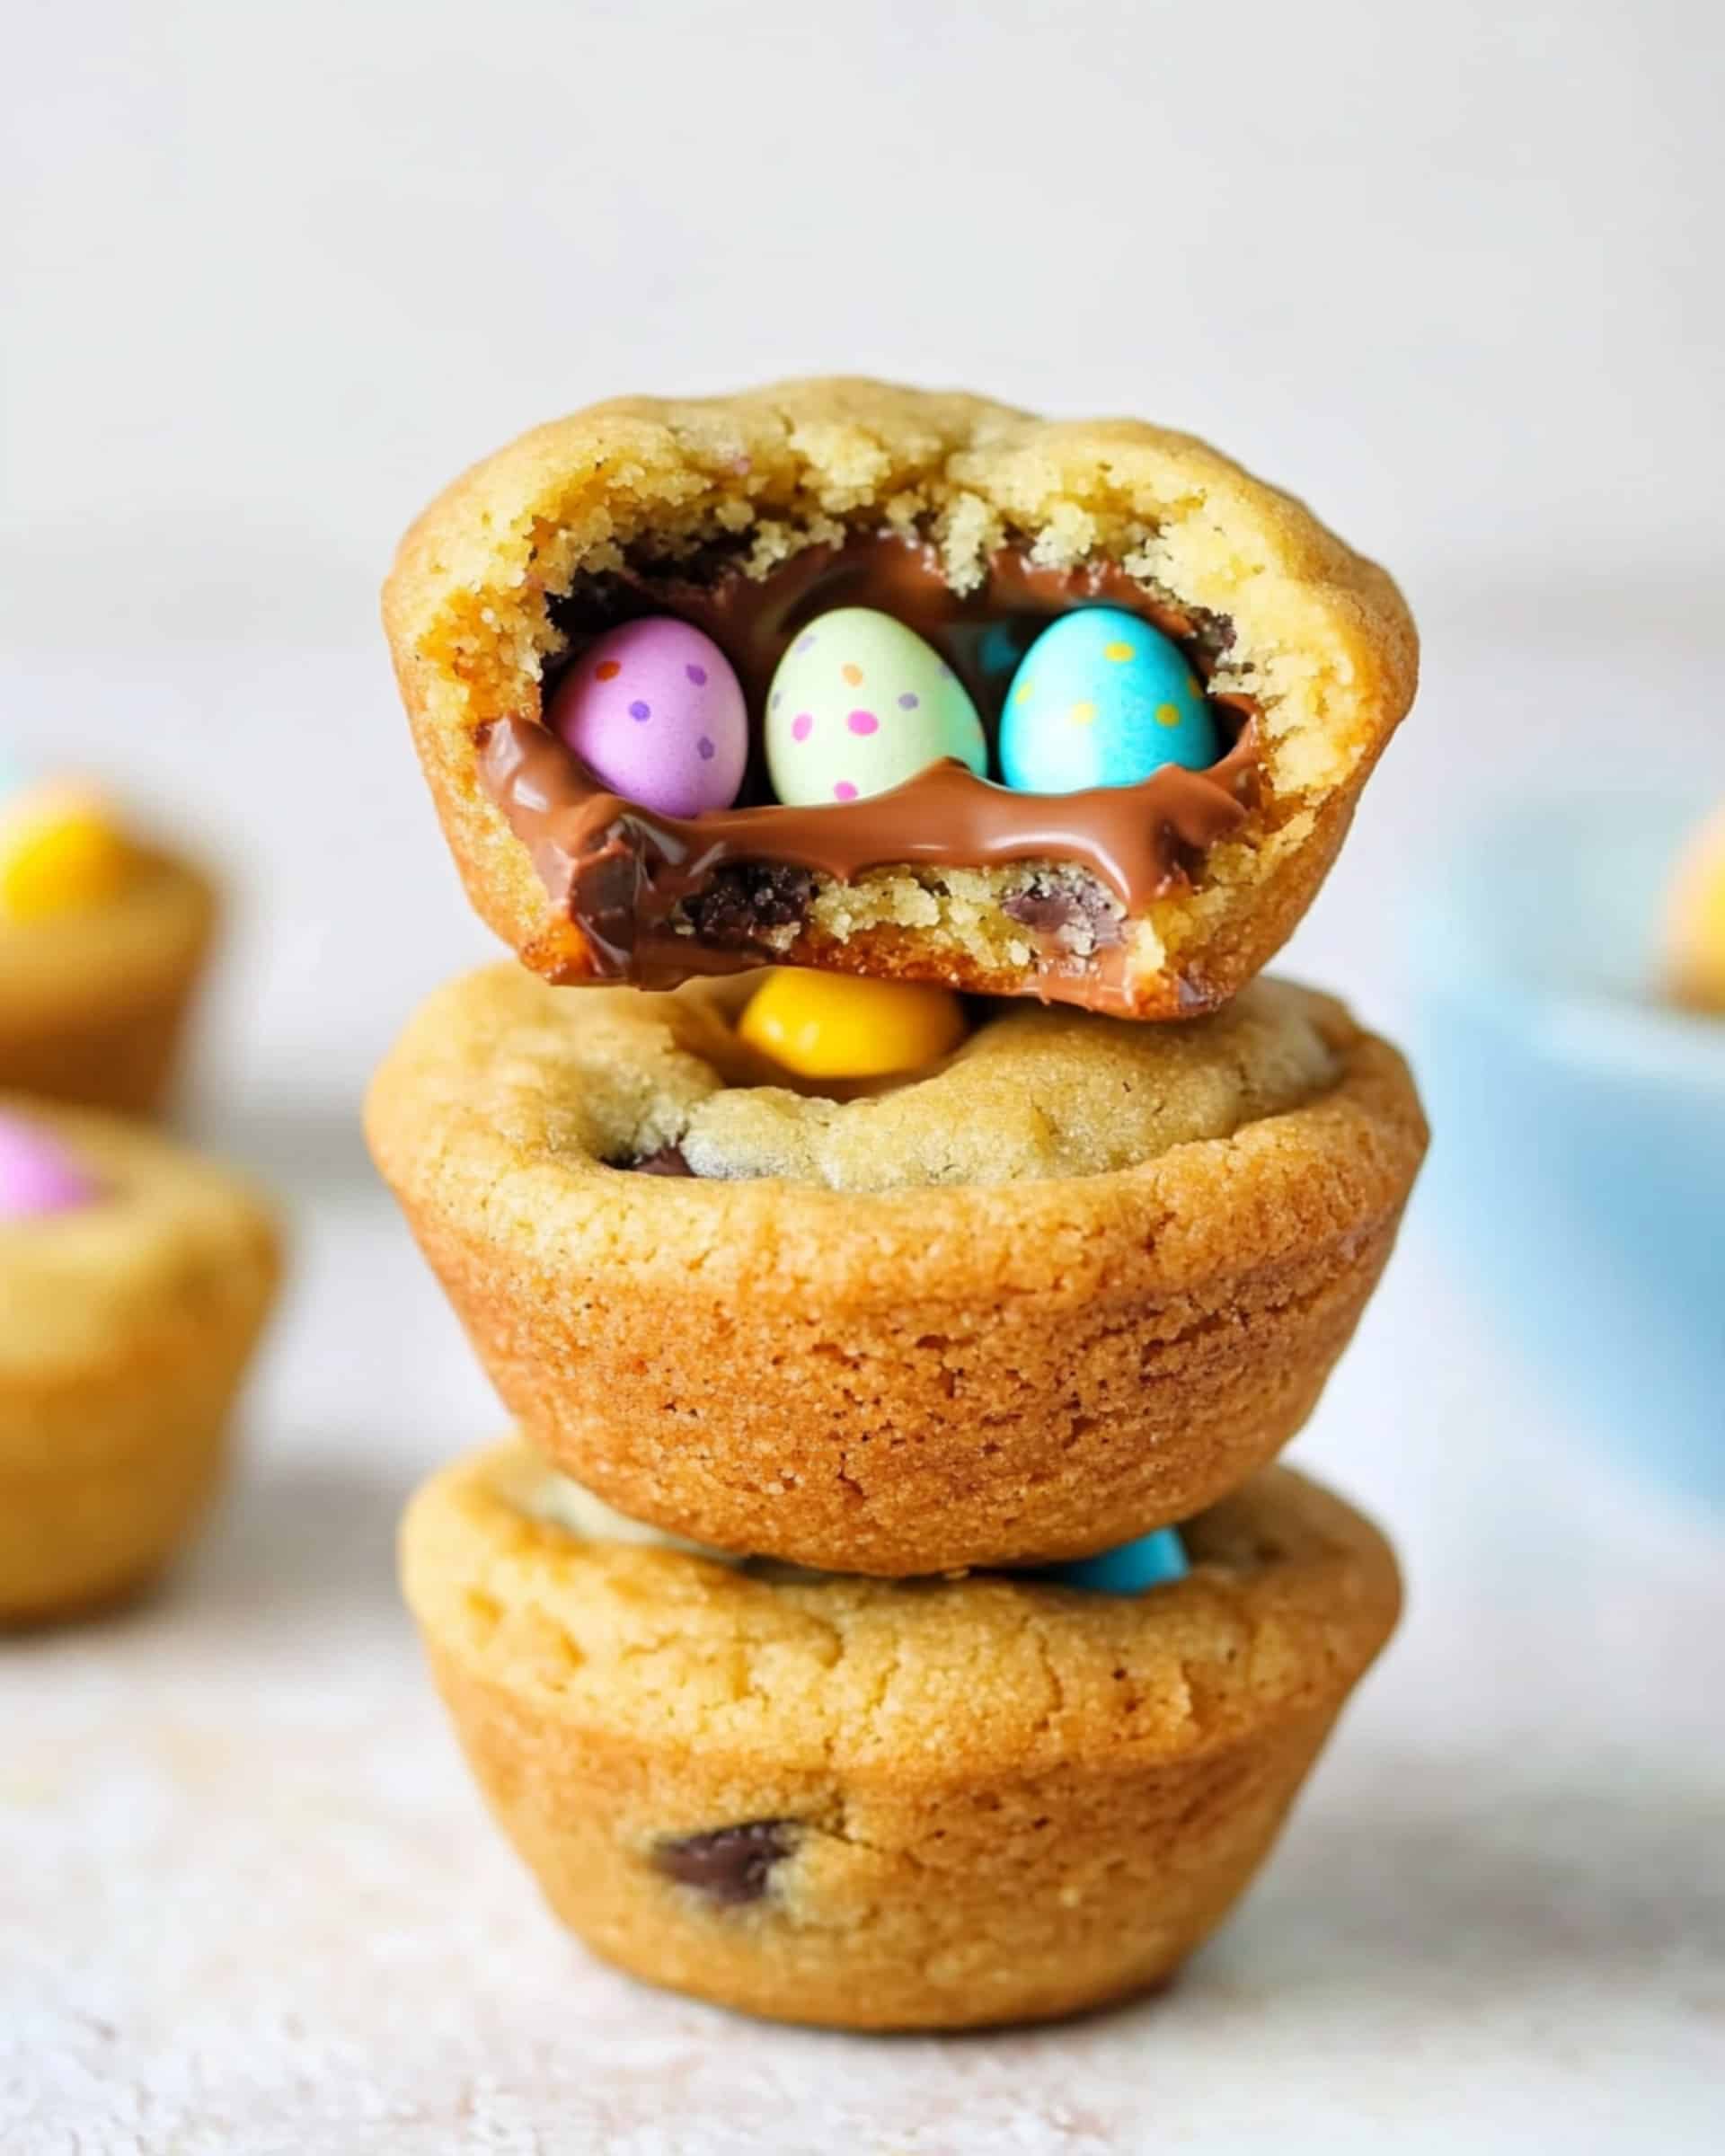
- Mini Eggs: These candy-coated chocolate eggs add a festive Easter touch and a delightful crunch. Their pretty pastel colors make these cookie cups Instagram-worthy!
Variations
Want to customize these cookie cups? Here are some fantastic ideas:
- White Chocolate Wonder: Replace half the chocolate chips with white chocolate chips for a sweeter, creamier flavor profile.
- Nutty Delight: Add 1/2 cup of chopped walnuts or pecans to the batter for extra texture and flavor.
- Year-Round Treat: Swap mini eggs for M&Ms, Reese’s Pieces, or seasonal candies to make these appropriate for any holiday.
- Double Chocolate: Add 1/4 cup of cocoa powder to the batter for chocolate cookie cups that create an even more decadent treat.
- Sprinkle Fun: Add colorful sprinkles to the batter for a birthday variation that kids will adore.
How to Make Easter Egg Chocolate Chip Cookie Cups
Step 1: Prepare Your Pans
Preheat your oven to 350°F. Lightly spray two muffin pans with cooking spray, making sure to coat the wells evenly for easy removal later.
Step 2: Create Your Cookie Base
In a large bowl, cream together the softened butter with both brown and granulated sugars until the mixture becomes light and fluffy. This usually takes 2-3 minutes with an electric mixer and is worth the time as it creates that perfect cookie texture.
Step 3: Add Wet Ingredients
Mix in the vanilla extract, then add the eggs one at a time, making sure each is fully incorporated before adding the next. This gradual addition helps create a smooth, even batter.
Step 4: Incorporate Dry Ingredients
In a separate bowl, whisk together the flour, baking soda, and salt. Gradually add this mixture to your wet ingredients, mixing just until combined. Overmixing can make your cookies tough, so be gentle!
Step 5: Add Chocolate Chips
Fold in the chocolate chips until evenly distributed throughout the dough. This is where all those pockets of melty goodness come from!
Step 6: Fill Muffin Cups
Using a cookie scoop, divide the dough evenly among the prepared muffin cups. Gently press down on each with the back of a spoon to create a slight indentation for your mini eggs later.
Step 7: Bake to Perfection
Bake in your preheated oven for 13-15 minutes, or until the tops are golden brown. The centers might look slightly underdone, but they’ll continue cooking as they cool.
Step 8: Add the Easter Touch
Allow the cookie cups to cool in the pan for 1-2 minutes, then press 3 mini eggs into the center of each cookie cup. The residual heat will slightly melt the candy coating, helping them stick without fully melting.
Step 9: Cool Completely
Let the cookie cups sit for another 2-3 minutes in the pan, then carefully transfer them to wire racks to finish cooling.
Pro Tips for Making the Recipe
- Room Temperature Ingredients: Make sure your butter and eggs are at room temperature for the best incorporation and texture.
- Don’t Overmix: Mix until ingredients are just combined to keep your cookies tender rather than tough.
- Watch the Baking Time: Every oven is different, so start checking at the 12-minute mark. Look for golden edges but still slightly soft centers.
- Cooling Time Matters: The brief cooling period in the pan is crucial – too short and they’ll fall apart, too long and they’ll stick to the pan.
- Muffin Pan Options: Standard muffin pans work best, but mini muffin pans can create adorable bite-sized treats (just reduce the baking time by 3-4 minutes).
- Cookie Scoop: Using a cookie scoop ensures uniform size, which means even baking and a more professional-looking result.
How to Serve
These Easter Egg Chocolate Chip Cookie Cups are versatile when it comes to serving options:
As a Festive Dessert:
Arrange them on a decorative platter with some scattered additional mini eggs for a beautiful Easter dessert table centerpiece.
With Ice Cream:
Serve warm with a small scoop of vanilla ice cream on top for an extra-special dessert that combines warm and cold contrasts.
Dessert Board:
Include these as part of a larger Easter dessert board with fruits, other cookies, and chocolates for a show-stopping presentation.
Gift Option:
Package them in colorful cellophane bags tied with ribbon for charming homemade Easter gifts that friends and family will appreciate.
Make Ahead and Storage
Storing Leftovers
Store completely cooled cookie cups in an airtight container at room temperature for up to 5 days. Place parchment paper between layers to prevent sticking.
Freezing
These cookie cups freeze beautifully! Place them in a single layer on a baking sheet to freeze solid, then transfer to a freezer-safe container or zip-top bag. They’ll keep for up to 3 months.
Make Ahead Options
The cookie dough can be made up to 3 days ahead and refrigerated. You can also freeze portioned dough in the muffin tins, then transfer the frozen dough cups to a freezer bag for longer storage. Bake directly from frozen, adding 2-3 minutes to the baking time.
Reheating
For that fresh-baked taste, warm refrigerated or frozen (and thawed) cookie cups in a 300°F oven for 3-5 minutes. You can also microwave individual cookie cups for 10-15 seconds.
FAQs
Can I make these cookie cups without a muffin tin?
While the muffin tin creates the distinctive cup shape, you can make these as regular drop cookies on a baking sheet. They won’t hold the mini eggs as well, but you can press the candy into the tops right after baking for a similar effect.
My mini eggs are cracking when I press them into the cookies. What am I doing wrong?
You might be pressing too hard or the cookies might be too hot. Let the cookies cool a bit longer (3-4 minutes) before adding the eggs, and use gentle pressure when pressing them in.
Can I use cookie dough from the store to make these?
Absolutely! Pre-made cookie dough works in a pinch. Just portion it into the muffin tins and follow the baking and decorating instructions as written. The texture and flavor won’t be quite the same as homemade, but they’ll still be delicious.
How do I know when the cookie cups are done baking?
Look for golden brown edges with centers that appear set but still slightly soft. Remember that they’ll continue to firm up as they cool. If the edges get too dark before the centers are done, lower your oven temperature by 25 degrees for your next batch.
Final Thoughts
These Easter Egg Chocolate Chip Cookie Cups capture the joy and festivity of spring in every bite. There’s something magical about the combination of warm, chewy cookies and colorful chocolate eggs that brings smiles to faces of all ages. Whether you’re making them for an Easter celebration or just as a special spring treat, they’re sure to become a favorite tradition in your home. The best part? They’re simple enough that even baking beginners can create something impressive and delicious. So grab your muffin tin, gather your ingredients, and get ready to create some sweet memories!
Print
Easter Egg Chocolate Chip Cookie Cups Recipe
- Prep Time: 7 minutes
- Cook Time: 13 minutes
- Total Time: 20 minutes
- Yield: 24 cookie cups
- Category: Desserts
- Method: Baking
- Cuisine: American
- Diet: Vegetarian
Description
These Easter Egg Chocolate Chip Cookie Cups are a delightful and festive dessert to brighten any holiday table. Easy to make, with soft, chewy cookies and a vibrant touch of mini eggs, it’s perfect for celebrations or for satisfying your sweet tooth.
Ingredients
Wet Ingredients
-
-
- 1 cup unsalted butter, softened
- 3/4 cup brown sugar
- 3/4 cup granulated sugar
- 1 tsp vanilla extract
- 2 large eggs
-
Dry Ingredients
-
-
- 2 1/4 cups all-purpose flour
- 1 tsp baking soda
- 1 tsp salt
-
Add-Ins
-
- 2 cups chocolate chips
- Mini eggs
Instructions
- Prepare the oven and pans: Preheat the oven to 350°F. Lightly spray 2 muffin pans with cooking spray and set aside.
- Cream the butter and sugars: In a large bowl, cream together the butter and sugars until light and fluffy.
- Add vanilla and eggs: Mix in the vanilla and eggs, one at a time, until fully combined.
- Combine dry ingredients: In a separate bowl, mix together the flour, baking soda, and salt. Slowly mix into the butter mixture until fully incorporated.
- Fold in chocolate chips: Gently fold the chocolate chips into the cookie dough to ensure even distribution.
- Portion and bake: Using a cookie scoop, divide the batter into the prepared muffin pans and press down with the back of a spoon. Bake in the preheated oven for 13-15 minutes, or until the top is golden brown.
- Add mini eggs: Allow the cookies to rest for 1-2 minutes, then press 3 mini eggs into the center of each cookie. Let them sit for an additional 2-3 minutes.
- Cool and serve: Transfer the cookies to wire racks to cool completely. Serve and enjoy!
Notes
- If you’d like to experiment, try using different types of candy or chocolate chips for variation.
- Keep an eye on the cookies while baking to ensure they don’t overbrown.
- Store these cookie cups in an airtight container for up to 3-4 days for the best freshness.
Nutrition
- Serving Size: 1 cookie cup
- Calories: 180
- Sugar: 14g
- Sodium: 120mg
- Fat: 9g
- Saturated Fat: 5g
- Unsaturated Fat: 3g
- Trans Fat: 0g
- Carbohydrates: 23g
- Fiber: 1g
- Protein: 2g
- Cholesterol: 25mg

Your email address will not be published. Required fields are marked *