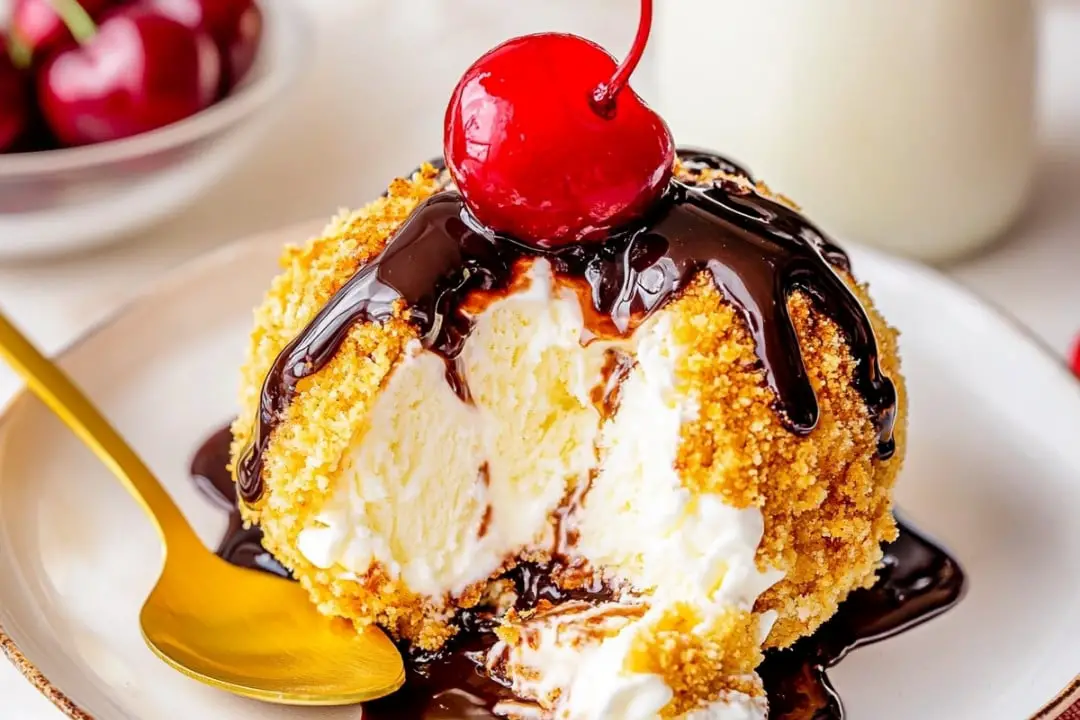
This Easy Homemade Fried Ice Cream delivers all the crispy, creamy magic of restaurant-style fried ice cream without the actual frying! A crunchy cinnamon-sugar cornflake coating surrounds cold, creamy ice cream for a dessert that’s impressively simple to make at home. Perfect for impressing guests or treating yourself to something special on a weeknight!
Why You’ll Love This Recipe
- No Deep Frying Required: Enjoy all the texture and flavor contrasts of traditional fried ice cream without the hassle and mess of hot oil.
- Simple Ingredients: Uses basic pantry staples you likely already have on hand – cornflakes, butter, cinnamon, and sugar transform ordinary ice cream into something extraordinary.
- Customizable: Works beautifully with any ice cream flavor you love, and you can personalize with endless topping combinations.
- Make-Ahead Friendly: Perfect for preparing in advance for parties or special occasions – just keep the balls frozen until serving time.
Ingredients You’ll Need
- Ice Cream: Forms the creamy center of this dessert. Vanilla works wonderfully as a classic base, but feel free to experiment with other flavors that pair well with cinnamon.
- Unsalted Butter: Helps toast the cornflakes to golden perfection and adds a rich flavor to the coating.
- Cornflakes: Creates that signature crunchy exterior that makes fried ice cream so special. The cornflakes need to be crushed but not pulverized into dust – you want some texture.
- Ground Cinnamon: Adds warmth and spice to the coating that perfectly complements the cold ice cream inside.
- Granulated Sugar: Adds a touch of sweetness to the coating and helps create that caramelized flavor.
- Toppings: Chocolate sauce, whipped cream, and cherries are classic choices, but caramel, honey, fresh fruit, or sprinkles are all delicious options.
Variations
Take your fried ice cream to the next level with these creative twists:
- Mexican-Style: Add 1/2 teaspoon of vanilla extract and a pinch of nutmeg to the cornflake mixture, then drizzle with honey instead of chocolate sauce.
- Coconut Lover’s Dream: Mix 1/2 cup toasted coconut flakes into your cornflake mixture for tropical flavor.
- Cookie Monster: Use crushed cookies (like graham crackers or gingersnaps) instead of cornflakes for a different flavor profile.
- Cereal Switch-Up: Try Cinnamon Toast Crunch or Frosted Flakes instead of plain cornflakes for an extra sweet coating.
- Temperature Twist: Serve on a warm brownie for an amazing hot-and-cold dessert experience.
How to Make Fried Ice Cream
Step 1: Form the Ice Cream Balls
Scoop out one cup of ice cream and quickly form it into a smooth ball with clean hands. Place it on a plate and put it in the freezer. Repeat with the remaining ice cream, working quickly to prevent melting. Let the balls freeze solid for at least 30 minutes.
Step 2: Prepare the Coating
In a large skillet over medium heat, melt the butter. Add the crushed cornflakes and cinnamon, stirring constantly to distribute the butter and spice evenly. Continue cooking for about 5 minutes until the cornflakes become fragrant and slightly darker in color. Remove from heat and stir in the granulated sugar. Transfer the mixture to a shallow dish and allow it to cool completely.
Step 3: Coat the Ice Cream
Once the cornflake mixture has cooled, remove one ice cream ball from the freezer at a time. Roll it in the cornflake mixture, pressing gently to make the coating stick. Return the coated ball to the freezer immediately. Repeat with remaining ice cream balls.
Step 4: Final Freeze
Allow the coated ice cream balls to freeze solid for at least 10-15 minutes before serving. This ensures the exterior stays crisp while the inside remains perfectly frozen.
Step 5: Serve and Enjoy
Place each fried ice cream ball in a serving dish and top with chocolate sauce, whipped cream, and a cherry. Serve immediately for the perfect contrast of temperatures and textures.
Pro Tips for Making Fried Ice Cream
- Super-Freeze the Ice Cream: Before starting, place your ice cream in the coldest part of your freezer for a few hours so it’s extra firm when you begin.
- Work in Batches: Only remove one or two ice cream balls from the freezer at a time to prevent melting.
- Double-Coat for Extra Crunch: For an even crunchier exterior, you can freeze the balls after the first coating, then dip them in beaten egg white and roll in the cornflake mixture again.
- Use an Ice Cream Scoop: A large cookie scoop can help you portion the ice cream more evenly before hand-shaping.
- Pre-chill Serving Dishes: Place your serving bowls in the freezer for 10 minutes before plating your dessert to keep the ice cream from melting too quickly.
How to Serve

Fried ice cream makes a showstopping dessert that’s perfect for ending a meal on a high note. Here are some serving suggestions:
Classic Presentation
Serve in a small bowl with a drizzle of chocolate sauce, a dollop of whipped cream, and a maraschino cherry on top.
Dessert Bar Style
Create a fried ice cream bar with multiple topping options like hot fudge, caramel sauce, crushed nuts, sprinkles, and various fruits so everyone can customize their own.
Mexican Fiesta Finish
After a Mexican meal, serve with a drizzle of honey, a light dusting of cinnamon, and a cinnamon sugar tortilla chip on the side.
Make Ahead and Storage
Freezing Before Coating
You can form the ice cream balls up to a week in advance. Store them in an airtight container with parchment paper between layers to prevent sticking.
Storing Coated Ice Cream Balls
Once coated, the fried ice cream balls can be stored in the freezer for up to 3 days. Place them in an airtight container, making sure they don’t touch each other to preserve the coating’s integrity.
Storing the Coating
The cornflake coating can be made up to 5 days in advance and stored in an airtight container at room temperature. If it loses its crunch, you can refresh it with a quick minute in a dry skillet.

FAQs
Can I use dairy-free ice cream for this recipe?
Absolutely! Dairy-free ice cream works wonderfully in this recipe. Just be aware that some non-dairy varieties melt faster than traditional ice cream, so you might want to work extra quickly and ensure your ice cream is very firmly frozen before starting.
Why is my coating falling off the ice cream?
This usually happens if the ice cream balls weren’t frozen solid enough before coating or if the cornflake mixture was still warm. Make sure your ice cream balls are very firm and the coating mixture is completely cool before combining them. Pressing the coating gently but firmly onto the balls also helps it adhere better.
Can I make this for a large group?
Yes! This recipe scales up beautifully for parties. You can prepare all the ice cream balls a day or two ahead, coat them, and keep them frozen until serving time. For a crowd, consider setting up a topping bar so guests can customize their own desserts.
Is there a way to make this without hand-forming the ice cream?
If you don’t want to shape the ice cream by hand, try lining a muffin tin with plastic wrap, filling each cup with softened ice cream, and freezing until solid. Then you can unwrap each “puck” of ice cream and coat it with the cornflake mixture.
Final Thoughts
This Easy Homemade Fried Ice Cream brings the magic of a beloved restaurant dessert right to your kitchen with surprisingly little effort. The contrast between the crispy, cinnamon-sugar coating and the cold, creamy ice cream creates a dessert experience that’s truly special. Whether you’re serving it for a family treat or as the grand finale to a dinner party, this no-fry version delivers all the wow factor without the hassle. Give it a try – you might find yourself making this impressive dessert far more often than you’d expect!
Print
Easy Homemade Fried Ice Cream Recipe
- Prep Time: 10 minutes
- Cook Time: 5 minutes
- Total Time: 15 minutes
- Yield: 4 servings
- Category: Desserts
- Method: Frying
- Cuisine: American
Description
This Easy Homemade Fried Ice Cream recipe is a delightful combination of creamy ice cream and a crunchy, cinnamon-coated cornflake crust. Perfect for parties or a special treat, this dessert requires just a handful of ingredients and minimal effort. With its unique texture and flavors, it’s bound to impress your family and guests alike!
Ingredients
Ice Cream
- 4 cups ice cream
Crunchy Coating
- 3 tablespoons unsalted butter
- 3 cups crushed cornflakes
- 1 teaspoon ground cinnamon
- 1 tablespoon granulated sugar
Toppings (optional)
- Chocolate sauce
- Whipped cream
- Cherries
Instructions
- Shape the Ice Cream:
Take one cup of ice cream and use your clean hands to form it into a smooth ball. Place it on a plate and freeze. Repeat this process with the remaining ice cream until all is shaped into balls. - Melt the Butter:
Place a large skillet over medium heat. Add the butter and let it melt completely. - Prepare the Crunchy Coating:
Add the crushed cornflakes and cinnamon to the skillet. Stir well to ensure the butter and cinnamon are distributed evenly across the cornflakes. Cook the mixture, stirring constantly, until the cornflakes smell toasty and slightly deepen in color (approximately 5 minutes). - Add the Sugar:
Remove the skillet from heat and stir in the granulated sugar. Transfer the mixture into a shallow dish and let it cool completely. - Roll the Ice Cream Balls:
Once the coating mixture is completely cool, take the frozen ice cream balls and roll them in the crumb mixture. Be sure to press the crumbs into the ice cream to achieve full coverage. Place the coated ice cream balls on a clean plate and return them to the freezer for 10-15 minutes until frozen solid. - Serve:
Remove the ice cream balls from the freezer and serve with your favorite toppings such as chocolate sauce, whipped cream, or cherries. Enjoy!
Notes
- Work Quickly: Ice cream melts fast, so minimize the freezer door opening. Shape, freeze, and coat the ice cream balls without delay.
- Use Gloves: Gloves can help prevent sticky hands and allow you to form neatly shaped balls.
- Custom Textures: For a finer crumb texture, crush the cornflakes using a rolling pin in a sealed plastic bag before preparing the coating.
- Prep Toppings Ahead: Have all your toppings ready to garnish, as the ice cream melts quickly once out of the freezer.
- Experiment with Flavors: This recipe works with various ice cream flavors such as cookies and cream, mint chocolate chip, or your personal favorites.
Nutrition
- Serving Size: 1 ice cream ball
- Calories: 320
- Sugar: 19g
- Sodium: 180mg
- Fat: 15g
- Saturated Fat: 8g
- Unsaturated Fat: 6g
- Trans Fat: 0g
- Carbohydrates: 37g
- Fiber: 2g
- Protein: 4g
- Cholesterol: 30mg


Your email address will not be published. Required fields are marked *