

If you’re like me and adore festive, melt-in-your-mouth holiday treats, then this Gingerbread Snowflake Cookies Recipe is going to become your new favorite. I absolutely love how these delicate snowflake-shaped cookies come out crisp around the edges but stay just soft enough inside, all wrapped up in those classic warm spices. Plus, that glossy vanilla glaze with intricate snowflake designs? It’s pure magic on a plate. Stick with me, because I’m sharing tips and tricks to make sure your batch turns out as beautiful and tasty as you dream.
Why You’ll Love This Recipe
- Classic Flavor Combination: The balanced spices and molasses create that perfect gingerbread taste we all crave during the holidays.
- Decorating Fun: The vanilla glaze makes it easy to pipe out pretty snowflake details that impress everyone.
- Make-Ahead Friendly: Dough chills beautifully, and the cookies keep well, so you can bake in advance.
- Family Favorite: Every year my crew goes crazy for these—your family will too!

Ingredients You’ll Need
For these cookies, you’ll want to gather ingredients that complement each other — soft butter and rich molasses give moistness and texture, while the combination of ginger, cinnamon, and allspice delivers that unmistakable holiday warmth. Here are a few tips on the essentials you’ll find in the pantry:

- Butter: Use softened unsalted butter to control salt levels and get a fluffy dough when creamed with sugar.
- Sugar: Granulated sugar helps the cookies get a nice crisp edge.
- Molasses: Blackstrap or robust molasses adds depth and that iconic gingerbread flavor—I wouldn’t skip this one!
- Egg: Binds everything together and adds moisture.
- Vanilla Extract: Adds aromatic richness beyond the spices.
- Flour: All-purpose is perfect for the structure you want.
- Ground Ginger, Cinnamon, and Allspice: These ground spices create that warm, earthy holiday note.
- Baking Soda: Helps the cookies lift slightly and become tender.
- Salt: Enhances flavor and balances the sweetness.
- Powdered Sugar (for glaze): Provides a smooth base for your icing.
- Milk or Cream: Thins the glaze to perfect piping consistency.
- Corn Syrup: Adds shine and helps the glaze dry with a nice finish.
Variations
I love making this Gingerbread Snowflake Cookies Recipe my own by tweaking it a bit depending on the occasion or what I have on hand. Feel free to experiment—you’ll see how easy it is to tailor these cookies to your taste and lifestyle.
- Spice it up: Sometimes I add a pinch of ground cloves or nutmeg for extra warmth; it makes the spice profile a little more complex.
- Gluten-Free Version: Swapping regular flour with a good quality gluten-free blend worked surprisingly well for me—just watch the dough texture closely.
- Vegan Adaptation: Using coconut oil in place of butter and a flax “egg” keeps these festive for plant-based diets, though the texture is a bit different.
- Colorful Icing: Try adding natural food coloring to the glaze for a playful twist when serving at kids’ parties or cookie exchanges.
How to Make Gingerbread Snowflake Cookies Recipe
Step 1: Cream Butter and Sugar Until Fluffy
Start by softening your butter—room temperature is key. You’ll want to beat it with the sugar until the mixture turns light and fluffy; this helps your cookies be tender with just the right touch of crisp. I use a stand mixer with the paddle attachment for this, but a hand mixer works fine too. It usually takes about 3-5 minutes on medium-high speed.
Step 2: Add Wet Ingredients – Egg, Vanilla, and Molasses
Next, beat an egg and a teaspoon of vanilla into the creamed butter and sugar until fully combined. Then stir in the molasses—you’ll notice the dough getting richer in color and deeper in aroma, that molasses magic. This step is what fills your kitchen with those warm holiday vibes.
Step 3: Combine Dry Spices and Flour
In a separate bowl, whisk together your flour, ground ginger, cinnamon, baking soda, allspice, and salt. Mixing these dry ingredients first ensures that the spices are evenly spread throughout your cookies without clumping anywhere.
Step 4: Mix Dry and Wet Ingredients to Form Dough
Gradually add the dry mixture into your wet ingredients bowl. Use a spatula or mixer on low speed to combine everything well. The dough will be soft but firm enough to roll out without sticking too much to your work surface. If it feels too sticky, you can lightly flour your hands or the surface as you work.
Step 5: Chill Your Dough for At Least an Hour
This step is crucial and one I learned not to skip. Wrap your dough tightly in plastic wrap and refrigerate it for at least one hour. Chilling firms up the butter in the dough, which prevents the cookies from spreading too much when baked—keeping those beautiful snowflake shapes crisp and defined.
Step 6: Roll, Cut, and Bake
Preheat your oven to 375°F. Divide the chilled dough into halves. Roll each half on a lightly floured surface to about a ¼-inch thickness. Use a snowflake cookie cutter to stamp out your shapes. My tip? Press firmly a few times to get clean edges, and wiggle the cutter just slightly if the dough sticks.
Place your cookies on parchment-lined baking sheets, leaving some space between. Bake for 8-10 minutes—you’re looking for firm edges but slightly softer centers. Remove from the oven and transfer cookies to a wire rack to cool completely before decorating.
Step 7: Make and Pipe the Vanilla Glaze
While the cookies cool, whisk powdered sugar, milk (or cream), corn syrup, and vanilla into a smooth glaze. It should flow easily but still hold its shape when piped. Adjust thickness by adding more milk to thin or more powdered sugar to thicken. Transfer to a piping bag fitted with a small round tip, then decorate each cookie with delicate snowflake patterns. I find that practicing on parchment paper first really helps to build confidence before going onto the cookies.
Pro Tips for Making Gingerbread Snowflake Cookies Recipe
- Keep Dough Cold: I always chill my dough way longer if I have time—overnight is even better for flavor and handling.
- Use Parchment Paper: It prevents sticking without greasing, keeping cookie bottoms perfectly textured.
- Glaze Consistency Check: If your glaze isn’t piping properly, let it rest a few minutes—it tends to thicken up as it sits.
- Mistake to Avoid: Don’t skip the cooling step before glazing; warm cookies melt the icing and ruin your designs.
How to Serve Gingerbread Snowflake Cookies Recipe

Garnishes
I like to add a little extra sparkle by dusting finished cookies lightly with edible glitter or sprinkling tiny silver dragees on the glaze once it’s set but still tacky. Fresh cranberries or a small sprig of rosemary beside the plate also add a festive touch that makes these perfect for passing around at parties or gifting.
Side Dishes
These gingerbread snowflakes pair wonderfully with hot drinks like spiced tea, mulled cider, or a creamy latte. Around the holidays, I often serve them with a bowl of whipped cream or a scoop of vanilla ice cream for an indulgent treat that melts the cold away.
Creative Ways to Present
For cookie exchanges, I’ve wrapped stacks tied with twine and small pine sprigs. Another quirky idea is arranging a “snowflake wreath” on a decorative platter—cookies overlapping in a circle, with a few fresh cranberries or nuts filling gaps, ready for guests to grab and enjoy.
Make Ahead and Storage
Storing Leftovers
Once glazed and fully dry, I store leftover cookies in an airtight container at room temperature for up to 5 days. Keep parchment or wax paper between layers to avoid sticking. They maintain a lovely balance of crispness and soft chewiness without getting hard quickly.
Freezing
I’ve found that freezing the unbaked dough works best. After forming your dough disc, wrap it well and pop it in the freezer up to 3 months. Thaw overnight in the fridge before rolling out and baking fresh cookies—this makes your holiday prep super stress-free.
Reheating
If you want to freshen up slightly stale cookies, pop a few in a 300°F oven for 5 minutes. Just avoid reheating glazed cookies, as the warm icing tends to soften too much and lose its crisp design.
FAQs
-
Can I use a different shape cutter instead of snowflakes for this Gingerbread Snowflake Cookies Recipe?
Absolutely! While snowflakes add a beautiful seasonal touch, this dough is very versatile. Any cookie cutter shape will work—stars, trees, or even simple circles if you’re in a pinch. The key is chilling the dough so it holds whatever shape you choose.
-
How long will these Gingerbread Snowflake Cookies stay fresh?
When stored properly in an airtight container at room temperature, these cookies taste fresh for about 5 days. Beyond that, they may begin to harden or lose that fresh-baked softness, but reheating briefly can revive them somewhat.
-
Is it okay to freeze the baked cookies after decorating?
I usually don’t recommend freezing after glazing because the moisture can affect the crispness and appearance of the icing. Freezing the dough instead gives you the best texture and flavor after baking fresh. If necessary, freeze baked cookies without icing and decorate after thawing.
-
Can I make these cookies without molasses?
Molasses is key to the signature flavor and moisture in this Gingerbread Snowflake Cookies Recipe. If you don’t have molasses, you can try substituting with dark corn syrup or honey, but it will alter the taste and texture slightly. I recommend seeking molasses for the most authentic results.
Final Thoughts
This Gingerbread Snowflake Cookies Recipe holds a special place in my kitchen tradition—it’s the comfort of those classic spices married with the joy of decorating with family and friends that makes it so wonderful. I hope you find yourself reaching for this recipe year after year. Trust me, with the tips I’ve shared, you’ll nail these cookies and wow everyone with both flavor and festive charm. Happy baking, and may your holidays be sweet and memorable!
Print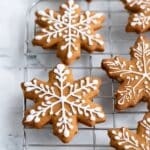
Gingerbread Snowflake Cookies Recipe
- Prep Time: 24 minutes
- Cook Time: 10 minutes
- Total Time: 1 hour 34 minutes
- Yield: 30 cookies
- Category: Dessert
- Method: Baking
- Cuisine: American
Description
These Gingerbread Snowflake Cookies are perfectly spiced and adorned with a delicate vanilla glaze, making them a festive and delightful treat for the holiday season. The cookies are soft yet firm enough to hold intricate snowflake shapes, ideal for baking enthusiasts looking to impress with both taste and presentation.
Ingredients
Cookies
- 1 cup butter (softened)
- 1 cup sugar
- ¾ cup molasses
- 1 egg
- 1 teaspoon vanilla extract
- 4 cups all-purpose flour
- 3 teaspoons ground ginger
- 2 teaspoons ground cinnamon
- 1 ½ teaspoons baking soda
- ½ teaspoon allspice
- ½ teaspoon salt
Vanilla Glaze
- 3 cups powdered sugar
- 3-4 tablespoons milk or cream
- 1 tablespoon corn syrup
- ½ teaspoon vanilla extract
Instructions
- Cream the Butter and Sugar: In a large mixing bowl, cream together the softened butter and sugar until the mixture is light and fluffy, which will help create a tender texture in your cookies.
- Add Vanilla and Egg: Stir in the vanilla extract and the egg until fully incorporated, ensuring the mixture is smooth and homogeneous.
- Combine with Molasses: Pour in the molasses and mix well until the dough is evenly combined and dark in color, characteristic of traditional gingerbread.
- Mix Dry Ingredients: In a separate bowl, whisk together the flour, ground ginger, ground cinnamon, baking soda, allspice, and salt to distribute the spices evenly throughout the flour.
- Combine Dry and Wet Ingredients: Gradually add the flour mixture to the wet ingredients, mixing thoroughly to form a cohesive cookie dough.
- Chill the Dough: Remove the dough from the mixing bowl, place it onto plastic wrap, form into a large disc, wrap tightly, and refrigerate for at least one hour. This step helps the dough firm up for easier rolling and cutting.
- Preheat the Oven: When ready, preheat your oven to 375°F (190°C) to prepare for baking.
- Roll and Cut Dough: Divide the chilled dough in half. On a lightly floured surface, roll out the dough to about ¼ inch thickness. Use a snowflake-shaped cookie cutter (or your choice of shape) to cut out the cookies.
- Arrange on Baking Sheet: Place the cut cookies on a baking sheet lined with parchment paper or use an ungreased baking sheet. Arrange spaced apart to allow for slight expansion.
- Bake the Cookies: Bake the cookies in the preheated oven for 8 to 10 minutes, or until the edges are firm and the centers are set. Avoid overbaking to keep them soft.
- Cool the Cookies: Remove the cookies from the oven and transfer them to a wire rack to cool completely before glazing.
- Prepare the Vanilla Glaze: In a bowl, mix the powdered sugar, 3 to 4 tablespoons of milk or cream, corn syrup, and vanilla extract until smooth. Adjust the consistency by adding milk or powdered sugar so the glaze can flow but still holds its shape when piped.
- Decorate with Glaze: Transfer the glaze to a piping bag fitted with a small tip and decorate the cooled snowflake cookies by piping snowflake designs onto each cookie.
Notes
- Make sure the butter is softened, not melted, for optimal creaming with sugar.
- Refrigerating the dough is essential to maintain the cut-out shapes during baking.
- The glaze consistency is key: too thin will run off the cookie, too thick will be hard to pipe.
- Cookies store well in an airtight container for up to one week.
- Use fresh spices for the best flavor.
Nutrition
- Serving Size: 1 cookie
- Calories: 150
- Sugar: 12g
- Sodium: 140mg
- Fat: 7g
- Saturated Fat: 4g
- Unsaturated Fat: 3g
- Trans Fat: 0g
- Carbohydrates: 21g
- Fiber: 1g
- Protein: 2g
- Cholesterol: 20mg

Your email address will not be published. Required fields are marked *