

If you’re on the hunt for a festive, fun, and downright adorable Halloween treat, you’ve got to try this Halloween Mummy Pizza Recipe. It’s the perfect blend of spooky and delicious, and the best part? Everyone from kids to adults goes crazy for it! Whether you’re hosting a Halloween party or just want a creative twist on your pizza night, this mummy-themed pie will steal the show and maybe even make you laugh while you eat it.
Why You’ll Love This Recipe
- Super Simple Prep: Using refrigerated dough gets you to the fun part in no time, and the assembly feels like arts and crafts in the kitchen.
- Kid-Friendly Fun: Little helpers love weaving the “bandages,” making it an interactive meal everyone can enjoy creating.
- Perfect Party Pleaser: It’s eye-catching and tasty, making it a hit at any Halloween gathering without needing fancy ingredients.
- Customizable: You can swap toppings or sauce to suit your tastes or dietary needs without losing the spooky vibe.

Ingredients You’ll Need
These ingredients come together to make a pizza that’s both classic and fun. I like using refrigerated dough because it saves a ton of hassle, and the mozzarella melts perfectly to hold everything in place. You can find most of these in your local grocery store without breaking the bank.
- Refrigerated pizza dough: Pillsbury biscuits or any store-bought dough works well here for a quick base.
- Pizza or marinara sauce: Choose your favorite—spicy, garlicky, or mild—because it sets the flavor tone.
- Mozzarella cheese: Freshly shredded is best for melting, but pre-shredded saves time.
- Pepperoni slices: For that classic pizza vibe and “bandages” that peek through.
- Black olive: The secret to the mummy’s haunting eyes—simple but so effective.
Variations
I love tweaking this Halloween mummy pizza recipe depending on what I have on hand or who I’m cooking for. It’s super forgiving, so don’t hesitate to make it your own!
- Vegetarian version: Swap pepperoni for sliced mushrooms, bell peppers, or even spinach—I’ve made it this way for my veggie-loving niece, and it still looks amazing.
- Spicy twist: Add a sprinkle of red pepper flakes or use spicy sausage instead of pepperoni if you want to kick it up a notch.
- Gluten-free: Use a gluten-free pizza crust and sauce to accommodate dietary needs—just keep in mind baking times might vary slightly.
- Mini mummies: Make smaller, individual pizzas—great for portion control or Halloween party platters.
How to Make Halloween Mummy Pizza Recipe
Step 1: Prep Your Canvas and Sauce It Up
Start by preheating your oven to 400°F and lining a baking sheet with parchment paper. Roll out your pizza dough on the parchment. I find that working directly on parchment makes transferring to the oven so much easier—and less messy! Spread the sauce down the middle section of the dough, leaving edges free. Don’t be shy with the sauce; it’s the flavor base that really makes this pizza sing.
Step 2: Cheese and Pepperoni — The Yummy Stuff
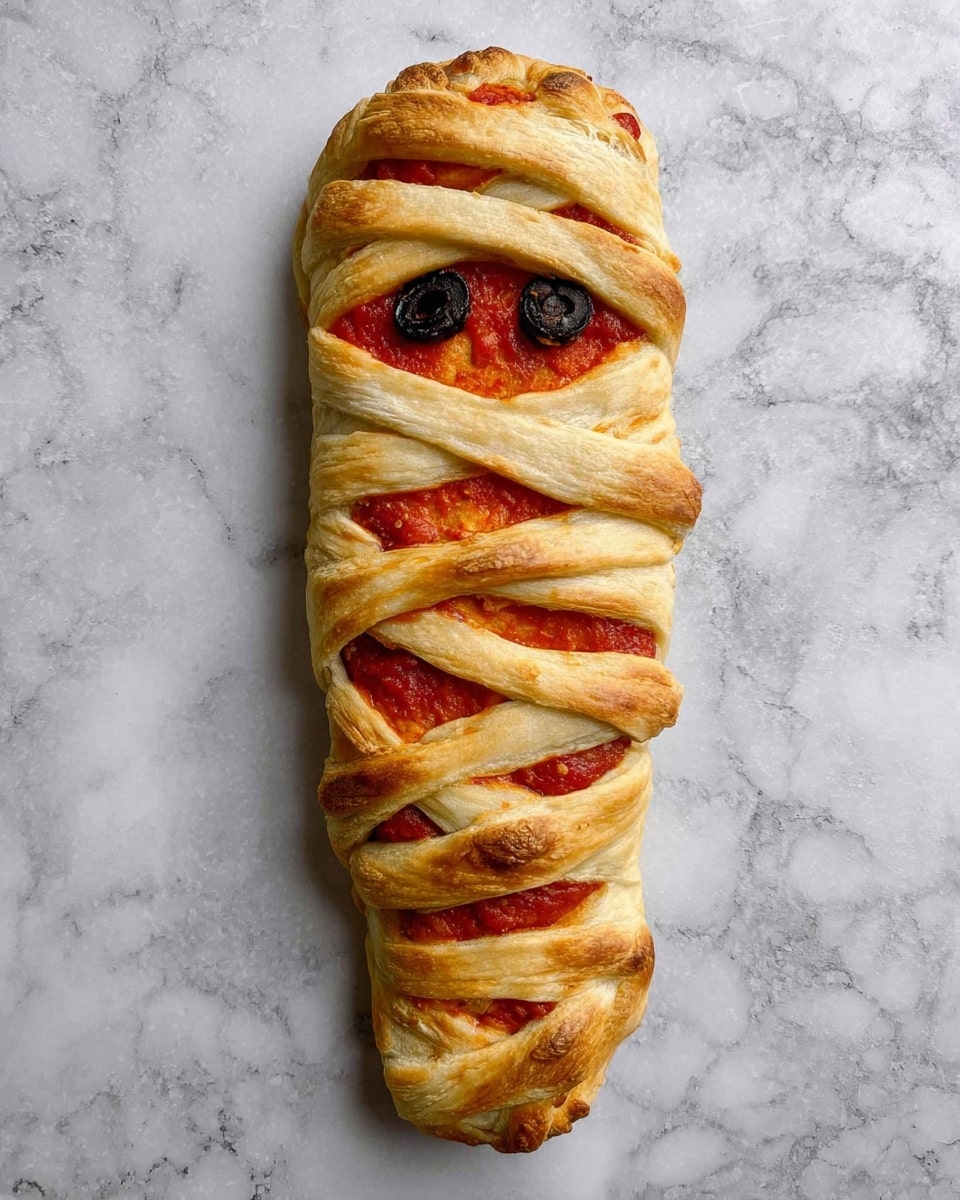
Next, sprinkle mozzarella evenly over the sauce, covering all the way to the edges of the sauce so your mummy looks nice and wrapped. Then, line up pepperoni slices on top of the cheese—these will peek out like the mummy’s bandages. I usually use about 40 slices to get a good “wrap” effect, but feel free to add more if you like.
Step 3: Cut the Strips and Weave the Mummy Bandages
This is where the fun really kicks in! Using a paring knife, cut one-inch-wide diagonal slits on both sides of the sauce-covered middle section, stopping short at the top to leave room for the mummy’s face. Fold the bottom strips over the cheesy filling, then braid or weave the strips up the sides to create a messy, tangled mummy look. It’s okay if it doesn’t look perfect—that’s the charm of a mummy!
Step 4: Give Your Mummy Some Eyes
Leave a bit of space near the top uncovered for the face. Slather some extra sauce in this gap, then slice your black olive into halves or thin rounds to make spooky eyes. I love this little detail because it really brings the mummy to life (or un-life!).
Step 5: Bake and Enjoy the Magic
Lift your creation on the parchment and slide it onto the baking sheet. Bake for about 20 minutes or until the dough turns golden brown and the cheese bubbles up just right. Keep an eye on it after 15 minutes to avoid burning the edges. When it comes out, everyone will be eager to dig in—be sure to snap a photo first!
Pro Tips for Making Halloween Mummy Pizza Recipe
- Use Parchment Paper: Moving the whole pizza on parchment paper makes transferring super easy and keeps the shape intact.
- Don’t Overload the Filling: Too much sauce or cheese can make the dough soggy and hard to braid, so keep it balanced.
- Keep the Slits Wide Enough: Cutting strips at least an inch wide ensures they fold easily and don’t tear when you braid them.
- Watch the Baking Time: Ovens vary, so start checking around 18 minutes to get that perfect golden finish without burning.
How to Serve Halloween Mummy Pizza Recipe
Garnishes
I like to add a sprinkle of fresh basil or oregano after baking to add some color and zest. A light dusting of Parmesan cheese adds an extra savory note, and a little drizzle of garlic-infused olive oil at the end ups the flavor without weighing it down.
Side Dishes
My go-to sides with this mummy pizza are a crisp green salad with a tangy vinaigrette and some roasted garlic carrots or sweet potato fries to keep the meal balanced but festive. If you want to keep the Halloween theme, try some “bloody” marinara dip or a spooky black bean salad.
Creative Ways to Present
One time, I set the mummy pizza on a dark serving tray lined with faux cobwebs and added some plastic spiders for a really fun party centerpiece. You can also cut the pizza into mummy “fingers” and place them on a large platter with little bowls of extra sauce for dipping—kids went nuts over that presentation!
Make Ahead and Storage
Storing Leftovers
If you have leftovers (which can be rare!), wrap the pizza tightly in plastic wrap or store in an airtight container in the fridge for up to 2 days. Keeping the pizza wrapped well helps prevent the crust from getting too chewy or hard.
Freezing
I’ve frozen whole Halloween mummy pizzas successfully by first baking them halfway, then wrapping them tightly in foil and plastic wrap. When you’re ready to eat, just thaw in the fridge overnight and bake fully the next day. This saves you time for busy Halloween nights.
Reheating
To bring back that freshly baked crispiness, I always reheat leftovers in the oven at 375°F for about 8-10 minutes instead of the microwave. It keeps the cheese melty and the crust nicely crisp, which is way better than soggy pizza slices.
FAQs
-
Can I use homemade pizza dough for the Halloween Mummy Pizza Recipe?
Absolutely! Homemade dough works beautifully and adds an extra touch of love, but if you’re short on time, store-bought refrigerated dough is a fantastic shortcut without sacrificing taste.
-
How do I make the mummy’s “bandages” look good?
Cut your dough strips about 1 inch wide and make sure they’re not too thick or too thin—this gives you flexibility when folding and braiding without tearing. Also, weaving loosely instead of tight braids creates that messy, authentic mummy vibe.
-
Can I make this recipe vegan?
Yes! Use vegan pizza dough, swap the cheese for a plant-based alternative, pick vegetable-based toppings, and choose a sauce without dairy or meat. It’s easy to keep the spooky look while accommodating vegan diets.
-
What if I don’t have black olives for the eyes?
No worries! You can use small pepperoni slices, bits of bell pepper, or even cut olives that are green or Kalamata—the goal is just to create contrast so the eyes stand out.
-
Can I prepare the Halloween mummy pizza ahead of time?
You can assemble it up to 2 days in advance and keep it covered in the fridge. Just bring it back to room temperature before baking to ensure even cooking and crispy crust.
Final Thoughts
This Halloween Mummy Pizza Recipe isn’t just about the adorable presentation—though that’s a huge bonus—it’s about making mealtime fun and festive without complicating your day. I’ve made this pizza several times for both family dinners and parties, and every single time, it’s a hit. It’s an easy, satisfying way to get everyone involved in the kitchen and create smiles all around. Trust me, once you try this, Halloween pizza night might just become a beloved tradition!
Print
Halloween Mummy Pizza Recipe
- Prep Time: 10 minutes
- Cook Time: 20 minutes
- Total Time: 30 minutes
- Yield: 6 servings
- Category: Main Course
- Method: Baking
- Cuisine: Italian-American
Description
This spooky Halloween Mummy Pizza is a fun and festive twist on traditional pizza, featuring mozzarella, pepperoni, and olive eyes wrapped in braided strips of pizza dough. Perfect for Halloween parties, it’s easy to make and bakes to a golden, delicious finish.
Ingredients
Pizza Base
- 14 oz refrigerated pizza dough (1 can, such as Pillsbury) or homemade pizza dough
Toppings
- 1 1/2 cups pizza sauce or marinara sauce
- 2 cups shredded mozzarella cheese
- 40 slices pepperoni
- 1 black olive
Instructions
- Preheat the Oven: Preheat your oven to 400°F (200°C) and prepare a baking sheet by lining it with parchment paper.
- Prepare the Dough: Place the pizza dough onto a piece of parchment paper on a clean work surface. Spread the pizza or marinara sauce evenly over the middle vertical half of the dough.
- Add Toppings: Sprinkle shredded mozzarella cheese over the sauce then layer the pepperoni slices on top evenly to cover the cheesy area.
- Create Dough Slits: Using a paring knife, cut 1-inch wide diagonal slits on both sides of the sauce-covered area, extending from the sauce out toward the edges of the dough. These strips will be used for braiding.
- Braid the Dough: Fold the bottom dough strips towards the filling, then braid the strips alternately over the toppings to give a messy mummy appearance from bottom to top. Leave some space near the top for the mummy’s eyes, then braid further to form the mummy’s head shape.
- Add Eyes: Spoon some extra pizza sauce into the empty space left at the top and place halves of the black olive on the sauce to create the mummy’s eyes.
- Bake the Pizza: Carefully lift the parchment paper with the assembled mummy pizza onto the baking sheet. Bake in the preheated oven for about 20 minutes or until the dough is golden brown and cooked through.
- Serve: Remove from oven and serve warm for a delicious Halloween-themed treat.
Notes
- Can I make it ahead of time? While the mummy pizza is best served fresh, you can prepare it up to 2 days in advance and store it in an airtight container in the refrigerator.
- Reheat Methods: Warm it up in the oven or microwave before serving to maintain the best texture.
- Substitutions: Use your favorite pizza dough or sauce, and customize toppings to your liking.
- Serving Size: Best shared as a fun party appetizer or light meal for about 6 people.
Nutrition
- Serving Size: 1 slice (assuming 6 slices per pizza)
- Calories: 280 kcal
- Sugar: 3 g
- Sodium: 600 mg
- Fat: 12 g
- Saturated Fat: 6 g
- Unsaturated Fat: 4 g
- Trans Fat: 0 g
- Carbohydrates: 28 g
- Fiber: 2 g
- Protein: 14 g
- Cholesterol: 35 mg

Your email address will not be published. Required fields are marked *