
If you’re looking to wow your guests with something that’s both spooky and utterly delicious, I’ve got just the thing for you: my Halloween Salad with Mozzarella Skulls and Cherry Tomatoes Recipe. Not only is it a feast for the eyes, but it’s also surprisingly simple to make and super fresh-tasting. I absolutely love how the creamy mozzarella transformations into tiny skulls add an unexpected fun factor that turns an everyday salad into a Halloween party hit. Trust me, once you try this, you’ll want to make it every October!
Why You’ll Love This Recipe
- Fun and Festive: The mozzarella skulls make this salad an instant Halloween conversation starter and delight for kids and adults alike.
- Simple Ingredients: You’ll use classic fresh ingredients that come together easily without any complicated prep.
- Fresh and Flavorful: The combination of juicy cherry tomatoes, basil, and balsamic glaze keeps the flavors light but exciting.
- Versatile and Impressive: Perfect for Halloween parties but also adaptable for other occasions or as a unique side salad.

Ingredients You’ll Need
These ingredients play so nicely together — the creaminess of mozzarella contrasts beautifully with the bright acidity of cherry tomatoes, while basil brings a fresh herbaceous note. I always recommend grabbing the freshest salad greens you can find; it really makes a difference.
- Mozzarella balls: Fresh is key here; the soft texture helps them mold nicely into skull shapes.
- Mixed salad greens: Use whatever mix you like — I prefer a colorful blend for extra visual appeal and texture.
- Sweet cherry tomatoes: Their natural sweetness balances the creaminess and adds a pop of color.
- Fresh basil: Thinly sliced, it adds brightness and enhances the Italian vibe of this salad.
- Olive oil: Choose a good-quality finishing oil to drizzle for added richness.
- Balsamic glaze: Adds a tangy sweetness that ties all the flavors together beautifully.
- Flaky sea salt: Use this for a perfect burst of saltiness and crunch.
- Freshly cracked black pepper: Essential for a subtle spice and warmth.
- ½ lemon (optional): A squeeze brightens the greens and helps balance the rich cheese.
Variations
I love to customize this Halloween Salad with Mozzarella Skulls and Cherry Tomatoes Recipe depending on who I’m serving — sometimes I swap the greens or punch up the dressing to keep things interesting. Don’t be afraid to tweak it to fit your taste or occasion!
- Greens swap: I’ve tried using peppery arugula or baby spinach instead of mixed greens for a different flavor profile — both were fantastic!
- Cheese variation: If you can’t find mozzarella balls, cutting fresh mozzarella into cubes works too, though the skull effect is less pronounced.
- Add some crunch: Topping with toasted pine nuts or pumpkin seeds gives a nice textural contrast that my family really enjoyed.
- Dressing twist: A splash of red wine vinegar in place of lemon gives the salad a deeper tang — try both and see which you prefer.
How to Make Halloween Salad with Mozzarella Skulls and Cherry Tomatoes Recipe
Step 1: Prepare the Mozzarella Skulls
Start by preheating your oven to 350°F. I find the key to getting those perfect skull shapes is to bake the mozzarella balls just until they’re soft but not melty — about 6 minutes does the trick. Place one mozzarella ball in each skull mold; you can grease the molds lightly if you’re worried about sticking, but I’ve found the cheese usually pops out easily without extra oil. Immediately after baking, press the cheese into the molds using the back of a spoon to fill all those sneaky crevices. This helps capture the little skull details perfectly. Pop the molds into the fridge for 10 to 15 minutes to firm up, then gently remove each mozzarella skull and set aside. I like to make these ahead so they’re ready to go when assembling the salad.
Step 2: Assemble the Halloween Salad
In a large bowl, toss your mixed salad greens with a drizzle of olive oil and a squeeze of fresh lemon juice — this little step adds such a fresh brightness! Next, scatter the cherry tomatoes over the greens, then artfully place your mozzarella skulls on top. Finish with a sprinkle of thinly sliced fresh basil for herbaceous flair. For the finishing touches, drizzle extra olive oil and balsamic glaze across the top, then season with flaky sea salt and freshly cracked black pepper. Serve immediately for the best texture and flavor — this salad tastes at its freshest right after assembly.
Pro Tips for Making Halloween Salad with Mozzarella Skulls and Cherry Tomatoes Recipe
- Don’t Overbake the Cheese: The mozzarella should be soft enough to mold but not melted — keep a close eye around 6 minutes in the oven.
- Use a Silicone Skull Mold: I discovered these molds make popping out shapes much easier and keep details sharp.
- Chill Before Popping Out: Cooling the cheese in the fridge helps it hold the skull shape better and prevents distortion.
- Assemble Last Minute: To keep salad greens crisp and mozzarella fresh, toss everything together right before serving.
How to Serve Halloween Salad with Mozzarella Skulls and Cherry Tomatoes Recipe

Garnishes
I love to finish this salad with a drizzle of balsamic glaze — it looks like little dark veins weaving around the skulls, which adds to the Halloween vibe. You can also sprinkle some extra fresh basil leaves or even a few edible flowers if you want a pretty gothic touch. Flaky sea salt adds that perfect bite and a touch of crunch that makes every forkful interesting.
Side Dishes
This salad pairs beautifully with simple roasted chicken or grilled sausages when you want something hearty. For a vegetarian spread, I like serving it alongside garlic bread or stuffed mushrooms — they balance out the freshness with savory richness.
Creative Ways to Present
One year, I served this in hollowed-out mini pumpkins for a dramatic centerpiece. You can also plate it in a large shallow bowl, arranging the skulls and tomatoes in a pattern for an artistic “Halloween graveyard” effect. If you’re throwing a kids’ party, setting up a “build-your-own salad” station with skull molds at the table really amps up the fun.
Make Ahead and Storage
Storing Leftovers
If you happen to have leftovers — which is rare because it’s usually devoured — store the salad and mozzarella skulls separately. Wrap the skulls tightly in plastic wrap and keep them refrigerated to maintain their shape and freshness. The greens are best stored in a sealed container with a paper towel to absorb extra moisture.
Freezing
I don’t recommend freezing this salad due to the fresh greens and delicate mozzarella texture. Freezing can cause watery greens and altered cheese consistency, which won’t deliver the same wow factor.
Reheating
This salad is best enjoyed fresh and cold. If you want to gently warm leftover mozzarella skulls for another use, pop them in the oven at low heat (about 275°F) for a few minutes — but save the greens and tomatoes fresh for assembling right before serving.
FAQs
-
Can I use regular mozzarella instead of mozzarella balls for the skulls?
You sure can! If you don’t have mozzarella balls, cut fresh mozzarella into small pieces and press them into the skull molds the same way. The effect won’t be quite as smooth, but it still looks great and tastes fantastic.
-
How do I prevent the mozzarella skulls from sticking to the molds?
Lightly greasing your molds with olive oil before placing the cheese helps, especially if you’re using silicone molds. I’ve also found chilling the cheese in the fridge after baking makes popping them out much easier.
-
Can I prepare the mozzarella skulls ahead of time?
Yes! You can make the mozzarella skulls a day ahead and keep them refrigerated until you’re ready to assemble the salad. Just keep them wrapped loosely to prevent drying out.
-
What’s the best way to store leftovers from this salad?
Keep the salad greens and mozzarella skulls separate in the fridge. Store greens in an airtight container with a paper towel to absorb moisture, and wrap the skulls in plastic wrap to keep their shape.
Final Thoughts
This Halloween Salad with Mozzarella Skulls and Cherry Tomatoes Recipe is such a fun, fresh twist on typical party fare — it always gets compliments, and making those mozzarella skulls is oddly satisfying! I remember the first time I tried it; my family went crazy over how festive and tasty the salad was, even my picky eaters got on board. If you want to impress your friends with something both spooky and delicious, this is my top recommendation. Give it a try this year and watch it become a seasonal favorite in your kitchen!
Print
Halloween Salad with Mozzarella Skulls and Cherry Tomatoes Recipe
- Prep Time: 15 minutes
- Cook Time: 6 minutes
- Total Time: 25 minutes
- Yield: 4 servings
- Category: Salad
- Method: Baking
- Cuisine: American
- Diet: Vegetarian
Description
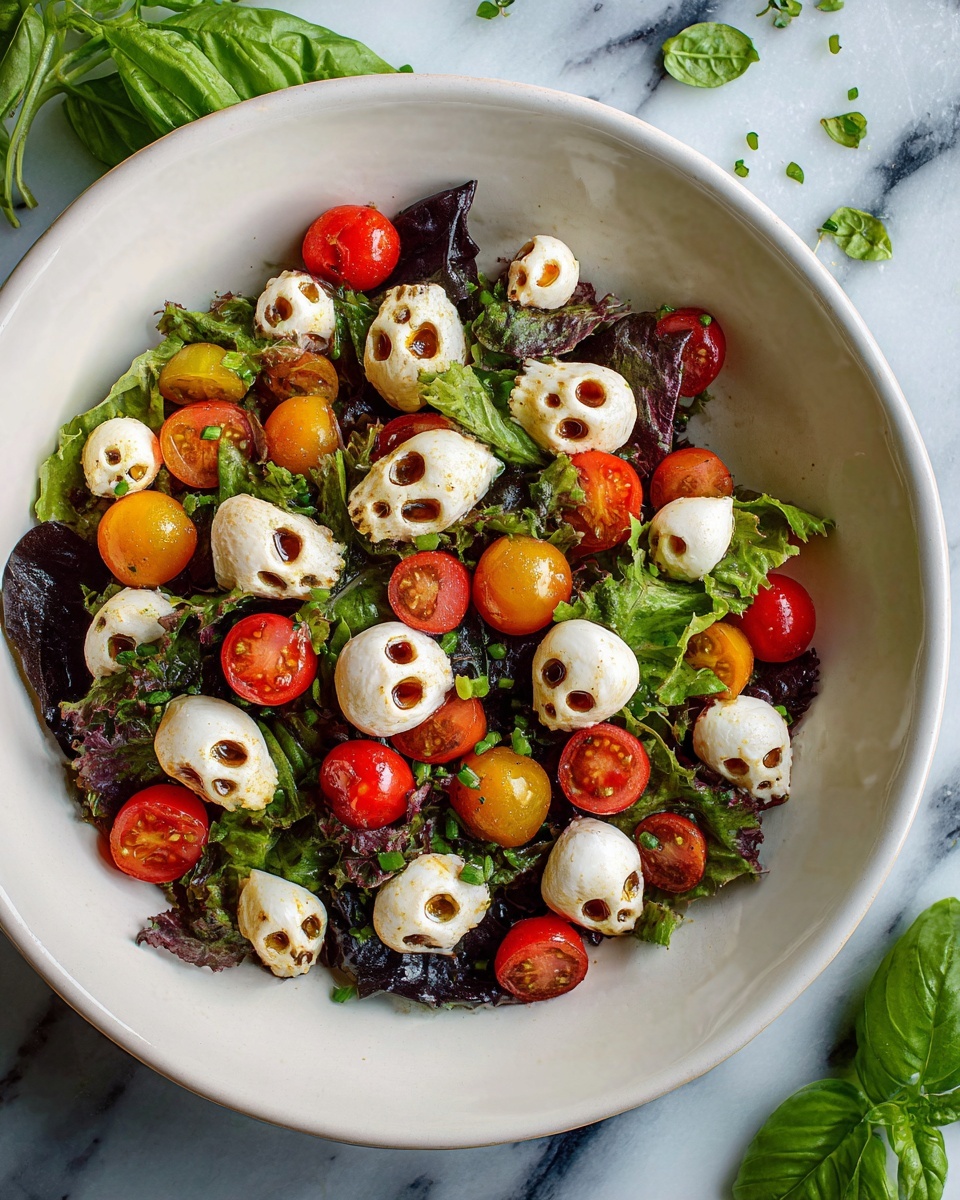
Celebrate Halloween with this spooky and delicious Halloween Salad featuring mozzarella shaped into skulls, fresh mixed greens, sweet cherry tomatoes, and a flavorful combination of basil, olive oil, and balsamic glaze. Perfect as a festive appetizer or light meal that combines fun presentation with fresh, vibrant flavors.
Ingredients
Main Ingredients
- 8 oz mozzarella balls (about 16 small balls or a large ball cut into cubes)
- 6 oz mixed salad greens
- 1 pint sweet cherry tomatoes
- 3 tablespoons fresh basil, thinly sliced
For Dressing and Seasoning
- Olive oil (good quality finishing oil)
- Balsamic glaze
- Flaky sea salt
- Freshly cracked black pepper
- ½ lemon (optional)
Instructions
- Make the mozzarella skulls: Preheat your oven to 350°F. Place one mozzarella ball into each skull mold. Optionally, grease the molds lightly with olive oil to aid in removal, though it’s usually not necessary. Bake the mozzarella balls at 350°F for about 6 minutes until they become soft but are not fully melted.
- Shape the skull molds: Remove the molds from the oven and immediately press each mozzarella ball into the mold with the back of a spoon to ensure it fills all crevices, creating detailed skull shapes. Place the molds in the fridge for 10-15 minutes to let the cheese cool and set.
- Remove and store mozzarella skulls: Carefully pop the mozzarella skulls out of the molds once cooled. Serve them immediately on your salad or store them refrigerated until needed.
- Assemble the salad: In a large mixing bowl, add the mixed salad greens and drizzle with olive oil. Optionally squeeze fresh lemon juice over the greens and toss gently to coat.
- Add toppings: Top the greens with sliced cherry tomatoes, mozzarella skulls, and thinly sliced fresh basil.
- Finish and serve: Drizzle additional olive oil and balsamic glaze over the salad. Sprinkle flaky sea salt and freshly cracked black pepper to taste. Serve immediately and enjoy the festive flavors and spooky presentation.
Notes
- Use a good quality mozzarella for best flavor and texture when shaping skulls.
- Greasing molds with olive oil is optional but can help with easy removal of mozzarella skulls.
- The lemon juice is optional but adds a nice brightness to the salad.
- Serve the salad immediately for best texture and freshness or keep components refrigerated until ready to serve.
- If you don’t have skull molds, use any silicone mold with fun shapes or serve mozzarella balls as a simpler alternative.
Nutrition
- Serving Size: 1 bowl (approximately 1/4 of recipe)
- Calories: 230 kcal
- Sugar: 4 g
- Sodium: 320 mg
- Fat: 18 g
- Saturated Fat: 8 g
- Unsaturated Fat: 9 g
- Trans Fat: 0 g
- Carbohydrates: 6 g
- Fiber: 2 g
- Protein: 10 g
- Cholesterol: 22 mg

Your email address will not be published. Required fields are marked *