
I absolutely love sharing this Moelleux au Chocolat Recipe with you because it’s one of those magical desserts that feels fancy but is surprisingly straightforward to make. When I first tried this rich, molten chocolate cake, I was hooked by its deeply chocolatey flavor and that perfect contrast between a slightly crisp outer layer and a gooey, luscious center. It’s that kind of recipe that’s perfect for impressing guests or turning an ordinary day into a special occasion.
You’ll find that this Moelleux au Chocolat Recipe is not only a crowd-pleaser but also quite forgiving, which I adore. Whether you’re baking for a birthday, a weekend treat, or just craving chocolate, it’s a reliable winner that doesn’t require complicated ingredients or hours in the kitchen. Plus, it pairs beautifully with anything from vanilla ice cream to fresh raspberries – I’ll share my favorite combos later on!
Why You’ll Love This Recipe
- Decadently Chocolatey: Using high-quality dark chocolate and cocoa powder gives a rich intensity that chocolate lovers dream of.
- Simple but Elegant: Just a handful of ingredients, yet the outcome tastes like a gourmet dessert.
- Perfect Texture: That beautiful contrast between a slightly crisp exterior and a meltingly soft center is what makes it unique.
- Flexible Serving Options: Enjoy warm with ice cream or chill it for a different but equally delicious experience.

Ingredients You’ll Need
The beauty of this Moelleux au Chocolat Recipe is in its simplicity. The ingredients are straightforward, but choosing good-quality chocolate and fresh eggs really makes a difference for the best texture and flavor.
- Unsalted butter: Butter adds richness and helps create that melt-in-your-mouth texture.
- Good-quality dark chocolate: I recommend 70% cocoa for a perfect balance of bitterness and sweetness.
- Cocoa powder: Adds a deeper chocolate flavor and helps with the cake’s structure.
- Salt: Just a pinch to enhance the chocolate and balance out the sweetness.
- Large eggs: Eggs provide structure and richness; always use fresh ones for best results.
- Caster sugar: Also known as superfine sugar, it dissolves easily and provides the right sweetness without graininess.
Variations
I love customizing this Moelleux au Chocolat Recipe depending on the occasion or what I have on hand. You should definitely feel free to experiment with different chocolate types or flavors to make it your own.
- Lower cocoa percentage chocolate: I’ve tried it with 54% semi-sweet chocolate to soften the bitterness, which works great if you have a sweet tooth.
- Berry coulis topping: Adding a fresh raspberry or cherry coulis creates a wonderful tart contrast against the rich cake.
- Nut additions: For a crunchy surprise, finely chopped toasted hazelnuts or almonds can be folded into the batter before baking.
- Dairy-free version: Use dairy-free butter and chocolate to create a vegan-friendly variation. I haven’t tried it extensively but it’s worth a shot if that’s your preference.
How to Make Moelleux au Chocolat Recipe
Step 1: Prepare Your Bakeware and Preheat Your Oven
Start by preheating your oven to 180°C Fan (that’s 355°F Fan or 200°C/400°F if you don’t have a fan oven). Generously butter a 23cm (9-inch) springform tin and line the base with baking paper – this helps your cake release easily, especially since this cake is delicate. Trust me, it’s a small step that saves a lot of stress later!
Step 2: Melt Butter and Chocolate to a Glossy Mixture
I usually melt the butter and chocolate together in the microwave using 30-second bursts, stirring between each to avoid burning. If you prefer, set a heatproof bowl over a pan of simmering water (making sure the bowl doesn’t touch the water) to gently melt them. The key here is to end up with a smooth, glossy blend – a chocolate and butter hug, if you will!
Step 3: Add Cocoa and Salt to the Chocolate Mixture
Sift your cocoa powder and a pinch of salt into the melted chocolate, then stir gently until smooth. This enhances the chocolate flavor and ensures there won’t be any lumps, which can sometimes happen with cocoa powder. I discovered this trick early on and it really makes the texture more pleasant.
Step 4: Separate and Whisk Your Eggs
Separate your eggs, putting the whites in a clean bowl for whipping and the yolks into another bowl. Add half the caster sugar to the yolks and whisk until light, pale, and thick – about 2 minutes with an electric whisk. This step builds air into your yolks to keep the cake fluffy.
Step 5: Whip Egg Whites to Stiff Peaks
Whisk the egg whites until they just form soft peaks. Gradually add the remaining sugar and beat until the whites are glossy and stiff but not dry. The trick I learned is to make sure your bowl and whisk are super clean – any grease can stop the whites from whipping properly.
Step 6: Combine Chocolate with Yolks and Fold in Egg Whites
Pour the melted chocolate mixture into the whisked yolks, stirring gently until combined. Then stir in two spoons of the whipped egg whites vigorously — this is called the ‘sacrificial spoon’ and helps the final folding go smoothly. Gently fold in the rest of the egg whites with a spatula, trying to keep as much air as possible, so the batter stays light and airy.
Step 7: Bake Your Cake Base
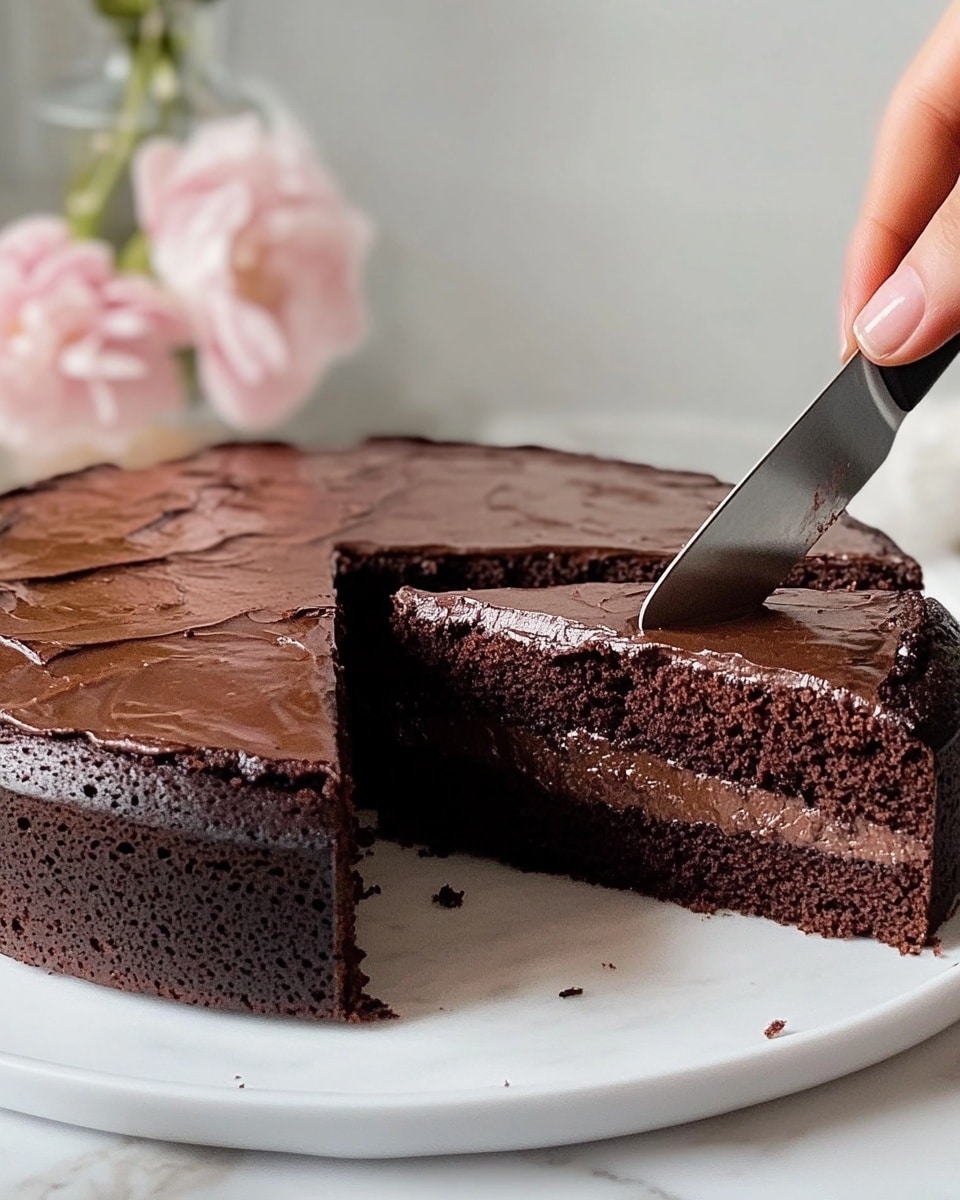
Pour two-thirds of the batter into your prepared tin and bake for about 25 minutes. You’re aiming for a well-risen, puffy top with a clean skewer test. Don’t worry if the cake slightly collapses in the center once out of the oven; that’s actually a signature feature of this cake and part of what makes it so indulgent.
Step 8: Prepare the Molten Chocolate Top Layer
While the base cools completely in the tin, pour the remaining batter into a bowl or cover and chill if you’re using later. Once cooled, gently remove the base cake onto a baking tray lined with parchment paper and spread the reserved batter evenly on top. Bake again at 180°C Fan for 10-15 minutes until a thin crust appears but the center remains soft and slightly jiggly.
Step 9: Let Cool Slightly and Serve
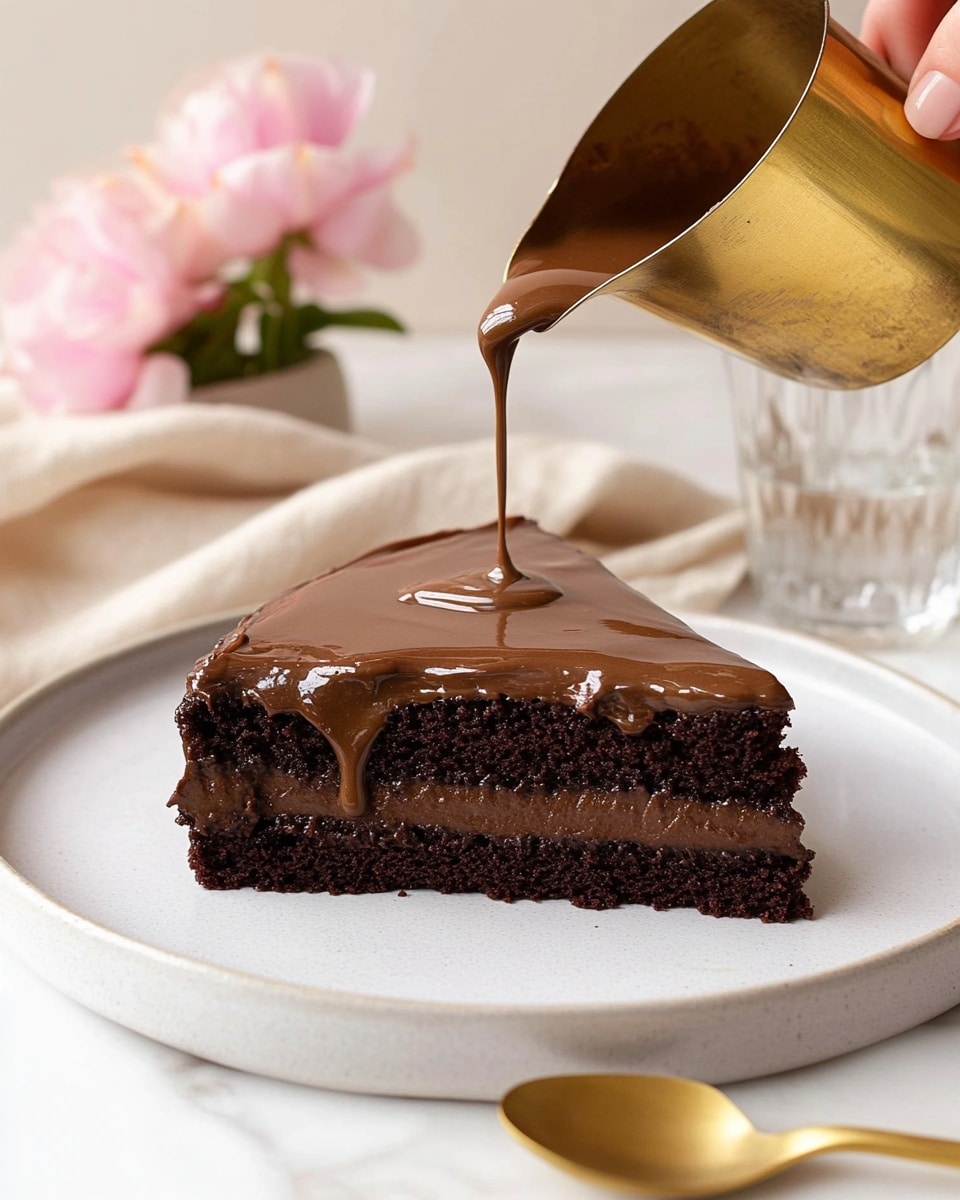
After baking, let your cake rest for about 10 minutes before slicing. I love serving it warm, paired with scoops of rich vanilla ice cream or a splash of double cream. It’s also delicious chilled if you want to make it in advance.
Pro Tips for Making Moelleux au Chocolat Recipe
- Use Quality Chocolate: Investing in good 70% chocolate really pays off with deeper flavor and smoother texture.
- Whisk Eggs Properly: Make sure your egg whites are whipped to stiff peaks for that perfect airy structure.
- Don’t Overbake: The center should still be a bit wobbly after the second bake for that gooey moelleux quality.
- Use a Clean Bowl for Egg Whites: Any fat or residue can prevent stiff peaks—this was a game-changer for me.
How to Serve Moelleux au Chocolat Recipe
Garnishes
I regularly garnish my Moelleux au Chocolat with a dusting of cocoa powder or powdered sugar when serving for a pretty finish. I also adore adding fresh raspberries or cherries — their tartness complements the rich chocolate beautifully. For a luxurious touch, a drizzle of warm custard or a scoop of vanilla bean ice cream truly elevates the dish.
Side Dishes
While this cake can happily stand on its own, I’ve often paired it with fresh berry coulis or a simple dollop of whipped cream to add freshness and balance. It also goes surprisingly well with a light espresso or mint tea on the side, making it perfect to round off a cozy dinner.
Creative Ways to Present
For special occasions, I love serving the Moelleux au Chocolat Recipe in individual ramekins topped with a crumble of crushed pistachios or edible flowers for a bit of flair. Another fun idea is to create a layered dessert by layering slices with fresh fruit and whipped cream in clear glasses — it looks stunning and tastes divine!
Make Ahead and Storage
Storing Leftovers
Leftover Moelleux au Chocolat keeps wonderfully in the fridge for up to three days when wrapped tightly or stored in an airtight container. I always recommend letting it come to room temperature or warming slightly before serving to enjoy that soft, gooey texture again.
Freezing
I’ve frozen this chocolate cake successfully by cutting it into portions first, then wrapping each slice in cling film and foil to prevent freezer burn. When you’re ready, thaw it overnight in the fridge, then warm briefly in the oven to revive its molten center.
Reheating
To warm leftovers, pop slices in a low oven (about 150°C/300°F) for 5-7 minutes or until heated through but still moist inside. Avoid microwaving as it can make the texture a bit rubbery; gentle oven warming is my go-to for maintaining that perfect melt-in-the-mouth quality.
FAQs
-
What does “Moelleux au Chocolat” mean?
“Moelleux au Chocolat” translates from French as “soft chocolate” or “melting chocolate,” which perfectly describes the cake’s soft, molten center and rich texture.
-
Can I use milk chocolate instead of dark chocolate?
You can, but the cake will be sweeter and less intense. I recommend dark chocolate with at least 70% cocoa for the best balance and deep flavor, but a semi-sweet option around 54% will also work if you prefer less bitterness.
-
Why did my cake collapse in the center?
This type of cake doesn’t have flour, so it often collapses a bit when cooled — it’s called a chocolate “slump” cake for this reason. The collapse is normal and contributes to its rich, molten quality, especially since you add a second layer of batter that bakes on top.
-
Can I make this recipe ahead of time?
Yes! You can bake the bottom layer, cool it completely, then refrigerate it for up to 1-2 days before finishing with the top layer. It’s perfect for prepping dessert in advance.
Final Thoughts
This Moelleux au Chocolat Recipe has a special place in my heart because it combines ease with elegance so effortlessly. Every time I make it, I feel like I’m treating myself and my loved ones to something truly indulgent without a ton of fuss. If you give this recipe a try, I promise you’ll love how it turns out—you’ll be reaching for it again and again when craving that perfect chocolate fix!
Print
Delicious Recipe
- Prep Time: 20 minutes
- Cook Time: 40 minutes
- Total Time: 1 hour
- Yield: 8 servings
- Category: Dessert
- Method: Baking
- Cuisine: French
Description
Moelleux au Chocolat is a rich and decadent French chocolate cake known for its molten center and fudgy texture. Made with high-quality dark chocolate, butter, eggs, and sugar, this two-layer cake combines a baked base with a luscious molten topping. Perfectly paired with cream, ice cream, or custard, it offers a divine chocolate experience that’s both elegant and comforting.
Ingredients
For the Cake:
- 225 g unsalted butter, cut into cubes, plus extra for greasing (16 tbsp / 1 cup)
- 225 g good-quality 70% dark chocolate, roughly chopped (8 oz / 1 cup)
- 75 g cocoa powder (3/4 cup)
- Pinch of salt
- 7 large eggs
- 265 g caster sugar (1 1/3 cups / 9.3 oz, also known as superfine sugar in the US)
To Serve:
- Double cream, ice cream, or custard
Instructions
- Preheat and Prepare Tin: Preheat the oven to 180°C Fan (355°F Fan) or 200°C/400°F if not using a fan oven. Generously butter a 23cm (9-inch) round springform tin and line the base with non-stick baking paper. Set aside.
- Melt Chocolate and Butter: Melt the butter and chopped dark chocolate together until smooth and glossy, either using 30-second bursts in the microwave with stirring or over a heatproof bowl set on simmering water, ensuring the bowl doesn’t touch the water to avoid burning.
- Add Cocoa and Salt: Sift cocoa powder and a pinch of salt over the melted chocolate mixture and stir until fully incorporated and smooth. Set aside.
- Separate Eggs and Whisk Yolks: Separate the 7 large eggs, placing the whites in a clean bowl for whisking and the yolks in another large bowl. Add half of the caster sugar (135 g) to the yolks and whisk for about 2 minutes until pale, light, and thick.
- Whisk Egg Whites: Using a stand mixer or electric whisk, whisk the egg whites until soft peaks form. Gradually add the remaining sugar while whisking until stiff, glossy peaks develop.
- Combine Mixtures: Pour the melted chocolate mixture into the egg yolks and gently stir. Then add two spoons of the whisked egg whites into the chocolate-yolk mixture and stir vigorously to incorporate the ‘sacrificial spoon’ of whites.
- Fold in Remaining Egg Whites: Gently fold the remaining egg whites into the chocolate mixture with care to retain as much air as possible, ensuring no visible egg whites remain.
- Bake Base Layer: Pour about two-thirds of the batter into the prepared springform tin and bake for approximately 25 minutes, or until the cake is risen, puffy, and a skewer inserted comes out clean. Let the cake cool completely in the tin.
- Reserve Molten Layer Batter: Pour the remaining one-third of the batter into a medium bowl, cover with cling film, and refrigerate if not using immediately. This will be the molten chocolate top layer.
- Prepare to Finish Cake: Preheat the oven again to 180°C Fan. Line a baking tray with non-stick baking paper and set aside.
- Add and Bake Molten Layer: Once the base cake has cooled, remove from the tin and place onto the lined baking tray. Spread or pour the reserved batter evenly over the cooled cake.
- Bake Final Layer: Bake the cake for 10-15 minutes until a thin crust forms on top with a soft, jiggly center underneath. Remove from oven and allow to stand for 10 minutes.
- Serve: Slice and serve warm with double cream, ice cream, or custard. The cake can also be enjoyed chilled from the fridge.
Notes
- The cake may collapse in the center after baking; this is normal due to its flourless nature and creates the characteristic molten center.
- We recommend using weights for accuracy instead of volume measurements for the best results.
- Serve with fresh raspberries, cherries, or berry coulis for added flavor contrast.
- You can prepare the base layer ahead, cover, and refrigerate for 1-2 days before finishing the cake.
- Leftovers should be cooled completely, covered, and stored in the fridge for up to 3 days.
- Caster sugar is essential for texture; if unavailable, blend granulated sugar to a superfine consistency before use.
- For less bitterness, use dark chocolate with a lower cocoa content (around 54%) if preferred.

Your email address will not be published. Required fields are marked *