
If you’re on the hunt for a fun, eye-catching treat that doubles as a festive activity, I’ve got you covered with this fan-freaking-tastic Monster Marshmallow Pops Recipe. These whimsical pops are not just oh-so-cute but also ridiculously easy to make. Whether you’re preparing for a Halloween party, a kid’s birthday, or just craving a colorful, sweet snack, this recipe will become your new go-to. Trust me, once you try it, you’ll find yourself wanting to mix and match colors and monster styles every single time!
Why You’ll Love This Recipe
- Fun and Creative: You get to decorate each marshmallow like its own quirky little monster — kids and adults alike love it!
- Simple Ingredients: Uses pantry staples plus a handful of candy – no need for fancy baking tools.
- Perfect for Parties: These pops make an adorable display and are easy to hand out at gatherings.
- Customizable: You can change up colors and decorations to suit any theme or occasion.

Ingredients You’ll Need
When I first tried making this Monster Marshmallow Pops Recipe, I was pleasantly surprised by how well these ingredients come together to create both fun and flavor. Choosing vibrant gel colors and a variety of candies really brings these monsters to life. If you plan ahead and set your decorations nearby, the process flows effortlessly.
- White frosting: I love using canned frosting for convenience, but homemade frosting works beautifully if you want a richer taste.
- Gel food colors: These give you bright, vivid colors without thinning out your frosting like liquid dye would.
- Large marshmallows: The perfect canvas for decorating – big enough to hold plenty of frosting and details.
- Mini M&M’s: Grab assorted colors to use as eyes, ears, and other fun monster features.
- Candy eyes: They add instant character and cuteness to each pop.
- Black sprinkles (jimmies): These are perfect for creating monster hair textures.
- Black gel icing: Great for drawing mouths or tiny details when sprinkles aren’t ideal.
- White sugar pearls: These little gems are stunning for pumpkin eyes or other accents.
- Oreos or Oreo Thins: Halved cookies make the best bat wings with a great crunch.
- Popsicle sticks, wax paper, and styrofoam block: Essential tools for dipping, drying, and displaying your pops.
Variations
I love how easy it is to adapt this Monster Marshmallow Pops Recipe to your own style or dietary needs. You can get as creative or as simple as you want — I’ve found that tossing in new colors or swapping candies really keeps it exciting for repeat runs.
- Vegan Variation: Use vegan marshmallows and a dairy-free frosting to make these friendly to all diets — my sister tried it and swore by it!
- Seasonal Colors: Switch up the gel colors for different holidays — reds and greens for Christmas, pastels for Easter, or spooky blacks and oranges for Halloween.
- Flavor Twists: Add a few drops of peppermint or almond extract to your frosting to give your monster pops a new personality.
- Gluten-Free Options: Choose gluten-free cookies or skip the wings entirely if you’re concerned about allergies.
How to Make Monster Marshmallow Pops Recipe
Step 1: Prep Your Workspace and Frosting
First off, set up your decorating station with all the candies and sprinkles spread out on plates or bowls so they’re easy to reach — trust me, it makes the process so much smoother. Divide the frosting evenly into four deep small bowls, which will each be dyed a different color. Heat the frosting in the microwave for about 10 seconds per bowl (stirring in between), just enough to soften it for dipping without making it runny.
Step 2: Color and Dip Each Monster
Next, add gel food coloring to each bowl: teal for Frankensteins, purple for bats, pink or magenta for monsters, and orange for pumpkins. Stir well so the color is even. Working with one color at a time, gently push a popsicle stick about 3/4 through a large marshmallow. Then, holding the stick, dip the marshmallow halfway down into the colored frosting bowl and spin it to coat all around. Tap the stick on the edge to shake off excess frosting. Your marshmallow should be smoothly covered—this frosting acts like colorful glue for the decorations.
Step 3: Add Your Monster Features
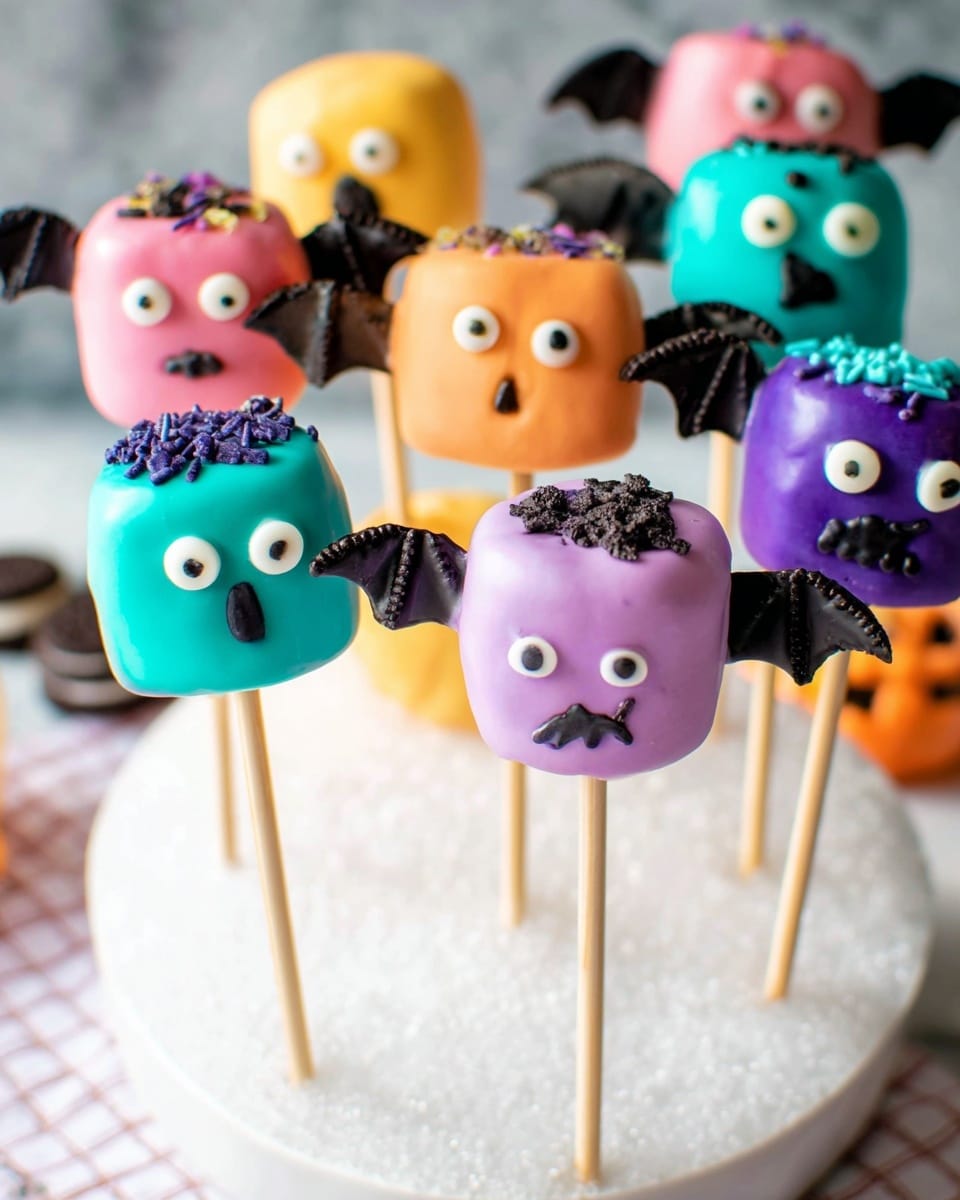
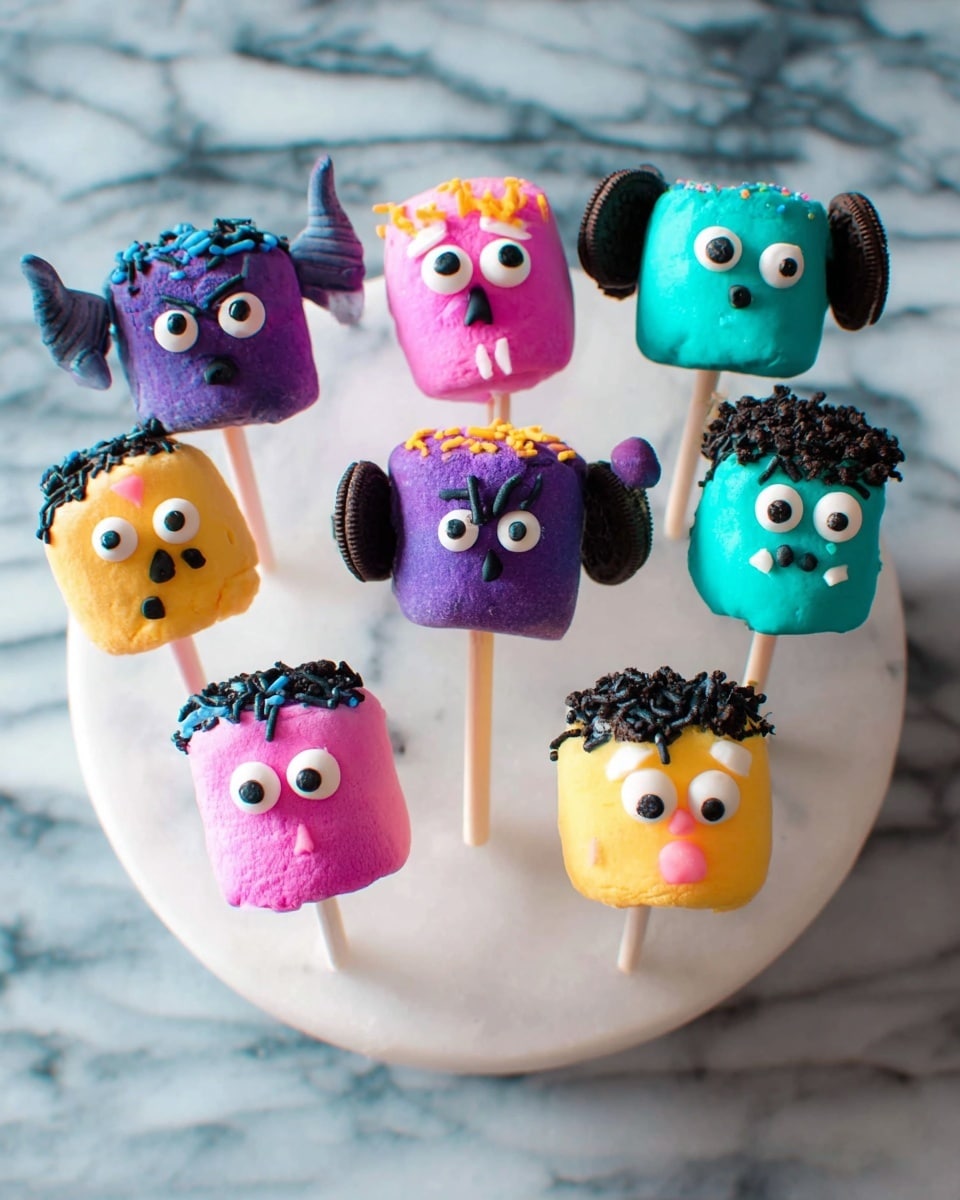
This is the creative part where your marshmallows become monsters! For Frankenstein pops, dip the top of the frosted marshmallow into black sprinkles to create “hair,” then add mini M&M “ears,” candy eyes with gel icing pupils, and a sprinkle mouth. Bat pops get Oreo wing halves stuck on with frosting, blue M&M “eyes,” and gel icing dots for pupils and mouths. Monster pops get black sprinkle hair and candy eyes (use one or three for a spooky look) with a tiny sprinkle or icing mouth. Finally, pumpkins get orange frosting with triangle eyes and jagged mouths drawn on with black gel icing, accented by white sugar pearls in the eyes. Place each decorated pop hair side down on wax paper to dry.
Step 4: Let Them Set and Store
After decorating all 24 pops, give the frosting at least 20-30 minutes to firm up. I usually pop them into the fridge standing upright in a styrofoam block — it keeps them safe and upright while the frosting hardens. Once dry, store your pops in a large airtight container, making sure the sticks aren’t pressing the marshmallows together. These treats usually don’t last more than a couple of days once out, but properly stored they can keep for up to a week.
Pro Tips for Making Monster Marshmallow Pops Recipe
- Softening Frosting: Don’t overheat the frosting or it’ll get too runny; a few seconds at a time with stirring is perfect for smooth dips.
- Stick Placement: Inserting the popsicle sticks about 3/4 of the way into the marshmallow prevents them from wobbling or falling off when dipped.
- Quick Work: Have your decorations prepped and ready since the frosting can dry fast once cooled.
- Avoid Soggy Wings: Attach Oreo wings immediately after frosting before it sets, so they stick firmly instead of falling off later.
How to Serve Monster Marshmallow Pops Recipe
Garnishes
I usually garnish my Monster Marshmallow Pops with extra black jimmies and white sugar pearls scattered on the serving plate to add contrast and fun texture. Sometimes, I toss in colorful sprinkles or edible glitter to really amp up the party vibe — it’s a simple way to make the display even more festive!
Side Dishes
These pops are sweet and substantial on their own, but I love pairing them with a crunchy side like caramel popcorn or apple slices coated in cinnamon sugar for a balance of textures and flavors. If you’re serving at a kids’ party, mini juice boxes or hot chocolate cups are also perfect companions.
Creative Ways to Present
For Halloween parties, I stick the Monster Marshmallow Pops upright in a decorated styrofoam block wrapped with spooky fabric or paper to mimic a monster garden. Another fun presentation I tried was arranging them lying flat in rows on a colorful tray lined with edible confetti. If you want an interactive display, set out bowls of extra decorations so guests can add to their own monster pops!
Make Ahead and Storage
Storing Leftovers
If you happen to have leftovers—and believe me, they usually disappear fast—I store mine in an airtight container in the fridge. To keep the marshmallows from getting sticky or soggy, I separate layers with parchment paper. They stay fresh and just as cute for up to a week.
Freezing
Freezing Monster Marshmallow Pops isn’t my go-to because the frosting texture can get a bit off, but if you want to, wrap each pop individually in plastic wrap and place them in a freezer-safe container. When thawing, bring them to room temperature slowly so the frosting doesn’t sweat or crack.
Reheating
Since these are no-bake treats, there’s no reheating needed. If you want the frosting softer before serving, just let the pops sit at room temperature for 20 minutes. Avoid microwaving or heating because it’ll melt the frosting and ruin your monsters’ faces!
FAQs
-
Can I use regular food coloring instead of gel colors for this Monster Marshmallow Pops Recipe?
You can, but gel food colors are definitely my preference here. They provide more vibrant colors without thinning out the frosting, which helps maintain a nice, thick coating on your marshmallows. Regular liquid food coloring can make the frosting too runny, making it tricky to get that smooth finish.
-
How far ahead can I make Monster Marshmallow Pops?
You can absolutely prepare these a day in advance and keep them refrigerated. Just keep them in an airtight container separated by parchment paper to avoid sticking. I wouldn’t recommend making them more than 2–3 days ahead, though, as marshmallows can start to get a bit sticky over time.
-
Can I use different candies to decorate if I don’t have mini M&M’s or candy eyes?
Definitely! Use whatever candies you love—chocolate chips, colored sprinkles, small gummy candies, or even edible markers to draw on faces. The best part about this recipe is how customizable it is, so feel free to experiment.
-
My popsicle sticks sometimes push through the frosting and mess up the marshmallow surface. Any tips?
This happens if the frosting is too thick or you dip quickly without steady hands. Try to dip slowly and don’t push the stick too far into the marshmallow before frosting. Also, warming frosting gently helps it flow better, allowing a smooth coat without tugging on the marshmallow surface.
Final Thoughts
I absolutely love how this Monster Marshmallow Pops Recipe turns out every time — it’s such a delightful mix of creativity and sweetness that brings smiles no matter the occasion. When I first made these with my kids, they were so proud of their colorful monsters, and honestly, I couldn’t stop decorating either! This recipe is perfect if you want a no-stress, playful dessert that doubles as an experience. I can’t wait for you to try it and see just how much fun you’ll have crafting these adorable marshmallow monsters!
Print
Monster Marshmallow Pops Recipe
- Prep Time: 10 minutes
- Cook Time: 0 minutes
- Total Time: 10 minutes
- Yield: 24 pops
- Category: No-Cook
- Method: No-Cook
- Cuisine: American
- Diet: Vegetarian
Description
Create fun and festive Monster Marshmallow Pops perfect for Halloween or any party. These colorful treats are made by dipping large marshmallows into colored white frosting, then decorating them with candy eyes, mini M&Ms, Oreos, and sprinkles to resemble cute monster characters like Frankensteins, bats, pumpkins, and whimsical monsters. Easy to make and visually impressive, they are ideal for kids and adults alike and can be displayed standing up or on a tray.
Ingredients
Frosting and Colors
- 1 can white frosting (or 2 cups homemade)
- Orange gel food color (4 drops)
- Pink or magenta gel food color (4 drops)
- Teal gel food color (4 drops)
- Purple gel food color (4 drops)
Marshmallow Pops
- 24 large marshmallows
- 36 Mini M&M’s (yellow, orange, red, and blue)
- 12 candy eyes
- 1/4 cup black sprinkles (jimmies kind)
- Black gel icing
- 12 white sugar pearls
- 6 Oreos or Oreo Thins – halved (or mini Oreos)
Supplies
- 4 small bowls
- Popsicle sticks
- Wax paper
- Styrofoam block to stand pops up in
Instructions
- Prepare colored frostings: Divide the white frosting evenly into 4 small bowls deep enough to dip marshmallows into. Microwave one bowl at a time for 10 seconds, stir, and heat an additional 5 seconds if needed to thin. Add gel food coloring as per each monster’s color and stir well.
- Assemble Frankensteins: Add 4 drops teal color to one bowl. Insert six popsicle sticks about 3/4 through each marshmallow. Dip half an inch of the stick in frosting, turn upside down and dip marshmallow into frosting to fully coat. Tap off excess frosting for smooth finish. Dip tops in black sprinkles for hair, add 2 red mini M&Ms on sides for ears, 2 yellow or orange mini M&Ms for eyes with black gel dots in centers, and a black sprinkle or gel icing mouth. Place hair side down on wax paper. Repeat for all six.
- Assemble Bats: Add 4 drops purple color to second bowl. Prepare marshmallows as above. Attach two Oreo halves as wings on marshmallow backs. Lay wing side down on wax paper. Add two blue mini M&Ms for eyes with black gel icing dots in centers and a black jimmies sprinkle or gel icing mouth. Repeat for six marshmallows.
- Assemble Monsters: Add 4 drops pink or magenta color to third bowl. Dip marshmallows as before, coat fully with frosting, and tap off excess. Dip tops in black sprinkles for hair. Add 1 or 3 candy eyes and a sprinkle or gel icing mouth. Place hair side down on wax paper. Repeat for six marshmallows.
- Assemble Pumpkins: Add 4 drops orange color to fourth bowl. Dip and coat marshmallows as before. Use black gel icing to draw triangle eyes and jagged mouth. Place a white sugar pearl in each eye’s center. Either set upside down on wax paper or insert into styrofoam block to let frosting set. Repeat for six marshmallows.
- Let Frosting Set: Allow pops to sit at room temperature or refrigerate until frosting hardens, approximately 30-60 minutes.
- Storage and Serving: Store hardened pops in an airtight container without touching each other for up to one week. Serve by laying on a flat tray or standing in a styrofoam block for a festive display.
Notes
- Heat frosting carefully to thin it for easier dipping, but do so in short increments to avoid overheating.
- Use gel food colors to achieve vibrant colors without thinning frosting too much.
- When attaching Oreos as wings for bats, be gentle to avoid breaking the cookies.
- Black sprinkles (jimmies) provide a textured hair effect; gel icing can be used for fine details like mouths and eye dots.
- Allow frosting to fully harden before storing to prevent decorations from shifting.
- Use styrofoam block to stand pops upright for drying and display.
- Customize monster faces with different candy eyes and colors for added fun variety.
Nutrition
- Serving Size: 1 pop
- Calories: 110
- Sugar: 18g
- Sodium: 55mg
- Fat: 3.5g
- Saturated Fat: 2g
- Unsaturated Fat: 1g
- Trans Fat: 0g
- Carbohydrates: 21g
- Fiber: 0.5g
- Protein: 0.5g
- Cholesterol: 0mg

Your email address will not be published. Required fields are marked *