

If you’re looking for a fun, spooky snack that’s as easy as it is adorable, you’re going to love this Mummy Dogs Recipe. I first tried this at a Halloween party and instantly fell in love with how simple, playful, and downright tasty it was. Wrapped in golden, flaky dough with just enough peeks of savory hot dog showing through, these “mummies” always steal the show—whether it’s for a kid’s lunchbox surprise or a festive appetizer. Stick with me, and I’ll walk you through everything you need to make these perfectly wrapped treats that everyone will ask for again and again.
Why You’ll Love This Recipe
- Super Simple Prep: You only need two main ingredients and minimal steps, making this a no-fuss recipe you can whip up last minute.
- Kid and Crowd-Pleaser: The fun, spooky look delights kids and adults alike—you’re basically guaranteed a hit every time.
- Customizable Fun: You can easily switch up dips, dough types, or toppings to suit your taste or dietary needs.
- Great for Themed Occasions: Whether it’s Halloween, a party snack, or a quirky weeknight dinner, this recipe fits right in.

Ingredients You’ll Need
This Mummy Dogs Recipe is all about simplicity and fun. The two main ingredients complement each other perfectly—the buttery, flaky crescent roll dough wraps around savory hot dogs to create this festive treat. When shopping, look for crescent rolls with perforations you can press together so the dough holds better when you cut strips.
- Hot Dogs: I prefer regular beef or turkey hot dogs for their flavor, but vegetarian options work great too.
- Crescent Roll Dough: Using refrigerated dough from the package is a big time-saver and gives you that light, golden crust.
Variations
One thing I love about the Mummy Dogs Recipe is how easy it is to tweak based on your mood or pantry. You can make it classic or get a little wild with flavors and toppings. Don’t hesitate to make it your own!
- Cheesy Mummy Dogs: Before wrapping, place a thin slice of cheese on the hot dog for a melty surprise—it’s always a family favorite.
- Spicy Version: Add a dash of smoked paprika or chili powder in the dough strips or mix in some spicy mustard for a little kick.
- Vegetarian Twist: Swap hot dogs for veggie dogs or cut cooked sausages into smaller pieces for mini mummies.
- Gluten-Free: Use gluten-free crescent roll dough or puff pastry if you find a brand that works well for wrapping.
How to Make Mummy Dogs Recipe
Step 1: Prep the Dough Like a Pro
Start by preheating your oven to 375°F—this is key so your mummies bake evenly. Open your crescent roll package and gently unroll the dough on a clean surface. Here’s a little trick I learned: press the perforations together firmly with your fingers or a rolling pin so you get one solid sheet without holes. This helps when you cut the dough into strips, so your “bandages” don’t fall apart during baking.
Step 2: Cut Strips and Wrap
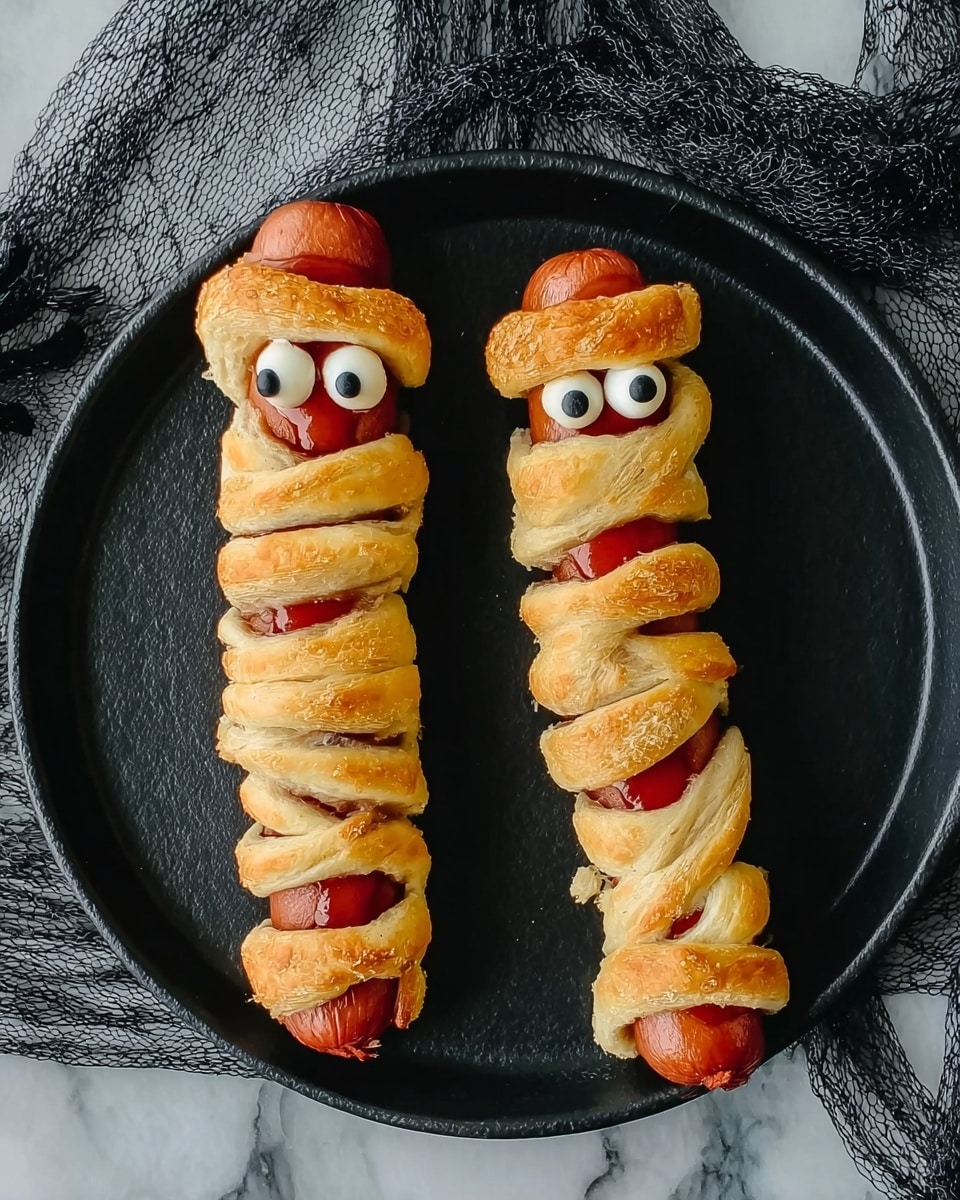
Grab a sharp knife or a pizza cutter and slice the dough into roughly 1/4-inch strips. This width is perfect—wide enough to wrap but thin enough to get that classic mummy look. Now, take a hot dog and start wrapping the strips around it. Stretch the strips slightly as you wrap, overlapping and criss-crossing them haphazardly so the hot dog peeks through. I love leaving gaps here because it makes them look authentic and a little spooky. Work quickly, but don’t rush—if the dough gets too warm, it’s harder to handle.
Step 3: Bake Until Gorgeous
Place your wrapped hot dogs on a baking sheet lined with parchment paper or a silicone mat to prevent sticking. Pop them in the oven for 10 to 12 minutes—keep an eye on them! You want a beautiful golden brown color on the dough and the hot dogs heated through. The smell alone will have everyone hovering. As soon as they’re done, pull them out and let them cool just a bit before the next step.
Step 4: Add Those Cute Eyes
Here’s where the magic happens. If you have candy eyes, perfect—dab a small dot of ketchup or mustard on the back of each eye, then stick two eyes on every mummy dog. Don’t have candy eyes? No worries! I do this all the time—I just add two tiny dots of ketchup or mustard right where the eyes should go. It’s simple, effective, and the kids love it.
Pro Tips for Making Mummy Dogs Recipe
- Sealing Perforations: Pressing the dough’s perforations flat keeps your strips from tearing when wrapping, making the mummies sturdier.
- Stretch the Dough Gently: Stretching dough strips slightly helps them wrap snugly without snapping or bunching.
- Use Silicone Mats: Baking on a silicone mat prevents sticking and makes cleanup so much easier.
- Don’t Overbake: Keep an eye during the last few minutes to avoid dough burning; golden brown is your sweet spot.
How to Serve Mummy Dogs Recipe
Garnishes
I usually keep it simple with the classic candy eyes, but some days I like to add a little extra flair. You could sprinkle a pinch of smoked paprika or finely chopped fresh herbs like parsley for a hint of color and flavor. Plus, setting out ramekins of ketchup, mustard, or even a cheesy dip gives everyone options to customize their “mummy.”
Side Dishes
My go-to sides to serve with mummy dogs are crispy oven-baked fries or a fresh simple salad to balance things out. Especially with kids, carrot sticks and cucumber slices on the side make this feel a little healthier. And if you’re at a party, little cups of chili or baked beans on the side always bring smiles.
Creative Ways to Present
For Halloween, I’ve arranged these on a platter lined with shredded lettuce for a graveyard effect. Another fun idea is serving them standing up by skewering each mummy dog with a wooden stick—perfect for little hands to grab during buffets. For a kid’s birthday, I even made mini-mummy dogs with cocktail sausages and mini crescent dough bites, which were a smash hit.
Make Ahead and Storage
Storing Leftovers
If there are any mummy dogs left (rare in my house!), wrap them tightly in plastic wrap or store them in an airtight container in the fridge. They keep well for 2-3 days. I recommend reheating them gently so the dough doesn’t get rubbery.
Freezing
I’ve frozen unbaked wrapped mummy dogs on a baking tray first, then popped them into a ziplock bag. When you want to bake them, no need to thaw—just add a few extra minutes to the bake time. This trick saves time on busy days or if you want a fun surprise snack ready to go.
Reheating
Reheat leftover mummy dogs in a toaster oven or regular oven at 350°F for about 5-7 minutes to bring back that crispiness. Avoid microwaving if you want to keep the dough nice and flaky; otherwise, it ends up a little soggy.
FAQs
-
Can I use different kinds of dough for this Mummy Dogs Recipe?
Absolutely! Crescent roll dough is traditional because it’s flaky and easy to work with, but puff pastry or biscuit dough can also work well. Just keep in mind the baking times might slightly vary depending on the dough used.
-
What can I use if I don’t have candy eyes?
No worries if candy eyes aren’t on hand. Simply add two small dots of ketchup, mustard, or even a dab of cream cheese or mayo with a bit of pepper on top for contrast. It’s simple and still super cute!
-
Can I prepare these ahead of time?
Yes! You can assemble the mummy dogs, cover them tightly, and refrigerate for a few hours before baking. Just add a couple of minutes to the baking time if they go in cold.
-
Are mummy dogs kid-friendly?
Definitely! Kids love the fun appearance and tasty flavors. Just watch out for hot spots right after baking and let them cool enough to enjoy safely.
Final Thoughts
I absolutely love how this Mummy Dogs Recipe brings a little whimsy and ease to mealtime. It’s one of those dishes that feels special despite its simple ingredients, and the smiles it sparks are priceless. Whether you’re teaming it with friends for Halloween or sneaking a fun twist into a weeknight dinner, your kitchen will thank you for this crowd-pleaser. So go ahead—wrap, bake, and watch your mummies disappear before your eyes!
Print
Mummy Dogs Recipe
- Prep Time: 15 minutes
- Cook Time: 12 minutes
- Total Time: 27 minutes
- Yield: 6 mummy dogs
- Category: Appetizer
- Method: Baking
- Cuisine: American
Description
Mummy Dogs are a fun and spooky twist on classic hot dogs, perfect for Halloween parties and kid-friendly gatherings. Wrapped in crescent roll dough to resemble mummy bandages, these hot dogs bake to golden perfection and are finished with candy eyes or ketchup/mustard details to create a creepy, yet delicious treat.
Ingredients
Ingredients
- 6 Hot dogs
- 1 package Crescent Roll Dough
- Candy eyes (optional)
- Ketchup or mustard (for decorating)
Instructions
- Preheat Oven: Preheat the oven to 375 degrees F (190 degrees C) to prepare for baking the mummy dogs.
- Prepare Dough: Open your crescent roll package and unroll the dough. Press along the perforations to seal the dough into one sheet, then cut it into 1/4 inch wide strips to use as the mummy bandages.
- Wrap Hot Dogs: Stretch and wrap the dough strips around each hot dog, overlapping and criss-crossing to mimic mummy bandages. Leave some gaps so the hot dog peeks through for a spooky effect.
- Bake: Place the wrapped hot dogs on a baking sheet and bake them in the preheated oven for 10-12 minutes, or until the dough is golden brown and the hot dogs are heated through.
- Add Eyes: Remove the mummy dogs from the oven and let cool slightly. Attach candy eyes using a small dot of ketchup or mustard as adhesive, adding two eyes per mummy dog. Alternatively, draw eyes directly on the dough using ketchup or mustard if candy eyes aren’t available.
Notes
- If candy eyes are not available, you can create eyes by placing small dots of ketchup or mustard on the mummy dogs where the eyes would go.
- Stretching the dough slightly helps achieve the bandage effect and prevents gaps from tearing.
- Use a baking sheet lined with parchment paper for easy cleanup.
- Watch closely in the last few minutes of baking to avoid over-browning the dough.
Nutrition
- Serving Size: 1 mummy dog
- Calories: 250
- Sugar: 2g
- Sodium: 650mg
- Fat: 12g
- Saturated Fat: 4g
- Unsaturated Fat: 6g
- Trans Fat: 0g
- Carbohydrates: 26g
- Fiber: 1g
- Protein: 9g
- Cholesterol: 25mg

Your email address will not be published. Required fields are marked *