

If you’re searching for a fun, spooky treat to whip up for Halloween, let me introduce you to my all-time favorite Mummy Halloween Cookies Recipe. These little mummies are super cute, ridiculously easy to make, and just perfect for impressing trick-or-treaters or party guests. I absolutely love how this recipe turns simple vanilla cookies into festive Halloween stars with white candy “bandages” and tiny candy eyes that look so adorable. Grab your apron—these cookies are a blast to make and eat!
Why You’ll Love This Recipe
- Super Simple Ingredients: You probably have everything already, and the vanilla cookies form the perfect base.
- Kid-Friendly and Fun: My family goes crazy for these mummies every Halloween—it’s a hands-on, creative project.
- Fast to Prep and Chill: This cookie project is perfect whether you’re last-minute or planning ahead.
- Delightful to Eat: The creamy candy coating and mini M&M eyes make for a crazy tasty bite every time.

Ingredients You’ll Need
The magic here really happens through simple ingredients working together. The vanilla cookies provide a sweet, crisp canvas, while the white candy coating molds perfectly to create those signature mummy bandages. For the eyes, mini M&Ms add a pop of color and character. All ingredients are easy to find, so no stress shopping here!
- Vienna Fingers vanilla cookies: These are ideal because their shape looks like little mummy bodies, and their flavor pairs perfectly with the candy coating.
- White candy coating: Also called white melting wafers or candy melts, this is what gives the mummies their iconic wrapping look.
- Mini M&Ms: Tiny and colorful, these serve as the cutest “eyes” for your mummies—so fun to place!
Variations
I love making this Mummy Halloween Cookies Recipe just as is, but sometimes I like to switch it up or accommodate what’s in my pantry. Mixing it up keeps the whole cookie-making experience creative and fresh, and you should definitely feel free to put your own spin on these spooky treats!
- Chocolate Candy Coating: When I tried using white and milk chocolate candy melts together, my family loved the contrast—it gave the mummies a more textured, interesting look.
- Peanut Butter or Almond Butter Filling: Try sandwiching your Vienna Fingers with a smear of nut butter before dipping for a rich, nutty surprise.
- Gluten-Free Cookies: Swap the classic Vienna Fingers for gluten-free vanilla wafers—works like a charm without losing that crispy base.
- Different Candy Eyes: If you can find candy eyeballs in the baking aisle, those are adorable, or try mini chocolate chips or colored icing.
How to Make Mummy Halloween Cookies Recipe
Step 1: Melt Your White Candy Coating
Start by melting the white candy coating following the instructions on the package. I usually microwave mine at 50% power in 30-second intervals, stirring each time, to keep it smooth and avoid burning. If you want to go old-school, gently melting over a double boiler is another reliable method. This part is crucial because a silky smooth coating makes all the difference in the final look and eatability of your mummies.
Step 2: Dip and Coat Your Cookies
Grab a fork, dip each vanilla cookie into the melted candy, making sure it’s completely coated on all sides. Then carefully transfer it to a piece of waxed paper to set. Don’t rush this! It’s tempting to coat all the cookies at once, but melting smaller batches ensures your candy coating stays in perfect dipping consistency. Repeat until all cookies are coated.
Step 3: Let the Coating Set and Chill
Once dipped, place the cookies in the fridge for at least 30 minutes (or leave them on the counter for about an hour) so the coating can harden properly. I learned that chilling speeds things up and helps keep the shape when we add the drizzle next. Patience here pays off with beautiful mummies!
Step 4: Drizzle the “Bandages”
Melt more white candy coating and pour it into a small Ziploc bag—then snip a tiny corner off. Drizzle thin “bandages” across each cookie to create the mummy effect. It’s so satisfying to watch them take shape! Be sure not to overdo it; light, uneven drizzles look more authentic.
Step 5: Add the Mini M&M Eyes and Set
While the drizzle is still wet, press two mini M&Ms onto each cookie to form eyes. These little colorful poppies bring the mummies to life. Then, let the cookies sit until the drizzle hardens—about an hour at room temp or 30 minutes in the fridge. After that, prepare yourself for all the compliments!
Pro Tips for Making Mummy Halloween Cookies Recipe
- Don’t Overheat the Candy Coating: I discovered heating at half power prevents the candy from seizing up—no one wants chunky coating!
- Use a Fork for Dipping: It lets excess coating drip off evenly to avoid thick spots that can make the cookies soggy.
- Chill for Crisp Results: Putting the cookies in the fridge helps them set quickly and keeps your ‘bandages’ well-defined.
- Work in Small Batches: Melting just enough coating for a handful of cookies means the candy remains smooth and easier to work with.
How to Serve Mummy Halloween Cookies Recipe
Garnishes
I usually keep it simple with the mini M&M eyes, but for an extra spooky touch, you can dust the cookies lightly with edible glitter or add tiny dots of black icing around the eyes for brows. Sometimes, a dusting of cocoa powder gives a dusty, ancient mummy vibe that I find pretty fun for Halloween.
Side Dishes
These cookies shine as party treats but also pair beautifully with warm apple cider or hot chocolate for cozy fall vibes. I once brought them to a Halloween potluck alongside caramel popcorn and spiced pumpkin muffins, and the trio was a total hit!
Creative Ways to Present
One year, I arranged the mummy cookies on a plate lined with fake spider webs for an eerie effect and scattered little plastic spiders around. Another time, I placed them on an old wooden board with orange and black cupcake liners as little “coffins.” It’s all about having fun and making the Halloween spirit come alive.
Make Ahead and Storage
Storing Leftovers
Once fully set, store your mummy cookies in an airtight container at room temperature. I usually stack them between sheets of parchment paper to keep them from sticking together. They last fresh and tasty for up to two weeks—perfect if you want to make them ahead of a party.
Freezing
Freezing is such a lifesaver! After the candy coating hardens, I place the cookies in a single layer on a baking sheet to freeze until firm, then transfer them to a freezer-safe bag. They keep well for up to four months and defrost in under an hour at room temp with no loss in flavor or texture.
Reheating
These cookies don’t really need reheating, but if you want the coating slightly soft for dipping or adding fresh drizzle, just pop them in the microwave for 5–10 seconds. Be careful—too long and the candy melts off! It’s great for a quick refresh before serving.
FAQs
-
Can I use regular chocolate instead of white candy coating for the Mummy Halloween Cookies Recipe?
You can absolutely substitute regular chocolate, but keep in mind it melts differently and may not have the same smooth, hard set that candy coating provides. White candy coating is specially formulated to harden with a glossy finish, which helps create those perfect mummy “bandages.” If using regular chocolate, be sure to temper it properly for the best results.
-
What if I don’t have Vienna Fingers? Can I use other cookies?
Of course! While Vienna Fingers are really ideal due to their shape and vanilla flavor, vanilla wafers or even sugar cookies can work. Just choose something fairly sturdy that won’t crumble when dipped in the melted coating. Smaller cookies might need a gentler hand when dipping and decorating.
-
How to prevent the candy coating from clumping during melting?
The best trick is to heat the candy coating slowly at 50% power in the microwave or use a double boiler method. Stir frequently—this avoids overheating hotspots where the chocolate burns or seizes. If it does clump, you can often smooth it out gently by adding a tiny splash of vegetable oil.
-
Can I make the Mummy Halloween Cookies Recipe ahead of time?
Definitely! I recommend making the cookies and coating them a day in advance to let the candy set fully and flavors meld. Store them in an airtight container at room temp or in the fridge. They actually taste even better the next day with the coating nicely firmed up.
-
What’s the best way to keep mini M&Ms eyes from sliding off?
Press the mini M&Ms gently into the drizzle coating while it’s still wet—that sticky surface acts like glue! If you let the drizzle dry first, the candy won’t adhere as well. Work quickly and allow everything to set undisturbed for a clean finish.
Final Thoughts
This Mummy Halloween Cookies Recipe holds a special place in my heart because it combines creativity, simplicity, and deliciousness all in one. Every year, making these mummies brings out the kid in me, and sharing them with family makes Halloween extra memorable. If you’re looking for a stress-free, fun, and utterly charming treat to wow your friends and family, you have to try this recipe. Trust me—you won’t regret it!
Print
Mummy Halloween Cookies Recipe
- Prep Time: 5 minutes
- Cook Time: 10 minutes
- Total Time: 45 minutes
- Yield: 26 cookies
- Category: Dessert
- Method: No-Cook
- Cuisine: American
- Diet: Vegetarian
Description
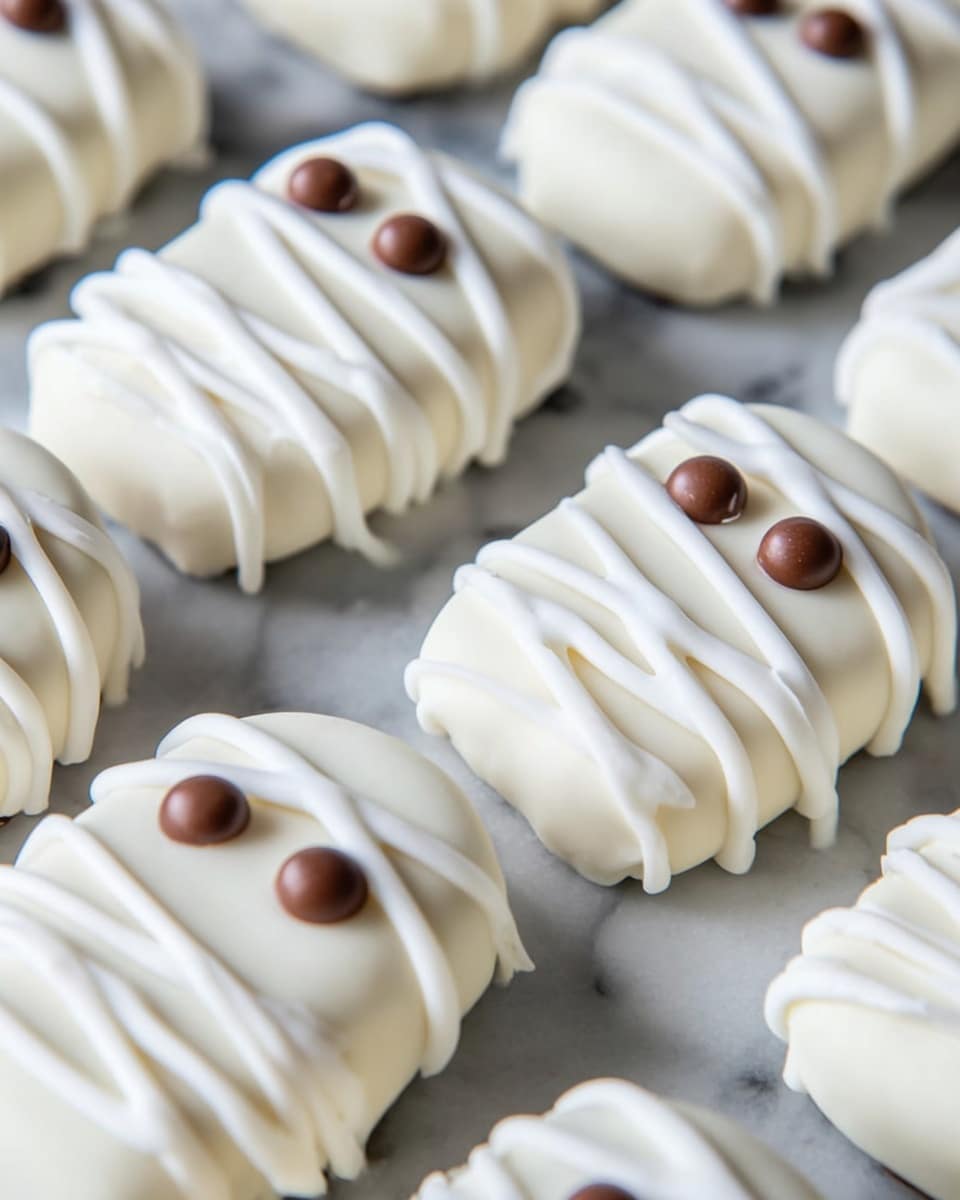
These Mummy Halloween Cookies are a fun and festive treat perfect for Halloween parties and celebrations. Featuring Vienna Fingers vanilla cookies dipped in a smooth white candy coating, decorated with drizzle and mini M&Ms to create adorable mummy eyes, they are easy to make and delightfully spooky.
Ingredients
Cookies
- 26 Vienna Fingers vanilla cookies
Candy Coating and Decorations
- 2 bags white candy coating
- 52 Mini M&Ms
Instructions
- Melting the Candy Coating: Begin by melting the white candy coating according to the package directions. You can use a microwave, stovetop, or double boiler method ensuring the coating is smooth and lump-free.
- Coating the Cookies: Using a fork, dip each Vienna Fingers vanilla cookie into the melted white candy coating, making sure all sides are completely covered. Place the coated cookies on waxed paper to set. Repeat this process for all 26 cookies.
- Setting the Coating: Allow the candy coating to harden by refrigerating the cookies for about 30 minutes or letting them sit at room temperature for at least 1 hour until firm.
- Drizzling and Decorating: Melt additional candy coating and transfer it into a ziploc bag, then snip a small edge to create a piping tip. Drizzle the white candy in a mummy-like pattern over the cookies. While the drizzle is still wet, add two mini M&Ms on each cookie to resemble eyes.
- Final Setting: Let the decorated cookies set completely until the drizzle hardens. Once set, your mummy cookies are ready to enjoy!
Notes
- Candy Coating Tips:
– Microwave: Heat candy wafers at 50% power in 30-second increments, stirring each time until smooth.
– Stovetop: Heat over medium-low heat in a small saucepan, stirring constantly until smooth.
– Double Boiler: Heat candy coating gently over boiling water for large batches, stirring until smooth. - Store the cookies in an airtight container for up to 2 weeks once the coating is hardened.
- To freeze: let cookies solidify fully, then place in an airtight bag in the freezer for up to 4 months. Thaw to room temperature before serving.
- Prepare only as much melted coating as needed for a few cookies at a time for best results.
Nutrition
- Serving Size: 1 cookie
- Calories: 110
- Sugar: 9g
- Sodium: 65mg
- Fat: 6g
- Saturated Fat: 3.5g
- Unsaturated Fat: 2g
- Trans Fat: 0g
- Carbohydrates: 14g
- Fiber: 0.5g
- Protein: 1g
- Cholesterol: 5mg

Your email address will not be published. Required fields are marked *