

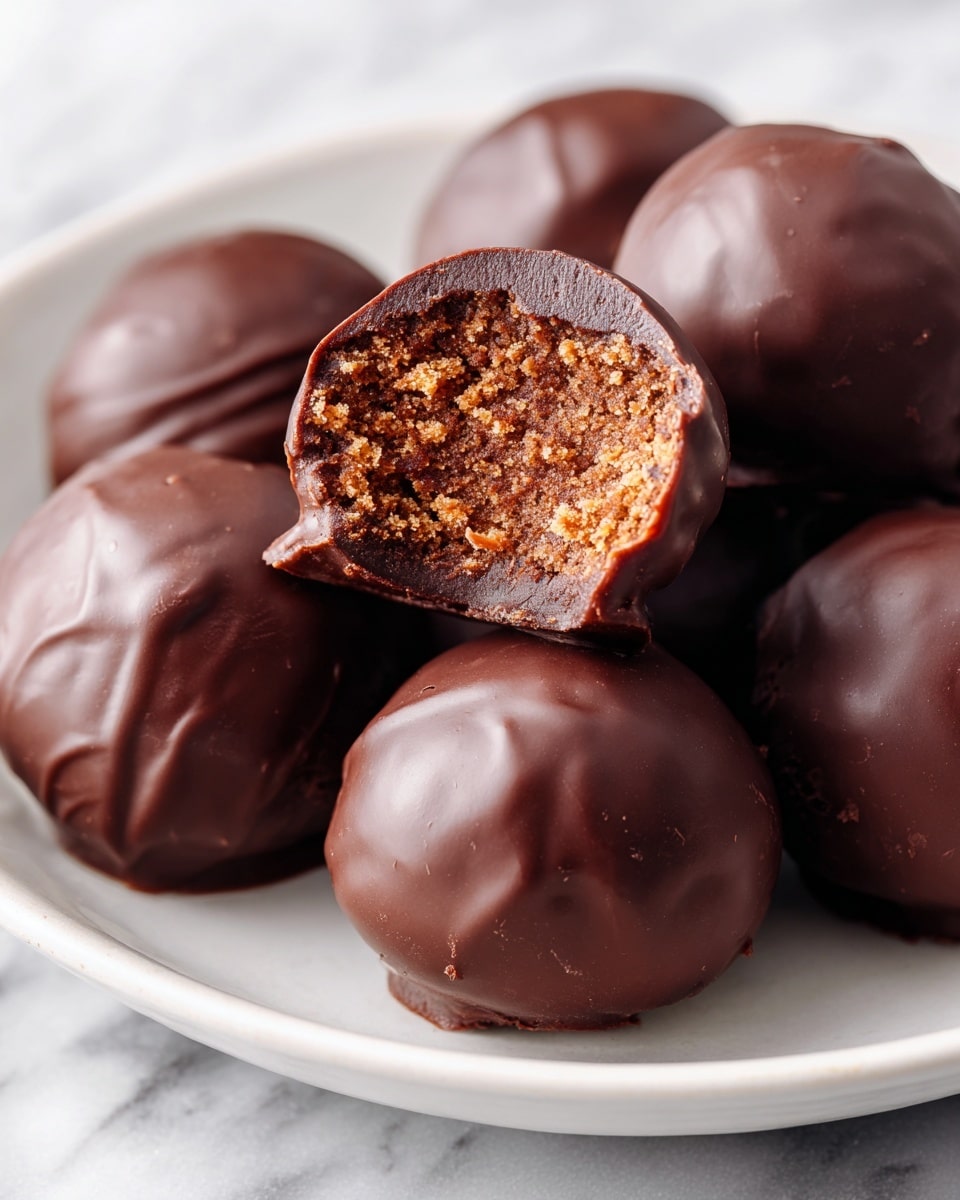
If you’re anything like me and have a soft spot for nostalgic treats, this Old Fashioned Peanut Butter Balls Recipe is going to feel like a warm hug from childhood. These little bites are chewy, chocolatey, and packed with that unmistakable peanut butter goodness. When I first tried making them at home, I quickly realized why they’ve stood the test of time — they’re simple to whip up, utterly delicious, and perfect for any occasion. Stick around, and I’ll walk you through all my best tips so your peanut butter balls turn out perfectly every single time.
Why You’ll Love This Recipe
- Simple Ingredients: You likely have most of what you need in your pantry, which makes this a great last-minute treat.
- Easy to Make: No fancy equipment required — just a bowl, a spoon, and your hands for rolling.
- Kid-Friendly: These have been my go-to for holiday baking with my kids; they love helping shape and dip the balls.
- Perfect Texture: The crispy Rice Krispies add a delightful crunch that keeps these peanut butter balls from being too dense.

Ingredients You’ll Need
These ingredients come together to create that classic old-fashioned flavor and texture. You’ll notice how the crispy cereal and powdered sugar balance out the richness of peanut butter. Plus, melted chocolate coating is the cherry on top.
- Creamy peanut butter: Opt for creamy over chunky for the smoothest consistency and easiest mixing.
- Salted butter: Melted butter adds richness and helps bind everything nicely; salted gives a little hint of savory balance.
- Rice Krispies cereal: For that signature light crunch — don’t substitute with other cereals, as texture matters here.
- Powdered sugar: Adds just enough sweetness and helps firm up the mixture so it’s easier to roll.
- Melting chocolate: Look for wafers or bars specifically made for melting, found in the baking aisle, to ensure smooth coverage.
Variations
I love how this Old Fashioned Peanut Butter Balls Recipe can be tweaked to suit your personal taste or dietary needs. Once you get the basic method down, feel free to get creative and make it your own.
- Add nuts: I sometimes fold in chopped roasted peanuts for an extra crunch that my family absolutely adores.
- Use natural peanut butter: For a healthier twist, I switched to natural peanut butter — just be prepared for a slightly softer mixture that needs gentle handling.
- Dark chocolate coating: I like using dark chocolate occasionally to balance out the sweetness and get a richer flavor profile.
- Peanut butter variations: You can swap peanut butter for almond or cashew butter for a different but equally delicious flavor.
How to Make Old Fashioned Peanut Butter Balls Recipe
Step 1: Cream the peanut butter and butter
Start by combining the creamy peanut butter and melted salted butter in a large mixing bowl. I find using a handheld mixer makes this super smooth and silky, but a strong rubber spatula works just fine too — just be sure you blend them until there are no lumps. This step is crucial because you want a creamy base to coat the cereal evenly.
Step 2: Fold in cereal and powdered sugar
Next, gently fold in the Rice Krispies cereal. Take your time so you don’t crush those crispy bits. Once coated, sprinkle in the powdered sugar and stir until the mixture holds together firmly — not too sticky, but nicely cohesive. You’re looking for a texture that’s easy to shape but stays together nicely.
Step 3: Roll and chill the peanut butter balls
Line a cookie sheet with parchment or wax paper. Using a tablespoon measure, scoop the mixture, then grease your hands lightly with butter or cooking spray before rolling each scoop into a walnut-sized ball. I learned that greasing your hands is a game changer—it helps prevent sticking and smooths the surface beautifully. Pop the balls onto your cookie sheet and chill for at least 30 minutes until firm.
Step 4: Melt the chocolate and coat the balls
In a microwave-safe bowl, melt your chocolate wafers in 30-second bursts, stirring in between to keep it silky smooth and prevent scorching. When fully melted, dip each chilled peanut butter ball gently into the chocolate, covering it completely. I use a fork to lift them out and let excess drip off before placing them back on the parchment. This method keeps the coating neat and prevents pooly thick spots.
Step 5: Final chill and serve
Once coated, refrigerate the peanut butter balls again for 15-20 minutes until the chocolate hardens. After this, they’re ready to enjoy or package up as gifts. I usually store mine in an airtight container in the fridge to keep them fresh and perfect for snacking.
Pro Tips for Making Old Fashioned Peanut Butter Balls Recipe
- Grease Your Hands Lightly: This little trick prevents the mixture from sticking while rolling, making it quicker and cleaner.
- Don’t Skip Chilling: Chilling both before and after chocolate coating ensures firm balls that hold their shape and look polished.
- Use Microwave Intervals: Melting chocolate in short bursts with stirring stops it from burning and helps you achieve that glossy finish.
- Avoid Cracks in Coating: If chocolate hardens too quickly when dipping, warm it gently again — patience is key for smooth shells.
How to Serve Old Fashioned Peanut Butter Balls Recipe
Garnishes
I love adding a tiny sprinkle of sea salt on top right after dipping to bring out the chocolate and peanut butter flavors. Sometimes I roll the balls through crushed peanuts or even a bit of shredded coconut for a festive touch. These little extras really add personality and make them extra special.
Side Dishes
These peanut butter balls are a star on their own, but pair beautifully with a cold glass of milk or a cup of strong coffee. They’re perfect for holiday dessert trays alongside other classic treats like fudge or homemade cookies.
Creative Ways to Present
For parties, I like arranging mine in mini cupcake liners or placing them in cute decorative tins wrapped with ribbon—they make charming homemade gifts. Another fun idea is stacking them in layers separated by parchment paper for an eye-catching display that invites everyone to dig in.
Make Ahead and Storage
Storing Leftovers
I store leftover peanut butter balls in an airtight container in the fridge, and they keep their texture nicely for up to two weeks. Just keep them chilled to prevent the chocolate from softening or sweating.
Freezing
Freezing works surprisingly well! I place the peanut butter balls on a parchment-lined tray to freeze individually, then transfer them to a freezer-safe container. When I want some, I let them thaw in the fridge for a few hours to avoid condensation issues.
Reheating
Since these are best eaten cold or at room temperature, reheating isn’t really needed. If your chocolate feels too firm, just leave them out for 10-15 minutes before enjoying—the texture will soften just right.
FAQs
-
Can I use crunchy peanut butter for this recipe?
Yes, you can, but keep in mind that crunchy peanut butter will add more texture to the balls. If you don’t mind a bit of extra crunch, go for it! Just be sure to mix thoroughly so the texture is even throughout.
-
What type of chocolate is best for coating peanut butter balls?
Look for melting wafers or baking chocolate bars designed for melting, as they give a smooth, shiny finish. Avoid regular chocolate chips if possible, as they contain stabilizers that can make melting tricky.
-
How do I prevent the peanut butter balls from falling apart?
Chilling the balls before dipping is key. This firms them up so the chocolate coating sticks better and doesn’t cause them to crumble or lose shape.
-
Can I make these peanut butter balls gluten-free?
Absolutely! Just make sure to use gluten-free crispy rice cereal, which many brands offer. Everything else in the recipe is naturally gluten-free.
Final Thoughts
Old fashioned peanut butter balls bring me straight back to holiday baking sessions with my family, filled with laughter and sticky fingers. I absolutely love how this recipe balances nostalgia with easy prep and crowd-pleasing flavor. If you try this Old Fashioned Peanut Butter Balls Recipe, I hope it becomes a staple in your kitchen the way it is in mine — it’s such a warm, comforting treat that never fails to bring smiles.
Print
Old Fashioned Peanut Butter Balls Recipe
- Prep Time: 30 minutes
- Cook Time: 0 minutes
- Total Time: 1 hour
- Yield: Approximately 24 peanut butter balls
- Category: Dessert
- Method: No-Cook
- Cuisine: American
Description
These Old Fashioned Peanut Butter Balls are delightful no-bake treats featuring a creamy peanut butter and butter base mixed with crispy Rice Krispies cereal and powdered sugar, all coated in smooth melted chocolate. Perfectly sized for snacking, these peanut butter balls offer a nostalgic and indulgent bite of sweet and crunchy goodness.
Ingredients
Peanut Butter Mixture
- 1 cup creamy peanut butter
- 3 tablespoons salted butter, melted
- 2 cups Rice Krispies cereal
- 1 cup powdered sugar
Chocolate Coating
- 12 ounces melting chocolate (wafers or bars)
Instructions
- Combine Butter and Peanut Butter: In a large mixing bowl, blend the creamy peanut butter and melted salted butter until smooth and well combined using a handheld mixer or a sturdy rubber spatula. The mixture should be creamy and thoroughly mixed.
- Add Cereal and Powdered Sugar: Gently stir in the Rice Krispies cereal until evenly coated with the peanut butter mixture. Then add the powdered sugar and mix thoroughly to form a firm, cohesive mixture.
- Shape and Chill: Line a cookie sheet with parchment or wax paper. Using a tablespoon, scoop out portions of the peanut butter mixture. Lightly grease your hands and roll each portion into a ball about the size of a walnut. Place the balls onto the lined cookie sheet and refrigerate for at least 30 minutes until firm.
- Melt and Dunk: Melt the chocolate in a microwave-safe bowl in 30-second intervals, stirring between each interval to prevent burning, until completely smooth. Dip each peanut butter ball into the melted chocolate to fully coat it. Place the coated balls back onto the lined baking sheet.
- Chill Again: Refrigerate the chocolate-coated peanut butter balls for 15-20 minutes or until the chocolate is fully set and firm. Once set, they are ready to serve and enjoy!
Notes
- To make shaping easier, lightly grease your hands or lightly dust with powdered sugar before rolling.
- Store peanut butter balls in an airtight container in the refrigerator for up to one week.
- You can substitute crunchy peanut butter for a different texture.
- Use dark, milk, or white melting chocolate based on your preference.
- For a festive touch, drizzle with contrasting chocolate or sprinkle with sea salt before chilling.
Nutrition
- Serving Size: 2 peanut butter balls (approx. 40g)
- Calories: 220
- Sugar: 18g
- Sodium: 90mg
- Fat: 15g
- Saturated Fat: 5g
- Unsaturated Fat: 9g
- Trans Fat: 0g
- Carbohydrates: 18g
- Fiber: 2g
- Protein: 6g
- Cholesterol: 15mg

Your email address will not be published. Required fields are marked *