

If you ve ever wanted to make a dessert that s both fun and absolutely indulgent, this Oreo Cake Pops Recipe is going to charm your socks off. These little bites are perfect for parties, gifts, or just a cozy night in with a cup of tea. What I love the most is how simple they are to pull together but still have that wow factor when you serve them up-think rich Oreo flavor wrapped in creamy cake pop magic.
When I first tried this Oreo Cake Pops Recipe, I was surprised by how much the combination of crushed Oreos and cream cheese works like magic to create a dough that s easy to shape but tastes like a decadent treat. Whether you re making these with kids or just treating yourself, you ll find that they re quick to whip up, making them a perfect last-minute crowd pleaser or a stylish addition to your dessert table.
Why You’ll Love This Recipe
- Simplicity Meets Deliciousness: Only a few ingredients come together to create a stunning treat that tastes much more complicated than it is.
- Perfect for Any Occasion: Whether it s a birthday, holiday, or just a treat-yourself moment, these pops are crowd-pleasers.
- Customizable and Fun: You can play with different chocolate coatings and decorations to match your style or event theme.
- Kid-Friendly and Hands-On: Little helpers will love rolling and dipping, making it a great family activity.

Ingredients You’ll Need
I always tell folks that the magic here is in the simplicity-the Oreo cookies bring in that perfect crunch and chocolatey punch, while the cream cheese adds just the right creaminess to hold everything together. Grab the best-quality chocolate you can find for dipping because that s what makes these cake pops truly shine.
- Oreo cookies: I like to use classic Oreos for that classic flavor-make sure to crush them finely for the smoothest cake pop dough.
- Cream cheese: Softened and at room temperature to blend perfectly with the crumbs-if you re out, mascarpone or Nutella are fun alternatives.
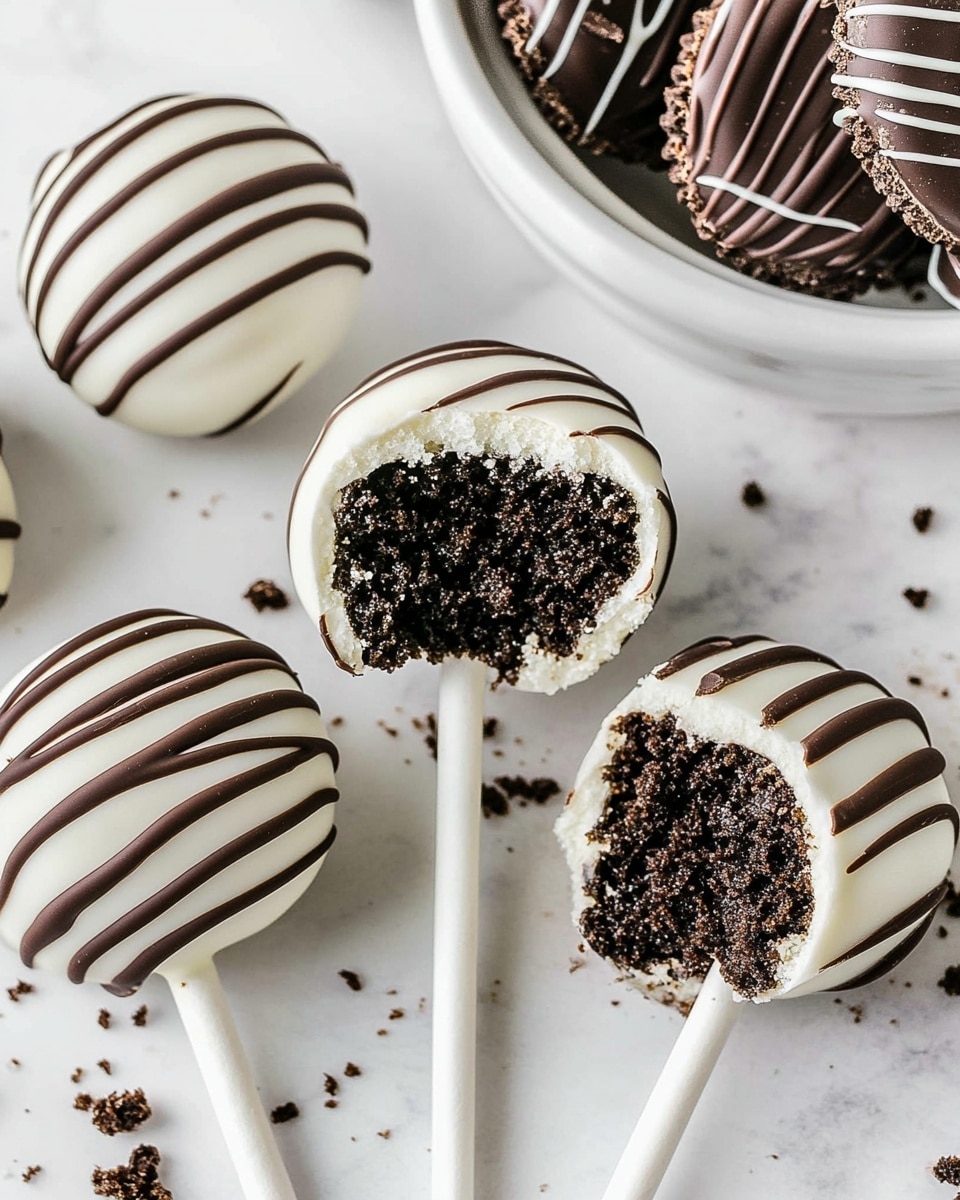
- White and semi-sweet chocolate: The white chocolate for coating adds a sweet contrast, while semi-sweet dark chocolate is perfect for decorative drizzles.
Variations
I often tweak this Oreo Cake Pops Recipe depending on the vibe I m going for. Sometimes, I swap out the cream cheese for Nutella to make hazelnut-flavored pops, or I add some colored sprinkles or crushed candy canes for a festive twist. Feel free to get creative here-you can’t really go wrong, and it s a great way to make the recipe truly your own.
- Nutella Variation: Replacing cream cheese with Nutella makes the pops extra rich-my family went crazy the first time I tried this!
- Decorative Touches: After dipping, sprinkle chopped nuts or mini chocolate chips for texture and a pop of color.
- Dairy-Free Option: Try using dairy-free cream cheese and chocolate to make these suitable for dietary restrictions.
- Seasonal Flavors: Add a pinch of pumpkin spice or peppermint extract to the mixture for holiday flair.
How to Make Oreo Cake Pops Recipe
Step 1: Pulverize Those Oreos
Start by finely crushing your Oreo cookies in a food processor until you have a fine powder with no big chunks. I ve found that a super fine texture helps the cake pops hold together smoothly and gives them a better bite. You can also place the cookies in a ziplock bag and crush with a rolling pin if you don t have a processor-just work patiently for the best result.
Step 2: Mix in the Cream Cheese
Now, add your softened cream cheese to the crushed Oreos. Use a tablespoon or your hands to combine everything until the mixture is smooth, moist, and compact. This is the point where you want it to be sticky enough to shape, but not too wet. Don t rush-blend well for the best result. I learned that mixing by hand gives you better control over the texture!
Step 3: Shape and Chill
Roll the dough into roughly 20 balls, each about 20 grams. I use a small cookie scoop to keep them uniform-that way, they cook and set evenly. Pop your Oreo cake balls into the fridge for about 20 minutes; chilling firms them up and makes dipping much less messy.
Step 4: Prepare Your Chocolate Coating
Gently melt your white chocolate-either using a double boiler or microwave in short bursts, stirring often until smooth and runny. Pour the melted white chocolate into a medium deep bowl, which will make dipping easier. I recommend a bowl that s deep enough so you can cover the cake pops fully without too much awkward maneuvering.
Step 5: Assemble and Dip
This is the fun part. Dip the tip of your lollipop stick into the melted chocolate, then insert it about halfway into each cake ball. This acts like glue and keeps the sticks from slipping out later. Then, fully dip each cake pop into the chocolate and gently shake off excess coating. If your chocolate feels thick, warm it slightly to get a smoother finish.
Step 6: Decorate and Chill Again
Place your cake pops upright in a stand or foam block. Let the chocolate harden completely-usually 15 to 30 minutes in the fridge works best. For extra flair, drizzle melted semi-sweet chocolate over the white coating using a piping bag, creating an elegant contrast. Finally, give them a last chill before serving, so everything sets perfectly and tastes amazing.
Pro Tips for Making Oreo Cake Pops Recipe
- Keep Things Cool: Chilling the Oreo balls before dipping helps avoid crumbly pops and keeps your hands less messy.
- Use Good Quality Chocolate: Higher-quality chocolate melts smoother and hardens with a beautiful shine.
- Avoid Overmixing Cream Cheese: I learned that mixing just until combined preserves the right texture for shaping and taste.
- Stick Placement Matters: Dipping the stick tip in chocolate before inserting helps secure the pop and prevents it from sliding off during dipping.
How to Serve Oreo Cake Pops Recipe
Garnishes
I love to garnish these pops with little sprinkles, mini chocolate chips, or even crushed mini Oreos for extra crunch and style. Often, I drizzle contrasting dark or milk chocolate across the pure white coating-that one simple step makes them look like a professional creation. When it s a special occasion, edible glitter or colored sugar adds a festive sparkle that kids and adults both adore.
Side Dishes
Though these pops can definitely stand alone, I like to serve them alongside a fresh batch of fruit or a simple cup of coffee or tea. They also pair beautifully with a scoop of vanilla ice cream or a glass of cold milk. These simple sides balance the richness of the Oreo cake pops and round out your dessert spread.
Creative Ways to Present
For parties, I ve tried displaying these Oreo cake pops in mason jars filled with candy or themed ribbons tied around the sticks for a cute touch. Another idea I love is embedding them in a Styrofoam block wrapped in decorative paper, so they look like a bouquet of cake pops-super cute for birthdays or showers. If you re feeling extra crafty, individual clear wrapping with a personalized tag makes for a perfect edible gift.
Make Ahead and Storage
Storing Leftovers
Once your Oreo cake pops are fully set, store any leftovers in an airtight container in the fridge. I ve kept them fresh for up to 5 days this way without any loss of flavor or texture. Just be sure to keep them away from moisture or condensation, which can make the chocolate coating less crisp.
Freezing
If you want to save them for later, freezing works great. I wrap each pop individually in plastic wrap and place them in a freezer-safe container or bag. When spreading a big batch for a party, freezing lets you prepare in advance and thaw them overnight in the fridge before serving.
Reheating
While these pops are meant to be enjoyed cold, if you want to bring back just a little softness, I gently let them sit at room temperature for 10-15 minutes after taking them out of the fridge or freezer. Reheating in a microwave isn t recommended as it melts the coating, but warming your hands while holding the pop slightly softens the cream cheese center for an indulgent mouthfeel.
FAQs
-
Can I use other types of cookies instead of Oreos for this cake pops recipe?
Absolutely! While Oreos are classic and give the best flavor and texture balance, you can get creative with other chocolate sandwich cookies or even non-chocolate varieties for a different twist. Just make sure to finely crush them so the dough binds well with the cream cheese.
-
What s the best way to soften cream cheese for this recipe?
The easiest way is to leave the cream cheese out at room temperature for about 30 minutes before using. If you re in a hurry, you can microwave it in short 10-second bursts, but watch carefully so it doesn t melt. Softened cream cheese blends much better and helps your cake pops hold together.
-
How do I prevent the cake pops from falling off the sticks?
Dipping the tip of the stick in melted chocolate before inserting it into the oreo ball acts as a glue that helps secure the pop. Also, chilling the cake balls well before dipping prevents them from falling apart during the process.
-
Can I make these Oreo cake pops ahead of time?
Yes! These cake pops are perfect for prepping ahead. You can make and freeze them weeks in advance, then thaw in the refrigerator a day before serving. Just keep them airtight to maintain freshness.
Final Thoughts
I absolutely love how this Oreo Cake Pops Recipe turns out-it s reliably delicious, easy to customize, and always a hit whenever I bring them along. Hopefully, you ll find them just as rewarding and fun to make as I do, whether you re a seasoned baker or trying something new. Go ahead and try this recipe-you might just find a new favorite dessert to share with friends and family!
Print
Oreo Cake Pops Recipe
- Prep Time: 15 minutes
- Cook Time: 5 minutes
- Total Time: 20 minutes
- Yield: 20 cake pops
- Category: Dessert
- Method: No-Cook
- Cuisine: American
Description
Delicious and fun Oreo Cake Pops made by blending crushed Oreos with cream cheese, shaped into balls, and coated in melted chocolate for a perfect treat or party snack.
Ingredients
Oreo Cake Ball Mixture
- 24 Oreo cookies (approx. 260 g)
- 70 g (1/3 cup) cream cheese, softened
Chocolate Coating
- White chocolate, for melting
- Semi-sweet (dark) chocolate, for decorating
- 20 lollipop sticks
Instructions
- Crush Oreos: Finely blend the Oreo cookies in a food processor until you get a fine powder with no lumps.
- Mix with Cream Cheese: Add the softened cream cheese to the Oreo powder and stir with a tablespoon until the mixture is smooth and compact.
- Form Cake Balls: Shape 20 balls of the dough, each weighing around 20g, forming them tightly to hold their shape.
- Chill Cake Balls: Place the Oreo cake balls in the fridge for about 20 minutes to firm up before dipping.
- Melt White Chocolate: Heat the white chocolate in a double boiler or microwave until smooth and runny, then pour it into a medium deep bowl for dipping.
- Insert Lollipop Sticks: Dip the end of each lollipop stick into melted chocolate, then insert it into the center of each cake ball to secure the stick in place.
- Dip Cake Pops: Fully dip each cake pop into the melted white chocolate, then gently shake off the excess chocolate to avoid drips.
- Set Cake Pops: Place the dipped cake pops on a cake pop stand or parchment paper to let the chocolate harden completely.
- Decorate: Use melted semi-sweet chocolate and a piping bag to create decorative designs on the hardened white chocolate coating.
- Chill Before Serving: Leave the decorated cake pops in the fridge to cool completely before serving for best texture and presentation.
Notes
- Storage: Keep cake pops refrigerated for up to 5 days or freeze for up to 3 months.
- Substitutions: Cream cheese can be replaced with mascarpone, Nutella, or other creamy spreads to vary flavor.
Nutrition
- Serving Size: 1 cake pop (approx. 25g)
- Calories: 120
- Sugar: 11g
- Sodium: 55mg
- Fat: 7g
- Saturated Fat: 4g
- Unsaturated Fat: 2g
- Trans Fat: 0g
- Carbohydrates: 14g
- Fiber: 0.5g
- Protein: 1.5g
- Cholesterol: 10mg

Your email address will not be published. Required fields are marked *