

If you’re looking for a delightful treat that combines the cozy flavors of fall with the fun of bite-sized pops, you’re in the right place! I absolutely love this Pumpkin Cookie Dough Pops Recipe because it’s easy to make, irresistibly delicious, and perfect for sharing at parties or enjoying as a quick sweet snack. Trust me, once you try these, pumpkin-flavored cookie dough wrapped in candy coating will become a fast favorite in your kitchen.
Why You’ll Love This Recipe
- No-Bake Joy: These pops don’t require baking, so you save time and avoid heating up the oven.
- Natural Warmth: The pumpkin flavor paired with spices and oats makes these perfectly seasonal and comforting.
- Crowd-Pleaser: My family goes crazy for these cute pops – they look adorable and taste amazing.
- Customizable Fun: You can swap out chocolate chips or candy melts to fit your flavor preferences or dietary needs.

Ingredients You’ll Need
This Pumpkin Cookie Dough Pops Recipe uses simple, pantry-friendly ingredients that come together beautifully for a sweet, textured treat. Using oats instead of flour gives it that wholesome, chewy bite I adore, and the candy coating adds just the right pop of color and sweetness.
- Butter: Make sure it’s softened to room temperature for smooth mixing without lumps.
- Granulated Sugar: Adds sweetness and a touch of crunch.
- Light Brown Sugar: Packed for moisture and a hint of caramel depth.
- Vanilla Extract: The magic flavor booster that ties everything together.
- Milk: Any kind works – it just helps bring the dough together perfectly.
- Gluten-Free Old Fashioned Oats: I love using gluten-free for a safer treat, but regular oats work great too.
- Salt: Tiny touch to balance sweetness and enhance flavor.
- Chocolate Chips: Melts slightly into the dough and adds bursts of chocolate heaven.
- Orange Candy Melts: For that beautiful pumpkin color and smooth coating.
- Green Fondant: To create the adorable pumpkin “stems” and vines—optional but totally adorable.
Variations
I love to switch things up a bit with this recipe depending on the occasion or just the mood I’m in—feel free to get creative and make it your own!
- Nutty Twist: Once, I stirred in chopped walnuts instead of chocolate chips, and it gave a delightful crunch and earthy flavor that balanced the sweetness.
- Dairy-Free Option: Swap butter with coconut oil and use dairy-free milk to make these vegan-friendly—my friend loved how creamy these turned out.
- Different Coatings: Try white chocolate candy melts tinted with a little orange color or even a drizzle of caramel for a rich twist.
- Spiced Up: Add a pinch of cinnamon, nutmeg, or pumpkin pie spice into the dough for extra autumn vibes.
How to Make Pumpkin Cookie Dough Pops Recipe
Step 1: Whip up the cookie dough base
Start by lining a baking sheet with parchment paper so your pops don’t stick later—that little prep step saves you time. In your mixer, beat the softened butter, granulated sugar, brown sugar, vanilla, and milk on medium speed until everything is smooth and combined. This usually takes about 2-3 minutes, and you’ll notice it’s creamy and shiny—that means you’re on the right track.
Step 2: Mix in the oats and chocolate chips
Next, add your oats and salt, mixing just until everything’s evenly combined—you don’t want to overmix here because the oats give this dough its lovely texture. Then fold in the chocolate chips with a spatula. If you like your pops extra chocolatey, feel free to toss in more chips!
Step 3: Shape and freeze the dough balls
Grab heaping tablespoon-sized portions of dough and roll them into neat balls with your hands. I find working quickly keeps the dough firmer and easier to handle. Place each ball on your prepared baking sheet, then pop the whole tray into the freezer for at least 2 hours. This step is crucial so your pops hold their shape when dipped in the candy coating.
Step 4: Coat with candy melts and add stems
While your dough balls are chilling, melt the orange candy melts according to package instructions. When the dough balls are frozen solid, quickly dip each into the melted candy, using a spoon to help coat them evenly. Then, transfer back onto the parchment and gently poke a treat stick through each ball’s top. Pop them into the fridge for a few minutes while you shape little stems and vines from green fondant—rolling small bits between your fingers is easier than it sounds, and these details bring the pumpkin effect to life!
Step 5: Chill and enjoy
Keep your pops refrigerated until you’re ready to serve so the dough stays firm and the candy coating hardens perfectly. I promise, the anticipation makes them even more rewarding!
Pro Tips for Making Pumpkin Cookie Dough Pops Recipe
- Smooth Butter is Key: Always use room temperature butter so the dough blends without graininess.
- Freeze Properly: Don’t rush the freezing time — solid dough balls dip easier and hold their shape better.
- Candy Melts Consistency: If your candy melts feel too thick, add a little neutral oil to thin—this helps cover the pops smoothly.
- Fondant Handling: Work quickly with fondant but keep it covered when not in use to prevent drying and cracking.
How to Serve Pumpkin Cookie Dough Pops Recipe
Garnishes
I usually keep it simple with the green fondant stems because they add that perfect whimsical pumpkin look. Sometimes I’ll dust a light sprinkle of edible glitter or cinnamon powder on the candy coating for an extra festive touch—looks gorgeous and tastes lovely, too!
Side Dishes
These pops make a great companion to warm apple cider, chai tea, or even a scoop of vanilla ice cream if you want to turn your treat into a little dessert party. I find they pair wonderfully with any fall-themed drinks or light finger foods.
Creative Ways to Present
For special occasions, I arrange the pops standing upright in a decorated pumpkin-shaped foam block or display them in a rustic basket lined with autumn leaves and mini gourds—it’s such a fun way to wow guests while keeping them easy to grab and eat!
Make Ahead and Storage
Storing Leftovers
I store leftover pumpkin cookie dough pops in an airtight container in the fridge. They stay fresh for up to a week, so you have plenty of time to enjoy the treat without worrying about them drying out or losing flavor.
Freezing
If you want to keep these pops longer, I wrap each individually in parchment paper and freeze in a sealed bag. When you’re ready to eat them, just thaw in the fridge overnight—this keeps their texture spot-on and the candy coating intact.
Reheating
Since these are no-bake and coated in candy, reheating isn’t really needed—in fact, I recommend enjoying them chilled. If the candy coating gets too firm in the fridge, let them sit at room temperature for 10 minutes before biting in to soften slightly.
FAQs
-
Can I make the Pumpkin Cookie Dough Pops Recipe without oats?
Yes! While oats add great texture and chewiness, you can substitute with finely ground gluten-free flour or almond flour. Just be mindful the texture will be slightly different, but still delicious!
-
What can I use instead of fondant for the stems?
If you prefer a natural alternative, you can use small pieces of green apple slices, mint leaves, or even candy candy cane bits shaped into stems. Just get creative with whatever you have on hand!
-
How long do these pops stay fresh?
Stored properly in the fridge in an airtight container, they should stay fresh and tasty for up to one week. Beyond that, the texture may start to change.
-
Can I make these pops ahead for a party?
Definitely! I recommend making the dough balls and freezing them a day or two in advance. Then do the candy coating and decorating the day of your event for the best appearance and freshness.
Final Thoughts
Honestly, this Pumpkin Cookie Dough Pops Recipe has become my secret weapon for impressing guests without spending hours in the kitchen. They’re cute, scrumptious, and just the right amount of sweet pumpkin goodness wrapped in fun candy. I can’t wait for you to try making these – once you do, I bet you’ll find yourself reaching for this recipe every fall. Happy popping!
Print
Pumpkin Cookie Dough Pops Recipe
- Prep Time: 25 minutes
- Cook Time: 0 minutes
- Total Time: 2 hours 25 minutes
- Yield: 15 pops
- Category: Dessert
- Method: No-Cook
- Cuisine: American
- Diet: Gluten Free
Description
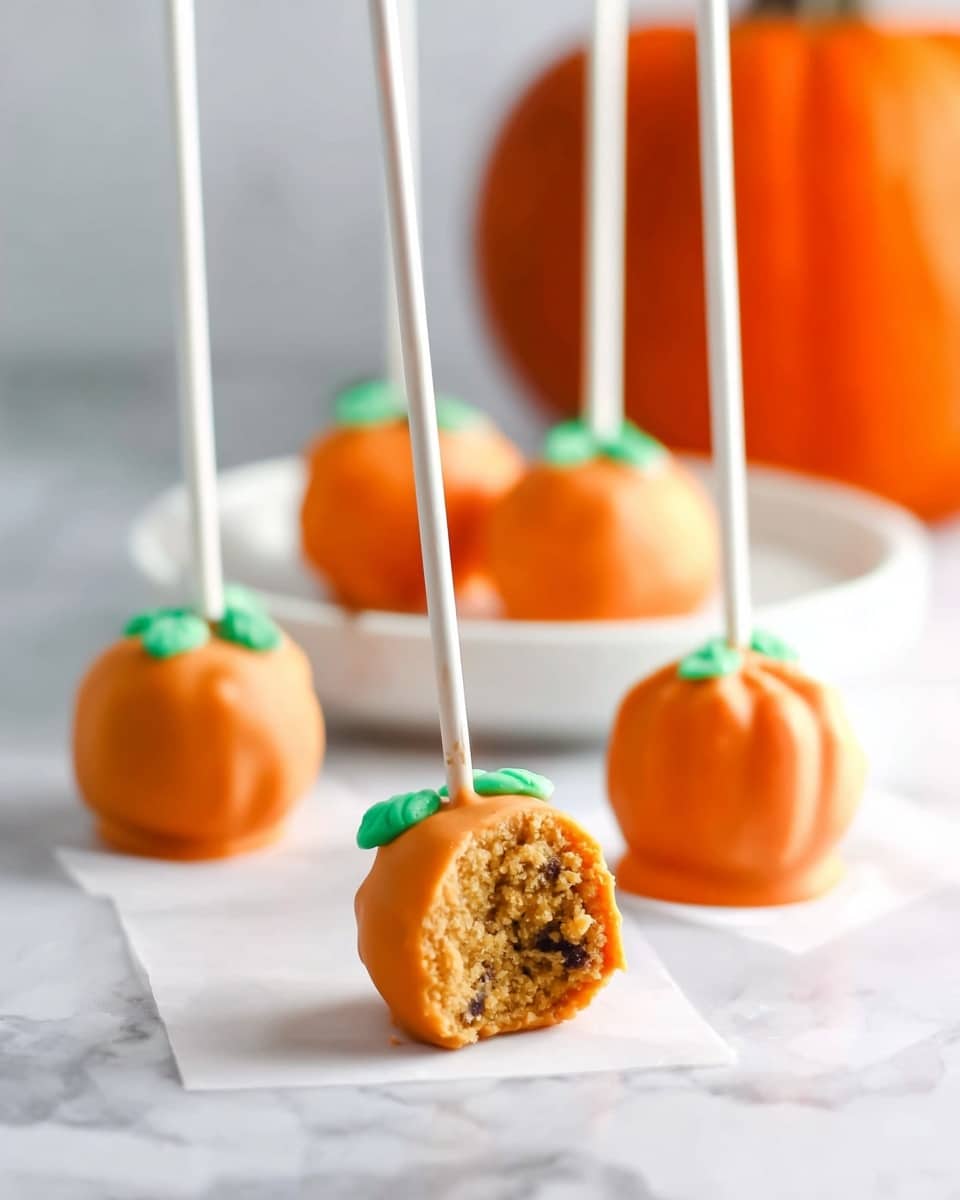
Delightfully festive Pumpkin Cookie Dough Pops are a no-bake treat featuring gluten-free oats, rich chocolate chips, and a smooth orange candy coating, topped with playful green fondant stems. Perfect for autumn celebrations and easy to make ahead, these pops combine the creamy texture of cookie dough with a fun, candy-coated exterior.
Ingredients
Cookie Dough
- 1 stick unsalted butter, room temperature
- ⅓ cup granulated sugar
- ½ cup light brown sugar, packed
- 1 teaspoon vanilla extract
- 2 tablespoons milk (any kind)
- 2 cups Gluten Free old fashioned oats (may substitute for non-GF oats)
- ½ teaspoon salt
- ⅔ cup chocolate chips
Coating and Decorations
- Orange Candy Melts
- Green fondant
Instructions
- Prepare Baking Sheet: Line a baking sheet with parchment paper and set aside to rest your cookie dough balls after shaping.
- Mix Wet Ingredients: Using a stand mixer, combine softened butter, granulated sugar, brown sugar, vanilla extract, and milk on medium speed until the mixture is smooth and fully combined, creating a creamy base for the dough.
- Add Dry Ingredients: Incorporate the gluten-free oats and salt into the wet mixture and mix until evenly combined, forming the cookie dough base.
- Stir in Chocolate Chips: Gently fold the chocolate chips into the dough to ensure each bite has a sweet surprise.
- Shape Dough Balls: Scoop heaping tablespoonfuls of the dough and roll them into balls with your hands. Place the balls on the prepared parchment-lined baking sheet with space between them.
- Freeze Dough Balls: Place the cookie dough balls in the freezer for at least 2 hours or until firm enough to handle for dipping.
- Melt Candy Coating: While the dough balls are still in the freezer, melt the orange candy melts according to package instructions, preparing the coating for dipping.
- Coat Dough Balls: Remove the cookie dough balls from the freezer and, using a spoon, dip and cover them completely in melted orange candy. Place the coated balls back onto parchment paper, then carefully insert a treat stick through the top of each ball to create the pop.
- Chill Pops: Refrigerate the coated pumpkin pops to allow the candy coating to set while preparing the fondant decorations.
- Create Fondant Stems and Vines: Use a knife to cut small portions of green fondant. Roll these pieces between your hands to form tiny stems and curly vines to decorate each pumpkin pop.
- Decorate Pops: Remove the pops from the fridge and gently attach the green fondant stems and vines on top of each candy-coated pumpkin pop to complete the festive look.
- Final Chill: Place the finished pumpkin pops back in the refrigerator until ready to serve to keep the dough firm and the coating intact.
Notes
- Ensure the butter is softened at room temperature to achieve a smooth cookie dough texture.
- Oats can be substituted with non-gluten-free if dietary restrictions are not a concern.
- Keep the cookie dough balls frozen until immediately before dipping to maintain their shape and prevent melting.
- Use a spoon to carefully coat each dough ball for an even candy melt layer.
- Store finished pops in the refrigerator to keep the candy coating firm and the dough fresh.
- Fondant decorations can be adjusted in size depending on desired look.
- For a dairy-free version, use a plant-based butter and milk alternative.
Nutrition
- Serving Size: 1 pop
- Calories: 160
- Sugar: 11g
- Sodium: 90mg
- Fat: 8g
- Saturated Fat: 4g
- Unsaturated Fat: 3g
- Trans Fat: 0g
- Carbohydrates: 20g
- Fiber: 2g
- Protein: 2g
- Cholesterol: 15mg

Your email address will not be published. Required fields are marked *