

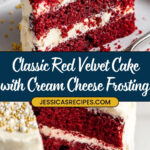
If you’ve ever craved a dessert that’s both stunning and utterly delicious, you’re going to love this Red Velvet Cake with Cream Cheese Frosting Recipe. I absolutely love how this cake turns out every single time — it’s moist, tender, and has that perfect balance between cocoa and tangy cream cheese. When I first tried making a red velvet cake from scratch, I struggled to get the colors and flavors just right, but after playing around with this recipe, it quickly became a family favorite. Stick with me, and I’ll share all my tips so you can create a show-stopping cake that everyone will rave about.
Why You’ll Love This Recipe
- Perfect Moisture: The combination of oil, butter, and buttermilk delivers the most tender crumb you’ll ever find in a red velvet cake.
- Rich Flavor Balance: The cocoa in coffee lifts the classic red velvet taste without overpowering the cream cheese frosting.
- Cream Cheese Frosting Mastery: This frosting is silky, fluffy, and easy to work with – perfect for a smooth finish or fun decorations.
- Kid- and Crowd-Friendly: Whether for birthdays, holidays, or just cake cravings, this recipe never disappoints.

Ingredients You’ll Need
The magic of this Red Velvet Cake with Cream Cheese Frosting Recipe lies in its balanced ingredients list – each component works together to create that classic red velvet flavor and gorgeous texture. When you shop, make sure to pick good-quality cocoa powder and cream cheese at room temperature for the best results.

- Hot Coffee or Boiling Water: Enhances the cocoa flavor, making the cake more decadent without tasting like coffee.
- Unsweetened Natural Cocoa Powder: Adds subtle chocolate notes and contributes to the traditional red velvet color when combined with food coloring.
- All-Purpose Flour: Gives structure; make sure to sift it to avoid lumps and ensure tenderness.
- Baking Powder, Baking Soda, Salt, Ground Cinnamon (optional): These leavening agents help the cake rise beautifully, while salt and cinnamon enhance flavor depth.
- Granulated Sugar: Sweetens and balances the cocoa’s slight bitterness.
- Vegetable Oil and Unsalted Butter: The mix of oil and melted butter provides moisture and richness — it’s the secret to a tender crumb.
- Eggs and Egg Yolk: Eggs bind everything together and give structure; the extra yolk adds richness.
- Buttermilk: Reacts with baking soda for leavening and adds tang to balance the sweetness.
- Vanilla Extract: Brings warmth and rounds out the flavors perfectly.
- Red Gel Food Coloring: Provides that iconic red hue without watering down the batter.
- Distilled White Vinegar: Acts as a tenderizer and boosts the leavening with baking soda.
- Cream Cheese (room temperature): For that signature frosting, it needs to be soft and creamy to blend smoothly.
- Unsalted Butter for Frosting: Adds richness and fluffy texture to the frosting.
- Powdered Sugar (sifted): Sweetens and thickens the frosting with a smooth finish.
Variations
I love how versatile this Red Velvet Cake with Cream Cheese Frosting Recipe can be. Over the years, I’ve tweaked it a bit here and there to suit different occasions and dietary preferences – and honestly, it always turns out fantastic. Feel free to make it your own!
- Vegan Version: I’ve experimented replacing dairy with coconut cream and a flax egg; while it’s delicious, the texture shifts slightly, so I recommend this only if you’re comfortable with slight variations.
- Less Sweet Frosting: My family sometimes finds the frosting a bit sweet, so cutting back on powdered sugar by a half cup balances it nicely.
- Mini Cakes or Cupcakes: Using this batter for cupcakes is a fun way to get individual servings—just reduce bake time and check with a toothpick.
- Spiced Twist: Adding a pinch extra cinnamon or nutmeg gives a warm depth that’s perfect for fall or holiday parties.
How to Make Red Velvet Cake with Cream Cheese Frosting Recipe
Step 1: Preparing Your Pans and Wet Ingredients
First things first, preheat your oven to 325°F and line three 8-inch round cake pans with parchment rounds — don’t skip the parchment! I like to spray the parchment and the sides of the pans generously with nonstick spray so the cakes come out effortlessly. Then, whisk together your hot coffee (or boiling water) and cocoa powder in a glass measuring cup, cover it, and let it sit for 5 minutes. This trick really helps unlock that deep chocolate flavor that’s subtle but so important.
Step 2: Mixing Dry Ingredients
In a medium bowl, whisk together your flour, baking powder, baking soda, salt, and cinnamon if you choose to include it. This step ensures everything is evenly distributed, which helps your cake rise perfectly and have a consistent crumb. Trust me, properly mixing dry ingredients makes a noticeable difference.
Step 3: Combining Wet Ingredients
In your large mixing bowl, whisk sugar, vegetable oil, and melted butter together. Then add the eggs and yolk, and whisk for about twenty seconds until everything is fully emulsified. Next, pour in the buttermilk, vanilla extract, red gel food coloring, and the vinegar. Finally, whisk in the coffee and cocoa mixture. It might look like a lot happening at once, but the batter comes together smoothly and beautifully at this stage.
Step 4: Bringing It All Together
Sift the dry ingredients through a fine mesh sieve directly into the wet batter, in three additions. Gently whisk after each addition just until incorporated — don’t overmix or you risk a tough cake. Divide the batter evenly between your lined pans, and here’s a little something I do: tap the bottom of the pans on the counter a few times to pop any air bubbles. This helps the cake bake evenly and prevents holes inside.
Step 5: Baking and Cooling
Bake for 25 to 30 minutes, or until a toothpick inserted in the center comes out clean. You might notice the cake looks a little spongy on top — that’s normal. Once out of the oven, cool the pans on racks until they’re just warm to the touch. Run a thin knife around the edges to loosen the cakes, invert onto wire racks, and let them cool completely. This patience will reward you with layers that frost beautifully and slice cleanly.
Step 6: Making the Cream Cheese Frosting
Using a stand mixer fitted with the paddle attachment, beat the room-temperature cream cheese and butter on medium-high speed until perfectly smooth, light, and fluffy — about 2 to 3 minutes. Scrape down the bowl so no lumps are hiding, then add vanilla extract and mix again. Gradually beat in the sifted powdered sugar on low speed, then bump it up to medium and whip for another 3 minutes until the frosting is fluffy. If it feels too thick, add a splash of milk or cream to loosen it up. Too thin? Just add a tad more powdered sugar.
Step 7: Assembling Your Cake
Place one cake layer flat-side up on your cake plate or stand. To keep things tidy, I like tucking strips of parchment paper under the edges — it saves you from a messy plate when frosting later. Spread about a third of the frosting evenly over the top, then add the second layer and repeat. Finish with the final layer, flat-side up, and use the remaining frosting to cover the top and sides of the cake. If you want to get fancy, you can pipe edges or leave it rustic — I love the homemade charm of the latter!
Pro Tips for Making Red Velvet Cake with Cream Cheese Frosting Recipe
- Use Gel Food Coloring: Gel colors provide intense red without watering down your batter, unlike liquid food dyes.
- Don’t Skip Room Temperature Ingredients: This helps everything mix smoothly and keeps your cake texture tender.
- Sift Your Flour and Powdered Sugar: Avoid clumps for an airy cake and silky frosting.
- Let Layers Cool Completely: Frosting warm cake can lead to melting and sliding layers — patience here really pays off.
How to Serve Red Velvet Cake with Cream Cheese Frosting Recipe

Garnishes
I love topping this cake with a few garnishes to kick it up a notch — fresh raspberries or strawberries add a lovely tart contrast to the sweetness. Sometimes I sprinkle chopped toasted pecans or walnuts around the edges for a delightful crunch. And for special occasions, edible gold leaf or a dusting of cocoa powder makes it feel extra festive and elegant.
Side Dishes
This cake is rich enough to stand on its own, but if you want to serve it with something, you can’t go wrong with a simple fresh fruit salad or a scoop of vanilla bean ice cream. The creaminess of the ice cream is divine against the tangy frosting. Hot coffee or a creamy latte are also my go-to pairings — perfect for an afternoon treat.
Creative Ways to Present
For birthdays, I’ve layered this cake with fresh strawberries inside between the layers for a surprise burst of fruitiness. I’ve also done individual mini cakes — just bake the batter in cupcake tins and frost each with a swirl of cream cheese frosting and a single raspberry on top. For holiday parties, I like making a naked cake (light frosting crumb coat) and decorating with edible rose petals or fresh herbs like mint for a rustic-chic look. It’s fun and always gets compliments!
Make Ahead and Storage
Storing Leftovers
After cutting into the cake, I always cover leftovers tightly with plastic wrap or store them in an airtight container in the fridge. The cream cheese frosting needs to stay cool, and this keeps it fresh for up to 4 days. I find the cake actually tastes better the next day because the flavors meld beautifully!
Freezing
I’ve frozen this cake both before and after frosting. For unfrosted layers, wrap each layer tightly in plastic wrap and then aluminum foil; layer in a freezer-safe container or bag, and freeze for up to 3 months. When you’re ready to frost, just thaw overnight in the fridge. For frosted cake, slice it into individual servings, wrap each piece well, and freeze. Thaw in the fridge overnight before serving — it holds up beautifully!
Reheating
If you want your cake a little warmer, I recommend reheating single slices in the microwave for 10 to 15 seconds — just enough to take the chill off without melting the frosting. If your cake has been frozen, let it thaw fully in the refrigerator before warming gently.
FAQs
-
Can I use regular liquid food coloring instead of gel?
While you can use liquid food coloring, I’ve found gel food coloring gives you a richer, deeper red without adding extra liquid to the batter. Using liquid dyes often means you need more, which can affect the cake’s texture, so I recommend sticking to gel for best results.
-
Can I substitute the vinegar? What does it do in the recipe?
Absolutely, you can substitute vinegar with lemon juice in equal amounts. Vinegar reacts with the baking soda to help the cake rise and adds tenderness. You might notice a slight citrus hint if you use lemon juice, but it’s usually subtle and overshadowed by the cocoa and vanilla.
-
How do I prevent the cream cheese frosting from being too runny?
Make sure your cream cheese and butter are softened but not melted or warm. Also, sift your powdered sugar to avoid clumps. If the frosting still seems too thin, add more powdered sugar gradually. Refrigerate the frosting briefly if you need to firm it up before spreading.
-
Can this cake be made in a single layer or different pan sizes?
Yes! You can make it as a single-layer cake or in different pan sizes, but you’ll need to adjust the baking time accordingly. For example, a single 9-inch layer will take longer to bake, so keep an eye on it and use the toothpick test to check for doneness.
Final Thoughts
This Red Velvet Cake with Cream Cheese Frosting Recipe holds a special place in my heart — it’s one of those recipes I always go back to because it never fails to delight. Whether you’re baking for a special occasion or just because, I can’t recommend giving this recipe a try enough. It’s straightforward, incredibly satisfying, and those layers of cream cheese frosting will keep you coming back for more. I hope you find as much joy in baking and sharing this cake as my family and I do!
Print
Red Velvet Cake with Cream Cheese Frosting Recipe
- Prep Time: 15 minutes
- Cook Time: 30 minutes
- Total Time: 55 minutes
- Yield: 12 servings
- Category: Dessert
- Method: Baking
- Cuisine: American
Description
This classic Red Velvet Cake recipe features moist and tender layers infused with cocoa and a hint of cinnamon, enhanced by the rich tang of buttermilk and finished with a luscious cream cheese frosting. Perfectly balanced with a striking red color and velvety texture, it’s a perfect dessert for celebrations or any special occasion.
Ingredients
For the cake:
- ½ cup plain hot coffee or boiling water
- ¼ cup (21 grams) unsweetened natural cocoa powder
- 2 ¼ cups (279 grams) all-purpose flour
- ½ teaspoon baking powder
- 1 teaspoon baking soda
- 1 teaspoon salt
- ¼ teaspoon ground cinnamon (optional)
- 2 cups (400 grams) granulated sugar
- ½ cup (109 grams) fresh vegetable oil
- 1 stick (113 grams) unsalted butter, melted
- 2 large eggs, at room temperature
- 1 large egg yolk, at room temperature
- 1 cup buttermilk, at room temperature
- 2 teaspoons vanilla extract
- 3 teaspoons red gel food coloring, plus more if needed
- 1 teaspoon distilled white vinegar
For the cream cheese frosting:
- 16 ounces (454 grams) cream cheese, at room temperature
- 2 sticks (227 grams) unsalted butter, at room temperature
- 2 teaspoons vanilla extract
- 4 cups (500 grams) powdered sugar, sifted
Instructions
- Preheat and prepare pans: Preheat oven to 325°F (163°C) and line three 8-inch round cake pans with parchment paper rounds. Spray parchment and sides generously with nonstick cooking spray to ensure easy release.
- Make cocoa mixture: In a glass measuring cup, whisk hot coffee with cocoa powder until combined. Cover and let stand for 5 minutes to bloom the cocoa flavor.
- Mix dry ingredients: In a medium bowl, whisk together flour, baking powder, baking soda, salt, and optional cinnamon evenly.
- Combine wet ingredients: In a large bowl, whisk sugar, vegetable oil, and melted butter together. Add eggs and egg yolk, whisking for about 20 seconds until well combined. Stir in buttermilk, vanilla extract, red food coloring, then whisk in vinegar and the cocoa-coffee mixture.
- Incorporate dry ingredients: Sift the flour mixture into the wet batter in three additions, whisking gently after each until just incorporated to avoid overmixing.
- Fill pans and bake: Divide batter equally among the prepared cake pans. Tap pans against the counter to release air bubbles. Bake for 25 to 30 minutes, or until a toothpick inserted at the center comes out clean.
- Cool cakes: Remove pans from oven and place on cooling racks. When cool enough to handle, gently run a knife around the edges and invert cakes onto wire racks to cool completely.
- Prepare frosting: Using a stand mixer fitted with a paddle attachment, beat cream cheese and butter on medium-high speed until light and creamy. Scrape down bowl sides to remove clumps. Add vanilla, then gradually add powdered sugar on low speed until fluffy, about 3 minutes. Adjust consistency with milk or powdered sugar if needed.
- Assemble cake: Place one cake layer flat-side up on a serving plate. Place baking paper strips under edges to keep plate clean. Spread one-third of frosting evenly over the layer. Repeat with the second layer. Top with the final cake layer and frost the entire cake with remaining frosting.
Notes
- It’s normal for the cake surface to look slightly spongy after baking.
- If you don’t have distilled white vinegar, substitute with an equal amount of lemon juice; the citrus flavor will be subtle and usually masked by cocoa and vanilla.
- Ensure all refrigerated ingredients are at room temperature for the best texture.
- Use gel food coloring rather than liquid for vibrant color without affecting batter consistency.
- Let the cake layers cool completely before frosting to prevent melting the cream cheese frosting.
Nutrition
- Serving Size: 1 slice (1/12 of cake)
- Calories: 420
- Sugar: 35g
- Sodium: 310mg
- Fat: 24g
- Saturated Fat: 9g
- Unsaturated Fat: 13g
- Trans Fat: 0.3g
- Carbohydrates: 49g
- Fiber: 1.5g
- Protein: 5g
- Cholesterol: 80mg
Your email address will not be published. Required fields are marked *