
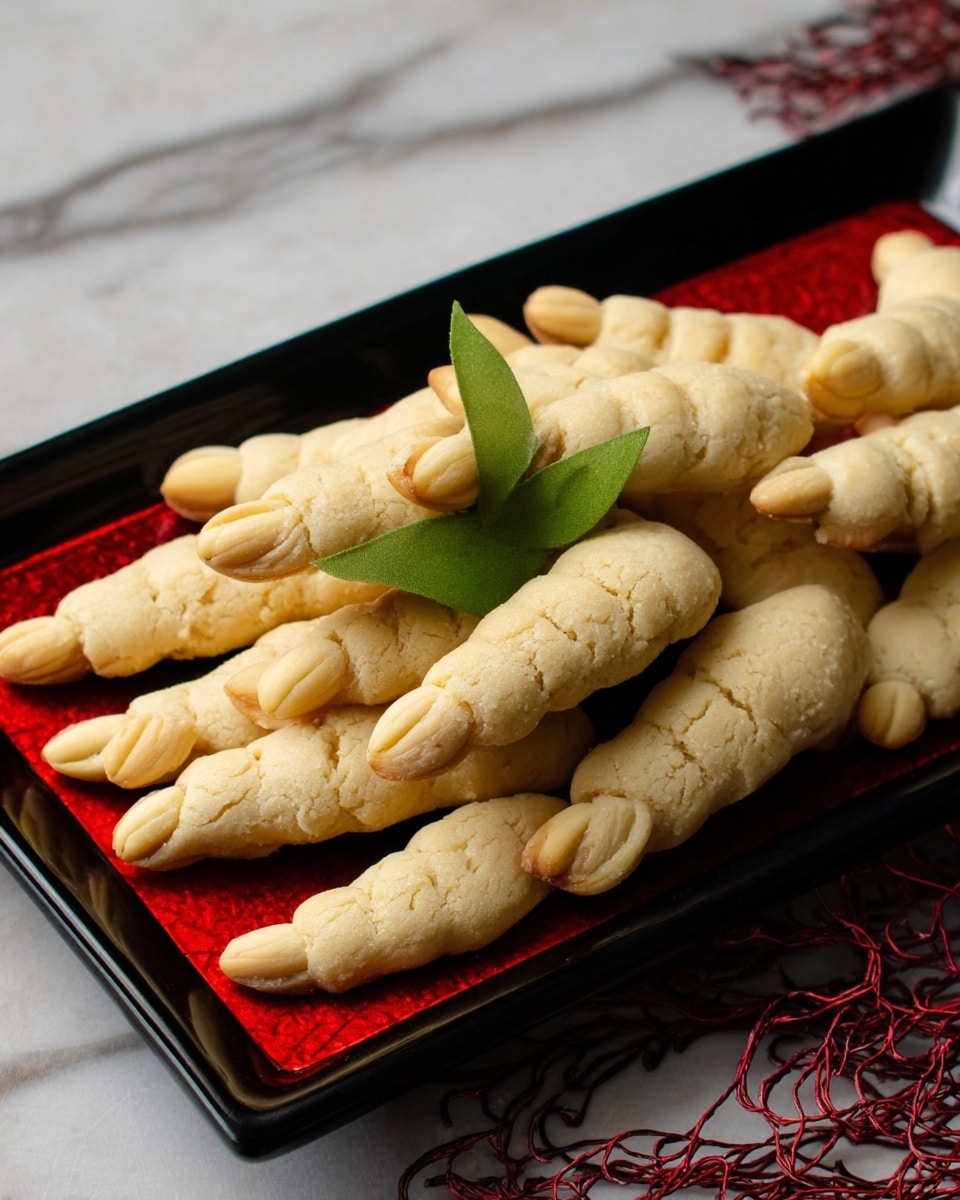
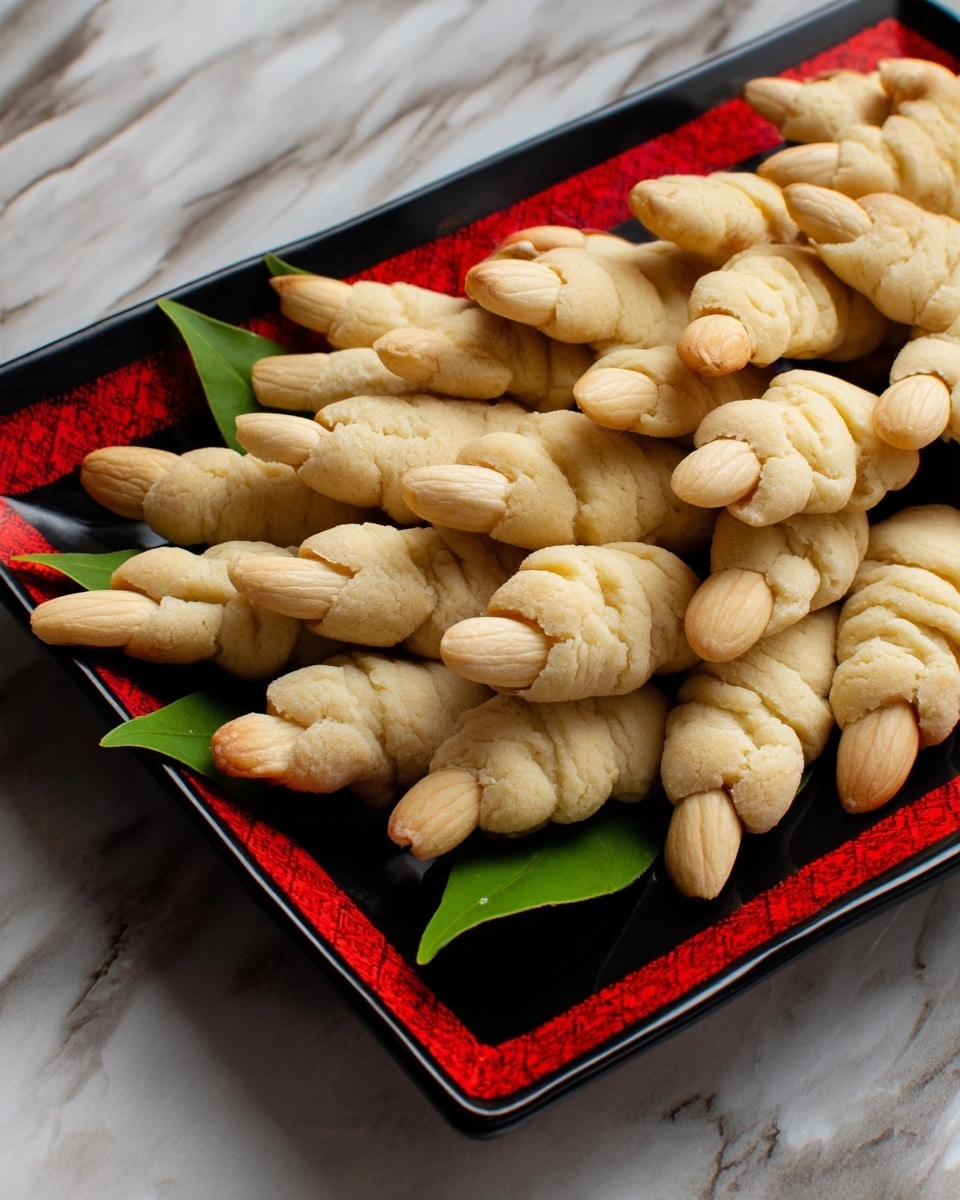
If you’re looking to wow your friends and family this Halloween with a treat that’s spooky, yet utterly delicious, this Shortbread Witches Fingers Recipe is exactly what you need. I absolutely love how buttery and crisp these cookies turn out, plus the almond “fingernails” give them that perfect eerie touch. Trust me, once you try this recipe, you’ll find it’s become a seasonal must-have in your cookie arsenal.
Why You’ll Love This Recipe
- Simple Ingredients: You likely have everything in your pantry already, making this a super easy bake.
- Perfect Texture: The shortbread is tender but crisp, delivering that satisfying snap with every bite.
- Fun & Festive: Shaping these into finger shapes is a creative activity that turns cookie time into a mini craft session.
- Customizable: From food coloring to different “fingernails,” you can make them uniquely yours.

Ingredients You’ll Need
The balance of flavors in this Shortbread Witches Fingers Recipe comes from buttery richness, a hint of cinnamon warmth, and the light sweetness of brown sugar. I always recommend using good quality butter here for that melt-in-your-mouth texture.
- All purpose flour: Spoon and level it for accuracy – this keeps the dough from becoming too dry or dense.
- Unsalted butter: Using unsalted lets you control the saltiness; also, softened butter creams better.
- Brown sugar: Adds moisture and a subtle caramel depth; I use light brown sugar for a milder flavor.
- Vanilla extract: Boosts the overall flavor profile, making these cookies irresistible.
- Ground cinnamon: Just a touch for warmth—don’t skip it; it complements the buttery notes beautifully.
- Kosher salt: Enhances all the other flavors and balances the sweetness.
- Slivered almonds: These make the perfect creepy “fingernails” and add a lovely crunch contrast.
Variations
I love that the Shortbread Witches Fingers Recipe lends itself easily to tweaks so you can get creative every time you make it. Here are a few of my favorite ways to mix things up:
- Green Witch Fingers: I discovered this trick when I added a few drops of green food coloring to the dough during mixing—it instantly turned my cookies perfect for Halloween!
- Alternative “Fingernails”: Pistachios, pecans, or even candy-coated chocolate chips work great if you don’t have slivered almonds handy.
- Spiced Up: Adding a pinch of nutmeg or ground ginger with the cinnamon creates a cozy, fall-spiced version my family goes crazy for.
- Jam for Blood: For a slightly gory effect, add a dab of raspberry or strawberry jam at the fingertip after baking. Just wait to add it until serving to keep the cookies crisp.
How to Make Shortbread Witches Fingers Recipe
Step 1: Cream the Butter and Sugar
Begin by creaming together your softened butter, brown sugar, and vanilla extract until the mixture is smooth and creamy, about 1 to 2 minutes. I like to use a stand mixer for this step because it saves my arm strength, but a hand mixer works just as well. The key here is that the mixture should be silky, not grainy—this sets up your dough to be tender later.
Step 2: Mix in the Dry Ingredients Gently
Next, sprinkle in the cinnamon, flour, and salt. Fold everything together gently until the dough just starts holding together. Don’t overmix here—you want to keep those buttery pockets intact. I like to turn the dough out onto a clean surface and press it together with my hands to form a cohesive square. If you find crumbly bits, keep pressing gently until it all sticks.
Step 3: Roll and Slice the Dough
Lay a sheet of parchment over the dough and roll it into a rectangle about ¼ to ½ inch thick—that’s the sweet spot for shortbread fingers. If you don’t have parchment handy, sprinkle a little flour on your rolling pin to prevent sticking. Then, cut the rectangle lengthwise in half and slice crosswise every ½ inch, creating lots of skinny finger-like rectangles.
Step 4: Shape into Witch Fingers
This is the fun part! Pinch each rectangle three times along its length: first about ½ inch from the top, then another ½ inch down, and a final pinch at the bottom. These dents mimic knuckles and give the “fingers” real character. After shaping, score three small lines across the bumps between pinches to add texture.
Step 5: Add Almond Fingernails and Chill
Insert a slivered almond at the tip of each finger to look like a creepy nail. If you prefer, try other nuts as I mentioned above. Once all fingers are shaped and nailed, cover and chill the baking sheet for 30 minutes or up to 3 days. Chilling firms the dough and helps the fingers hold their shape during baking.
Step 6: Bake to Perfection
Preheat your oven to 350°F (175°C). While warming up, take the baking sheet out of the fridge for about 10 minutes to let it come to room temperature slightly—this little pause makes a difference for even baking. Bake your witches fingers for 9 to 11 minutes, or until the bottoms just start to turn golden. Resist the urge to overbake—they look delicate but need that light color for the perfect melt.
Step 7: Cool and Enjoy
Let the cookies cool on the pan for 5 minutes—this pause prevents breakage—and then transfer them to a wire rack to cool completely. Watching these cool is tough because the smell alone makes you want to sneak one, but wait because the crispness sets best when fully cooled.
Pro Tips for Making Shortbread Witches Fingers Recipe
- Don’t Overwork the Dough: I used to struggle with crumbly dough until I learned that minimal mixing keeps the shortbread tender and flaky.
- Use Cold Almonds: Slightly chilling the slivered almonds before pressing them on prevents breakage and keeps their shape intact through baking.
- Chill Before Baking: Chilling really is a game changer—it helps the fingers bake without spreading too much.
- Use Parchment Paper: Prevents sticking and makes clean-up a breeze; you’ll thank me later.
How to Serve Shortbread Witches Fingers Recipe
Garnishes
I often sprinkle a tiny pinch of cinnamon sugar on top before baking for an extra sparkle. If you’re going for the scary factor, a little red jam “blood” at the almond fingernail is brilliant and always gets a reaction from guests—just add it right before serving to keep the crunch.
Side Dishes
Pair these with a warm cup of spiced cider, hot chocolate, or even a pumpkin-flavored latte. For a festive party, setting up a creepy cookie platter with candy eyeballs and gummy worms amps up the fun vibe.
Creative Ways to Present
One Halloween, I arranged the Shortbread Witches Fingers Recipe on a fancy black platter decorated with cobweb doilies and flickering LED candles. Another time, I wrapped individual cookies in clear cellophane with little red ribbon “bloody bandages” for party favors. It’s amazing how presentation makes these feel extra magical!
Make Ahead and Storage
Storing Leftovers
I store leftover witches fingers in an airtight container at room temperature and they stay perfectly crisp for up to a week. Just be sure they’re fully cooled before sealing to avoid sogginess, which I learned the hard way.
Freezing
You can freeze the unbaked shaped fingers by placing them on parchment-lined trays, freezing until solid, then transferring to a freezer bag. When you’re ready, bake them straight from frozen—just add a couple of minutes to baking time. I love this for last-minute treats!
Reheating
If your fingers lose a bit of their crispness, pop them in a 300°F oven for 5 minutes to freshen them up. The key is low heat to avoid burning but enough warmth to crisp the cookie back up.
FAQs
-
Can I make the Shortbread Witches Fingers Recipe gluten-free?
Absolutely! I’ve had success swapping the all-purpose flour for a gluten-free blend that’s designed for baking, like a 1-to-1 gluten-free flour mix. Just remember to keep the same measurement and avoid overmixing to keep the fingers tender.
-
What if I don’t have slivered almonds—any alternatives for the fingernails?
Yes! You can use pecan halves, pistachios, whole blanched almonds, or even candy-coated chocolate pieces. I’ve even used pumpkin seeds for a unique look. Just press them gently into the dough tip before chilling.
-
How thin should I roll the dough for the fingers?
Rolling the dough to about ¼ to ½ inch thick works best. Thinner than that and the fingers might break easily; thicker and they won’t have that classic crisp shortbread texture.
-
Can I prepare the dough ahead of time?
Definitely! You can prepare the dough, shape the fingers on the baking tray, cover tightly, and refrigerate for up to 3 days. This is great for spreading out your Halloween prep, and chilling actually improves the flavor and texture.
-
How do I avoid almond nails from falling off during baking?
Make sure the dough is well chilled before baking, and press the almond firmly into the tip of the finger. Also, slightly chilling your almonds before inserting helps them hold their shape better.
Final Thoughts
This Shortbread Witches Fingers Recipe quickly became one of my all-time favorite Halloween staples because it’s fun to make, gorgeous to serve, and downright delicious to eat. I love sharing these with friends who always get a kick out of the spooky design paired with that wonderful buttery crunch. Give this recipe a try—you’ll enjoy the process and the results, and maybe even make it a yearly tradition!
Print
Shortbread Witches Fingers Recipe
- Prep Time: 25 minutes
- Cook Time: 11 minutes
- Total Time: 1 hour 6 minutes
- Yield: 30 cookies
- Category: Dessert
- Method: Baking
- Cuisine: American
Description
Deliciously spooky Shortbread Witches Fingers are perfect for Halloween treats. These buttery, cinnamon-spiced cookies are shaped like eerie witch fingers with almond slivers as fingernails, baked to a golden finish, and chilled to enhance their crisp texture.
Ingredients
Dry Ingredients
- 6 ounces all purpose flour (1 1/4 cups + 1 tablespoon, spooned and leveled)
- 1/2 teaspoon ground cinnamon
- Pinch kosher salt
- 1 tablespoon slivered almonds
Wet Ingredients
- 4 ounces unsalted butter (1/2 cup)
- 2 ounces brown sugar (1/4 cup, lightly packed)
- 1 teaspoon vanilla extract
Instructions
- Cream Ingredients: In a mixing bowl, cream together the brown sugar, unsalted butter, and vanilla extract until the mixture is smooth and creamy, about 1 to 2 minutes.
- Add Dry Ingredients: Gently fold in the ground cinnamon, all purpose flour, and a pinch of kosher salt until the dough just begins to come together, taking care not to overwork it.
- Form Dough: Turn the dough out onto a clean surface and press it together until there are no more crumbs. Shape it into a square.
- Roll Dough: Cover the dough with a sheet of parchment paper or lightly flour the rolling pin, then roll the dough into a rectangle between 1/2 inch and 1/4 inch thick.
- Cut Dough: Slice the rectangle lengthwise in half, then cut crosswise into thin, long rectangles about 1/2 inch wide.
- Shape Fingers: Shape each rectangle into a finger by pinching the dough three times along its length—first at 1/2 inch down, second 1/2 inch further down, and then again at the bottom—to create knuckles.
- Indicate Knuckle Lines: Slice three small lines across the bumps created between each pinch to mimic knuckles.
- Add Almond Fingernails: Insert a slivered almond at the tip of each shaped finger to serve as the fingernail.
- Chill: Transfer the shaped cookies onto a parchment-lined baking sheet, cover, and chill for 30 minutes or up to 3 days to firm up the dough.
- Preheat Oven & Prepare to Bake: Preheat your oven to 350°F (175°C). Remove cookies from the refrigerator about 10 minutes before baking to slightly warm the pan.
- Bake: Bake the cookies for 9 to 11 minutes, or until the bottoms are just beginning to color lightly golden.
- Cool: Let the cookies cool on the baking sheet for 5 minutes before transferring them to a wire rack to cool completely.
Notes
- You can substitute granulated sugar for brown sugar if preferred.
- For green witch finger cookies, add food dye during the flour addition step.
- Any nut sliver can be used as a fingernail if slivered almonds are unavailable.
- Store the cookies at room temperature in an airtight container for up to 1 week.
- To create a more gruesome effect, add red jam on the fingernail and finger ends either immediately and refrigerate, or wait until ready to serve.
Nutrition
- Serving Size: 1 cookie
- Calories: 90
- Sugar: 4 g
- Sodium: 35 mg
- Fat: 5 g
- Saturated Fat: 3 g
- Unsaturated Fat: 2 g
- Trans Fat: 0 g
- Carbohydrates: 11 g
- Fiber: 0.3 g
- Protein: 1 g
- Cholesterol: 15 mg

Your email address will not be published. Required fields are marked *