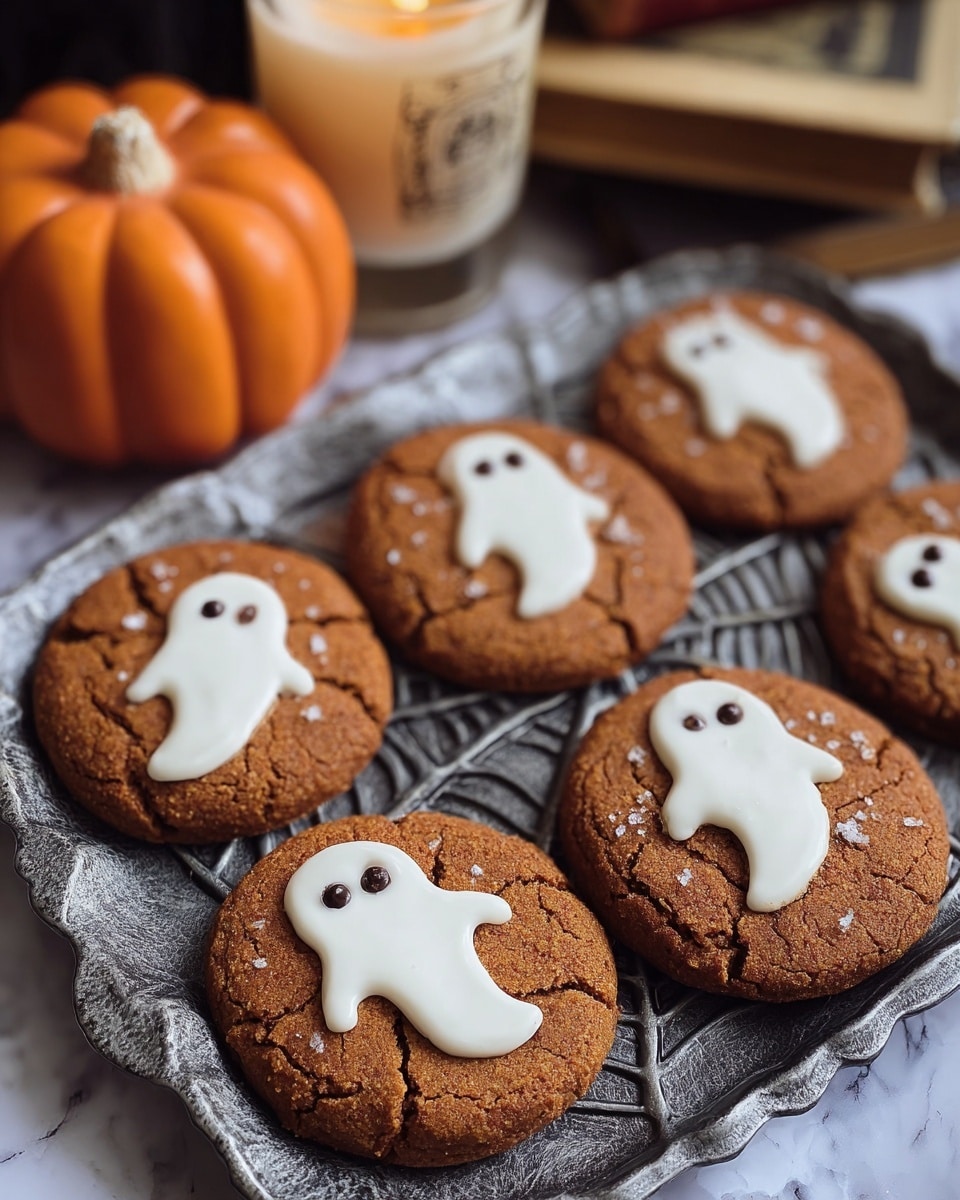
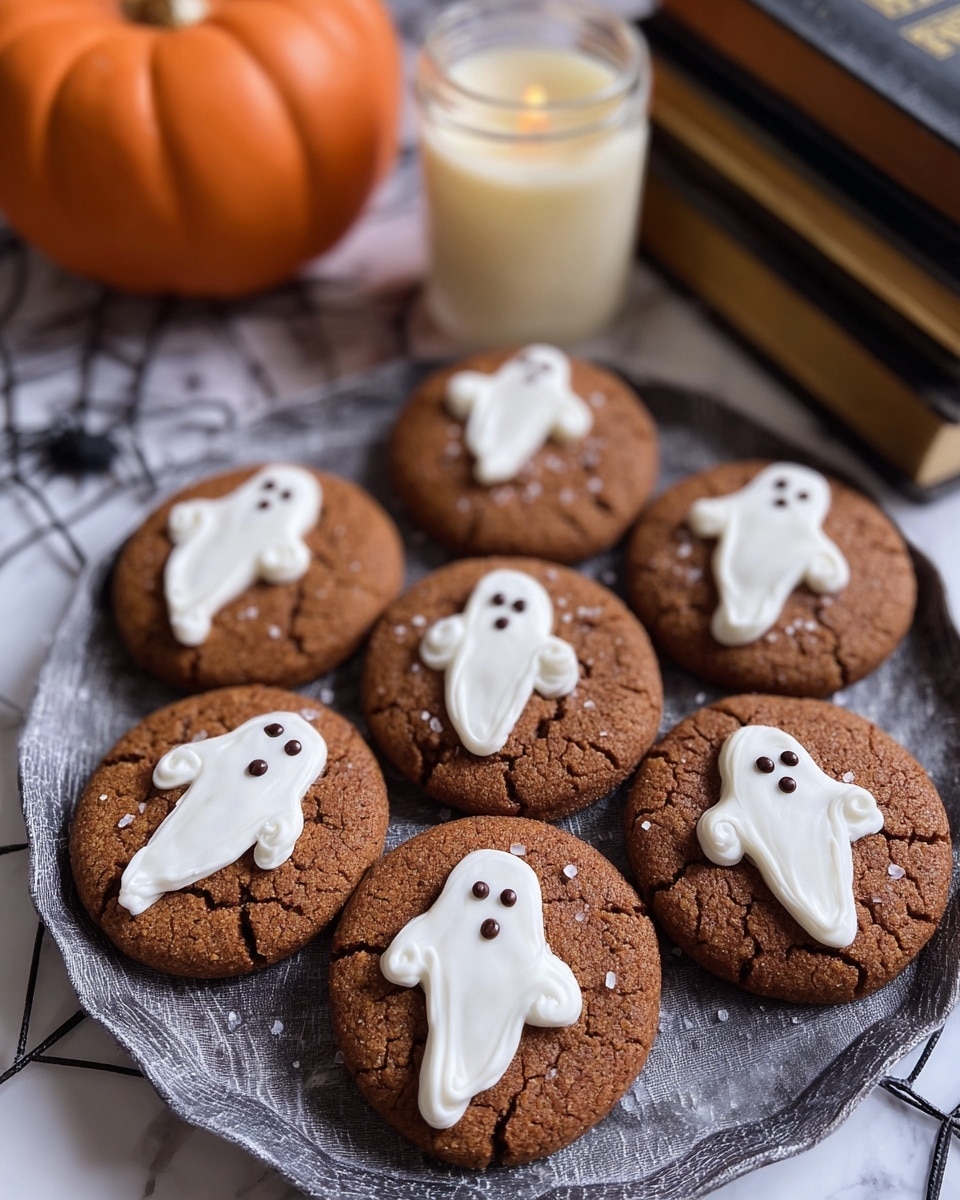
I absolutely love sharing this Spooky Ghost Brown Butter Pumpkin Cookies Recipe with you because it combines two of my favorite fall flavors in such a fun and festive way. The nutty warmth of brown butter accompanies the cozy pumpkin notes, and when you decorate them like little ghosts, it just makes your kitchen feel irresistibly seasonal and playful. Whether you’re baking these with your kids, prepping for a Halloween party, or simply craving a sweet autumn treat, these cookies really stand out on the dessert table.
When I first tried this recipe, I was amazed at how the brown butter deepens the pumpkin cookie’s flavor, making them chewy with just the right balance of spice and sweetness. Plus, decorating them is a creative experience that anyone can enjoy, even if you’re not a frosting pro. You’ll find that this Spooky Ghost Brown Butter Pumpkin Cookies Recipe is a delightful twist on classic pumpkin cookies that make every bite feel extra special.
Why You’ll Love This Recipe
- Unique Flavor Combination: The brown butter adds a rich, nutty depth that perfectly complements the pumpkin spices.
- Fun & Festive Design: Decorating the cookies as ghosts makes baking feel like a treat in itself, not just eating them.
- Perfect Texture: These cookies come out chewy with a slight crisp edge—just like I love them.
- Great for Any Skill Level: Whether you’re a cookie decorator or a cookie eater, this recipe is approachable and rewarding.
Ingredients You’ll Need
These ingredients work together to bring you a cookie that’s bursting with autumn flavors, balanced by the smooth creaminess of the white chocolate ghosts. I’ll share some helpful tips on picking the best versions of each to make your Spooky Ghost Brown Butter Pumpkin Cookies Recipe turn out beautifully.
- Brown Butter and Maple Chewy Pumpkin Cookie Base: Using a quality base really makes the flavor shine, and I recommend using Butternut Bakery’s special recipe for that perfect chewy texture.
- White Chocolate: I prefer using good-quality melting wafers like Ghirardelli; they melt smoothly and harden glossy without graininess.
- Black Candy Melts: These are essential for the ghost faces—choose candy melts that melt evenly and are easy to pipe for best results.
- Piping Bag: Although you can use a ziplock bag, a sturdy piping bag gives you better control for painting on ghost eyes and mouths.
- Medium Cookie Scoop: Helps keep your cookies uniform in size, ensuring even baking.
- Light Colored Baking Pans: Lighter pans help with even heat distribution to get that perfect cookie edge without over-browning the bottom.
Variations
I love to switch things up a bit when I make this Spooky Ghost Brown Butter Pumpkin Cookies Recipe, so don’t hesitate to customize it to suit your mood or dietary needs. Whether you want them more decadent or allergy-friendly, there’s a way to make it your own.
- Gluten-Free Variation: I once swapped the cookie base for a gluten-free pumpkin cookie mix, and with a few tweaks, it worked beautifully for my gluten-sensitive friends.
- Dairy-Free Option: Using dairy-free white chocolate and coconut oil-based butter alternatives can make this recipe accessible without losing that ghostly charm.
- Spice It Up: If you’re like me and enjoy a bit more heat, adding a pinch of cayenne or extra pumpkin pie spice gives a nice surprise kick.
- Chilling for Shape: If you want thicker cookies to better hold the ghost design, try chilling the dough before baking.
How to Make Spooky Ghost Brown Butter Pumpkin Cookies Recipe
Step 1: Bake and Cool Your Pumpkin Cookies
Start by baking your batch of Brown Butter and Maple Chewy Pumpkin Cookies according to the original recipe instructions — I use Butternut Bakery’s recipe because it gives the perfect chewy texture. Once baked, it’s critical to allow them to fully cool on a wire rack; warm cookies will cause the white chocolate to melt too fast and lose shape when decorating. Patience here really pays off for clean ghost shapes.
Step 2: Create the Ghost Shapes with White Chocolate
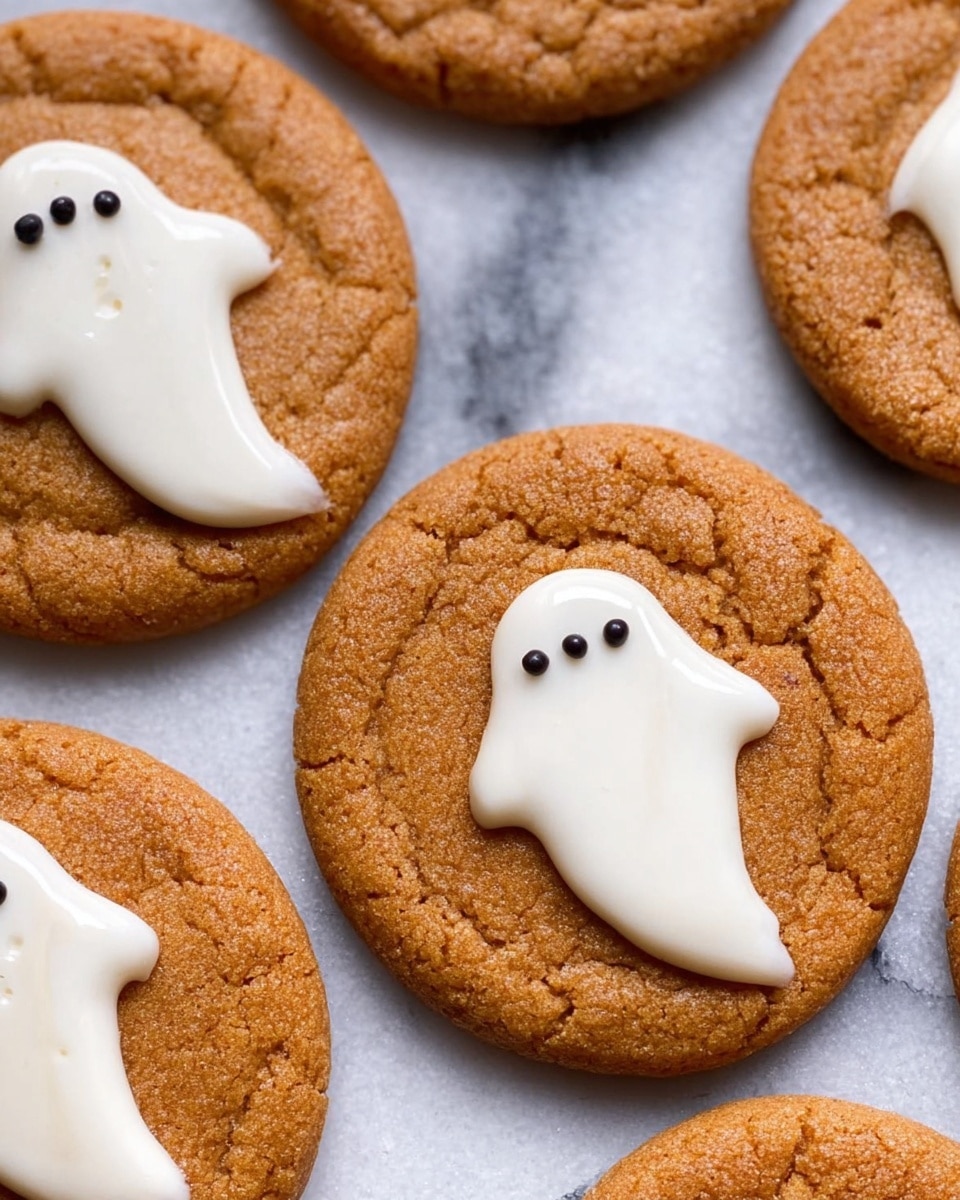
Next, melt your white chocolate slowly—microwave in short bursts or use a double boiler so it stays smooth and shiny. Spoon a small dollop onto the center of each cooled cookie, then use the back of a small spoon to gently drag downward, forming a ghostly silhouette. I recommend practicing this on a sheet of parchment paper first to get a feel for the pressure and movement. Remember, a light touch is key here to avoid picking up crumbs or lifting the chocolate off the surface.
Step 3: Add Eyes and Mouth with Black Candy Melts
After the white chocolate hardens completely—usually about 15-20 minutes—melt the black candy melts carefully. Pour them into your piping bag and trim the tip to a fine point. Then, pipe small dots for the eyes and a tiny oval or line for the mouth. These little details bring your ghost cookies to life and make them irresistibly cute. Allow the candy melts to fully dry before moving or stacking the cookies.
Pro Tips for Making Spooky Ghost Brown Butter Pumpkin Cookies Recipe
- Use Light Pressure on White Chocolate: I discovered this trick when my first ghosts looked uneven—the light touch creates smooth, ghostly waves without disturbing the cookie surface.
- Practice the Ghost Shape First: Before decorating cookies, I suggest trying on parchment paper so you get comfortable with the spoon drag technique.
- Piping Bag Over Ziplock Bag: Using a piping bag really improved my control when adding faces — it’s sturdier and less likely to leak unexpectedly.
- Avoid Warm Cookies: I used to rush this step and the chocolate melted too quickly; always cool your cookies completely for crisp ghost shapes that set perfectly.
How to Serve Spooky Ghost Brown Butter Pumpkin Cookies Recipe

Garnishes
I like to keep the garnishes simple since the white chocolate ghosts are the star, but if I’m feeling fancy, I’ll sprinkle a tiny pinch of edible glitter or a light dusting of cinnamon on the platter for a twinkle of autumn magic. You could also add a few candy eyes around the display for extra Halloween vibes.
Side Dishes
Pair these cookies perfectly with a cup of rich hot chocolate or a warm chai latte — the spices in the drink complement the pumpkin and brown butter beautifully. For a party, I also love serving them alongside pumpkin or apple cider to keep the cozy fall flavors flowing.
Creative Ways to Present
I’ve had so much fun arranging these cookies on rustic wooden boards or inside mini paper-lined baskets, scattered with autumn leaves or mini pumpkins for that harvest look. For kids’ parties, placing them in Halloween-themed treat bags or stacking them in clear jars with a ribbon adds instant charm. You’ll enjoy how these simple touches elevate your spooky spread.
Make Ahead and Storage
Storing Leftovers
Once decorated, I keep these cookies in an airtight container at room temperature for up to 4 days. The cookies stay chewy, and the chocolate ghosts maintain their shape and shine. Layering them with parchment paper helps prevent sticking or damage to your hard work.
Freezing
I’ve frozen undecorated pumpkin cookies successfully—wrap them tightly and freeze in a single layer first, then stack for convenience. When you’re ready, thaw completely before decorating, because freezing decorated cookies can crack the white chocolate ghosts.
Reheating
These cookies are best enjoyed at room temperature, so if you want a fresh-from-the-oven feel, pop them into a warm (not hot) oven at 300°F for 5 minutes before decorating. I don’t recommend microwaving the decorated versions, as that can melt the chocolate details.
FAQs
-
Can I use regular chocolate instead of white chocolate for the ghosts?
You can, but white chocolate offers the classic ghost look with a crisp contrast on pumpkin cookies. Using regular chocolate might blend in more and not give that spooky white silhouette, but feel free to experiment with colors or swirls!
-
What if my white chocolate is too thick to spread?
If it’s thick, try adding a tiny bit of coconut oil or vegetable oil to thin it slightly, then stir gently—this helps smooth spreading while maintaining a glossy finish. Just don’t add too much or it won’t set properly.
-
How do I prevent the candy melts from bleeding into the white chocolate?
Make sure the white chocolate ghosts have hardened completely before piping the candy melts. Also, avoid pressing the piping bag too hard, and let the candy melt dots dry undisturbed in a cool, dry spot for best results.
-
Are these cookies suitable for gifting?
Absolutely! These ghost cookies are adorable gifts and pack nicely in decorative tins or boxes with parchment layers. Just remind the recipient to store them at room temperature for freshness.
Final Thoughts
This Spooky Ghost Brown Butter Pumpkin Cookies Recipe is truly close to my heart because it pairs seasonal flavors with a fun decorating twist that anyone can enjoy. I remember the first time I made these for my family and how much laughter came from the decorating process—plus we couldn’t stop eating them afterward! I hope you find as much joy in making (and eating) these as I have. Trust me, once you try this recipe, it’ll become your go-to for fall baking celebrations.
Print
Spooky Ghost Brown Butter Pumpkin Cookies Recipe
- Prep Time: 30 minutes
- Cook Time: 15 minutes
- Total Time: 1 hour
- Yield: 12 cookies
- Category: Dessert/Cookies
- Method: Baking
- Cuisine: American
Description
Create festive Spooky Ghost Brown Butter Pumpkin Cookies perfect for Halloween. These chewy pumpkin cookies are richly flavored with brown butter and maple, then decorated with smooth white chocolate ghosts and expressive eyes and mouths piped with black candy melts for a fun, spooky treat.
Ingredients
Brown Butter and Maple Chewy Pumpkin Cookies
- 1 batch Brown Butter and Maple Chewy Pumpkin Cookies (recipe by Butternut Bakery)
For Decorating
- White chocolate (such as Ghirardelli melting wafers)
- Black candy melts
- Piping bag or ziplock bag
Helpful Tools
- Medium cookie scoop
- Light colored baking pans
- Small spoon
Instructions
- Bake the Cookies: Prepare and bake one batch of Brown Butter and Maple Chewy Pumpkin Cookies according to the base recipe instructions. Once baked, allow the cookies to cool completely before decorating.
- Melt White Chocolate: Gently melt white chocolate wafers in a microwave-safe bowl, stirring frequently for a smooth, lump-free consistency.
- Create Ghost Shapes: Spoon a small dollop of melted white chocolate onto each cooled cookie. Using the back of a small spoon, apply very light pressure and slowly drag the spoon downwards across the white chocolate to form the shape of a ghost. Practice on parchment paper first for best results.
- Harden White Chocolate: Let the white chocolate ghost shapes set and harden completely at room temperature or in the fridge.
- Melt Black Candy Melts: Melt black candy melts in a microwave-safe container until smooth. Transfer the melted candy into a piping bag or sturdy ziplock bag, cutting a small tip off the corner.
- Pipe Eyes and Mouths: Use the piping bag to pipe small dots representing eyes and a mouth onto each white chocolate ghost. Allow the candy melt details to dry completely without disturbance.
- Serve and Enjoy: Once fully set, these spooky ghost pumpkin cookies are ready to serve and delight guests with their festive look and delicious flavor.
Notes
- Use very light pressure when shaping the white chocolate ghosts to avoid picking up cookie crumbs and to maintain a smooth surface.
- Practice the ghost-shape dragging technique on parchment paper before applying on cookies to perfect your method.
- Ensure cookies are fully cooled before decorating to prevent melting and smudging.
- Use a sturdy piping bag for better control when piping the black candy melts details.
Nutrition
- Serving Size: 1 cookie
- Calories: 180
- Sugar: 15g
- Sodium: 100mg
- Fat: 9g
- Saturated Fat: 5g
- Unsaturated Fat: 3g
- Trans Fat: 0g
- Carbohydrates: 22g
- Fiber: 1g
- Protein: 2g
- Cholesterol: 20mg


Your email address will not be published. Required fields are marked *