
If you’re on the hunt for a show-stopping dessert that’s light, fluffy, and bursting with fresh fruit flavors, this Strawberry Swiss Roll Recipe is an absolute must-try. I love this recipe because it’s a beautiful balance of airy chiffon cake wrapped around luscious whipped cream and sweet, juicy strawberries—it’s like a party in every bite. Whether you’re entertaining guests or simply treating yourself, this Swiss roll is guaranteed to impress without intimidating you in the kitchen. Keep reading and I’ll walk you through every step with tips that help you nail this delicate yet delightful classic!
Why You’ll Love This Recipe
- Light and Fluffy Chiffon Cake: The base is airy and tender, making the roll easy to slice without cracking.
- Fresh Strawberry Filling: Juicy, diced strawberries add natural sweetness and a pop of freshness throughout.
- Versatile and Elegant: Perfect for a fancy dessert, afternoon tea, or even a festive occasion.
- Proven Techniques: With my step-by-step tips, you’ll avoid common pitfalls like cracking and soggy filling.

Ingredients You’ll Need
This recipe relies on simple, high-quality ingredients that work harmoniously. Fresh eggs give the chiffon cake its lift, while real vanilla brings warmth. Picking ripe but firm strawberries is key so they don’t make the cream watery.
- Eggs: Use large, fresh eggs separated carefully to ensure your meringue whips up beautifully.
- Cream of tartar: This helps stabilize the egg whites to get stiff peaks without collapsing.
- Granulated sugar: Divided use ensures smooth meringue and tender cake batter.
- Milk (dairy or non-dairy): Adds moisture without weighing down the batter.
- Light-tasting oil: Neutral flavor keeps the cake tender without overpowering the strawberries.
- Vanilla extract: The warming flavor that ties the cake and whipped cream together.
- Red or pink gel food coloring: A tiny dash for that pretty blush inside the cake—totally optional but so charming!
- Cake flour: Use cake flour over all-purpose for a silky, soft texture.
- Baking powder: Gives a gentle lift to the chiffon cake without heaviness.
- Whipping cream: For the luscious filling that holds its shape perfectly when whipped.
- Powdered sugar: So it dissolves smoothly in the whipped cream without graininess.
- Fresh strawberries: Finely diced for even distribution—plus extra for garnish.
Variations
I’ve played around with this Strawberry Swiss Roll Recipe a bit over the years, and I encourage you to make it your own. Whether it’s swapping out fruits or adjusting the sweetness, it’s a forgiving base that welcomes all kinds of creativity.
- Mixed Berry: I once tossed in blueberries and raspberries alongside strawberries, and the burst of mixed berry flavors was incredible.
- Chocolate Twist: Adding a tablespoon of cocoa powder to the cake batter gives you a subtle chocolate version—great if your family is chocolate-obsessed like mine.
- Dairy-Free: Use coconut cream whipped with a bit of powdered sugar if you want a non-dairy twist; it’s surprisingly delicious!
- Less Sweet: Reduce powdered sugar in the filling to let the fresh fruit’s natural sweetness shine if you prefer milder desserts.
How to Make Strawberry Swiss Roll Recipe
Step 1: Mastering the Chiffon Cake Base
Start by preheating your oven to 350°F and lining a large baking tray only on the bottom with parchment paper. Separating the eggs carefully is essential because the whip of your egg whites makes or breaks the cake’s light texture. I like to whip the whites with cream of tartar until they’re frothy like cappuccino foam before gradually adding sugar—this ensures your meringue becomes glossy and stiff, key to that fluffy lift.
Meanwhile, blend your egg yolks, sugar, milk, oil, and vanilla until smooth, then sift in your dry ingredients to avoid lumps. The next step requires patience—fold a third of the meringue into the yolk mixture gently to keep air in, then fold in the rest until the batter is airy and even. Pour into your pan and bake for about 12-13 minutes, just until the edges begin to turn golden. This cake is delicate, so keep an eye on it!
Step 2: Rolling Without Cracks
Once baked, let the cake cool a few minutes, then carefully run an offset spatula around the edges to release it from the pan. Flip it out onto a wire rack, peel off the parchment, then place a fresh sheet on top before flipping it back—this keeps your cake soft and prevents sticking. Trim off those brown edges so every slice looks perfect. Here’s a neat trick I always do: roll the cake *with* the parchment while it’s still warm and let it rest rolled up—that helps it “remember” the shape and reduces cracking when you do the final roll later with filling.
Step 3: Whipping Up the Creamy Filling
For the filling, whip cold whipping cream with powdered sugar and vanilla extract until you see firm peaks—this means the cream will hold its shape perfectly when spread. When the cake is completely cool, gently unroll it, leaving a small margin on one end empty to prevent the cream from squeezing out during the final roll. Spread a generous layer of whipped cream, then evenly scatter those diced strawberries, pressing them lightly so they stick nicely to the cream.
Step 4: The Big Roll and Chill
This is where it all comes together. Roll the cake back up carefully, just like before, scooping away any extra filling that tries to escape. I like to tuck the seam underneath and give the roll a gentle squeeze to shape it evenly. Wrap the Swiss roll tightly in plastic wrap and pop it into the fridge for at least 6 hours—overnight is even better. This resting period lets everything set so your slices stay neat and show off that beautiful strawberry swirl inside.
Step 5: Finishing Touches and Serving
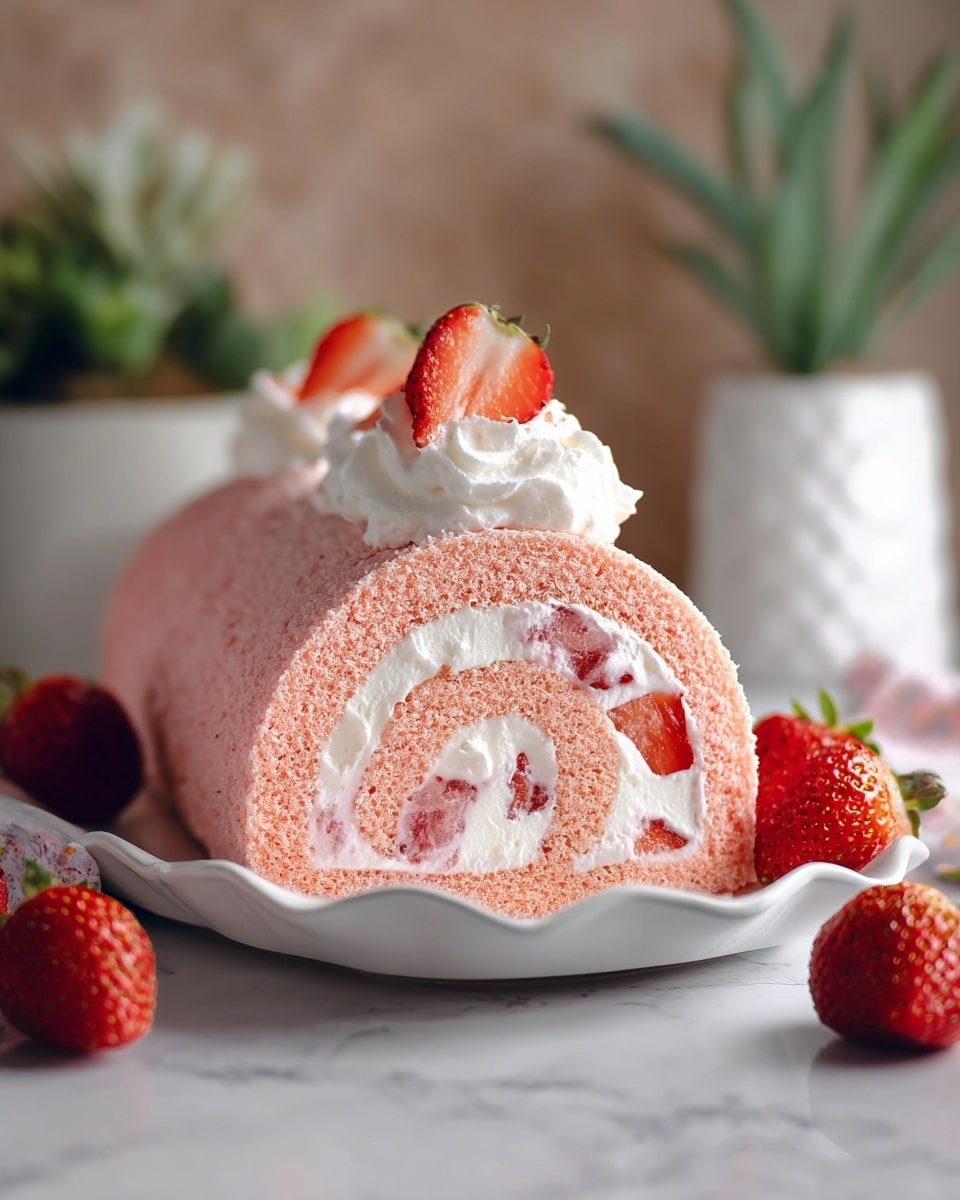
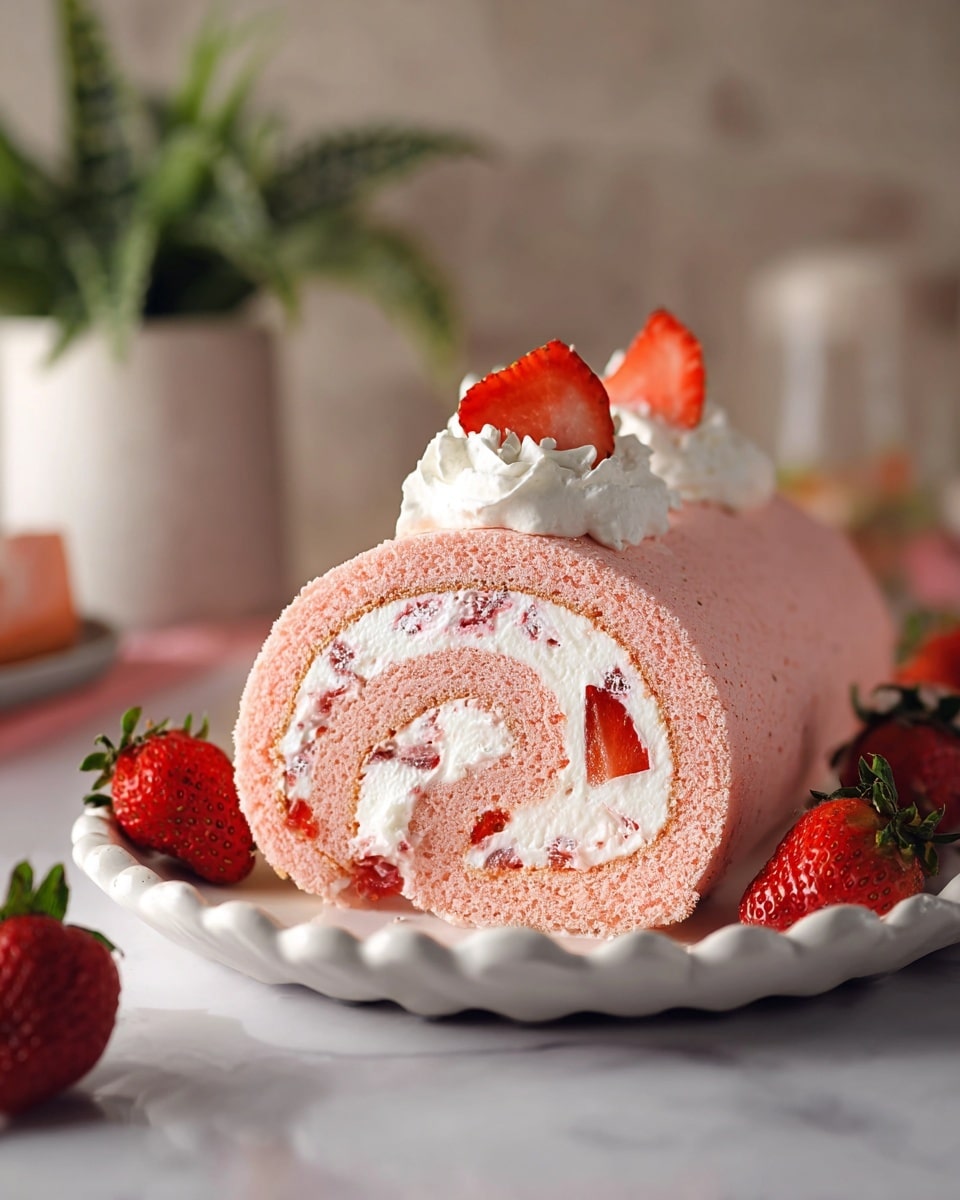
Unwrap the chilled Swiss roll and slice off the ends to reveal the gorgeous spiral. If you saved some whipped cream, pipe it artfully along the top, then crown your creation with whole or halved strawberries for that irresistible Instagram-worthy finish. Slice into 6-8 portions and watch your family or guests marvel at the elegance and freshness of this classic dessert.
Pro Tips for Making Strawberry Swiss Roll Recipe
- Folding Technique: Use a silicone spatula and fold gently with a “cut and fold” motion—this preserves air and keeps your batter light.
- Rolling Warm for Shape: Rolling the cake while it’s still warm trains it to roll easily later without snapping.
- Fresh Strawberries: Drain any overly juicy strawberries well to prevent sogginess in your filling.
- Chilling Time: Don’t skip chilling overnight if you can; it makes slicing cleaner and enhances flavor melding.
How to Serve Strawberry Swiss Roll Recipe
Garnishes
I adore topping the roll with some extra piped whipped cream and freshly sliced strawberries—nothing too fancy, just fresh and inviting. Sometimes, I dust a little powdered sugar for that hint of sweetness and elegance, especially if serving guests.
Side Dishes
This strawberry delight pairs beautifully with a simple cup of Earl Grey tea or chilled sparkling lemonade. If you want to make it part of a brunch spread, some fresh fruit salad or a scoop of vanilla ice cream on the side works wonders to round out the meal.
Creative Ways to Present
For birthdays or celebrations, I sometimes decorate the Swiss roll as a “log” cake with edible flowers and mint leaves along the top, making it visually stunning. You could also slice the roll thinly, stack and layer with additional whipped cream and berries between slices for a layered parfait effect.
Make Ahead and Storage
Storing Leftovers
I wrap leftover slices tightly in plastic wrap and store them in an airtight container in the fridge. This keeps their moisture locked in and prevents the cake from drying out for up to 3 days. My family actually prefers leftovers chilled slightly—it makes the cream more refreshing!
Freezing
If I need to stash the whole roll, I wrap it very tightly with plastic wrap and then foil before freezing. Defrost overnight in the fridge for best texture, though the strawberries may be slightly softer after thawing, so I recommend freezing only if you need to save it for longer.
Reheating
Since this is a chilled dessert, reheating isn’t necessary—you’ll want to serve it cold or at room temperature. If your kitchen is chilly, letting it sit out for 10-15 minutes before serving softens the cream for the perfect mouthfeel.
FAQs
-
Can I make the Strawberry Swiss Roll Recipe ahead of time?
Absolutely! One of the best things about this recipe is that it can be prepared a day in advance. After assembling and rolling the cake, chill it overnight to let the flavors meld and set the filling. This resting period also makes slicing easier.
-
How do I prevent the cake from cracking when rolling?
Rolling the cake while it’s still warm (directly after baking) helps “train” it to roll smoothly. Also, avoid a thick filling layer near the edges, and roll gently using the parchment paper to guide it. These steps help prevent cracks and tears.
-
Can I use frozen strawberries in this recipe?
Fresh strawberries are best because they remain firm and juicy without releasing too much water. If you must use frozen, thaw and drain them thoroughly to avoid soggy filling that could affect the cake’s texture.
-
What’s the difference between a Swiss roll and a jelly roll?
The terms are often used interchangeably, but traditionally, a Swiss roll may be filled with cream, whipped cream, or buttercream, while a jelly roll contains jelly or jam. This recipe fits perfectly into the Swiss roll category with its whipped cream and strawberry filling.
Final Thoughts
Honestly, this Strawberry Swiss Roll Recipe holds a special place in my kitchen. It’s one of those desserts that looks impressive but is totally doable at home, especially with a few tricks up your sleeve. I remember the first time I made it—I was amazed at how light and fresh the cake turned out, and my family went crazy for it! So next time you want something sweet and spectacular, give this recipe a shot. You’ll enjoy the process as much as the perfect, berry-bright results.
Print
Strawberry Swiss Roll Recipe
- Prep Time: 1 hour 10 minutes
- Cook Time: 12 minutes
- Total Time: 7 hours 22 minutes
- Yield: 6 slices
- Category: Dessert
- Method: Baking
- Cuisine: Western
- Diet: Vegetarian
Description
This Strawberry Swiss Roll features a light and airy chiffon cake rolled with a luscious whipped cream and fresh diced strawberries filling. Delicately tinted with pink gel coloring for a beautiful presentation, this dessert combines moist cake, fluffy cream, and juicy fruit layers, making it an irresistible treat perfect for special occasions or afternoon tea.
Ingredients
Chiffon Cake
- 6 large eggs
- ½ teaspoon cream of tartar
- 150 g granulated sugar, divided into 100g + 50g
- 50 g milk, dairy or non-dairy
- 50 g light-tasting oil
- 1 teaspoon vanilla extract
- 2 drops red or pink gel food colouring
- 120 g cake flour
- ½ teaspoon baking powder
Filling
- 350 g whipping cream
- 35 g powdered sugar
- 1 teaspoon vanilla extract
- 500 g fresh strawberries, finely diced, plus more for topping
Instructions
- Preheat and Prepare Pan: Preheat the oven to 350°F (175°C). Line a 12×17″ baking tray with parchment paper on the bottom only, setting it aside for the batter.
- Separate Eggs: Separate the egg whites and yolks into two large mixing bowls. Set the yolks aside.
- Beat Egg Whites: To the egg whites, add cream of tartar. Using an electric hand mixer with a whisk attachment, beat until frothy, resembling cappuccino foam.
- Add Sugar and Color: Gradually add 100g of sugar one spoonful at a time while beating. After all sugar is incorporated, add 1-2 drops of pink gel coloring. Continue beating until stiff peaks form. Set aside.
- Mix Egg Yolk Mixture: Add the remaining 50g sugar to the yolks and mix using the hand mixer until combined. Add milk, oil, and vanilla extract, mixing again until smooth.
- Sift Dry Ingredients: Sift cake flour and baking powder into the egg yolk mixture. Mix on low speed until combined and smooth.
- Fold Meringue Into Egg Yolk Mixture: Add one-third of the stiff egg whites to the yolk mixture and gently fold until it loosens. Fold in the remaining egg whites carefully until no streaks remain and the batter is fluffy and airy.
- Fill the Pan: Pour the batter into the lined baking tray. Use an offset spatula to spread evenly and smooth out the surface.
- Bake: Bake for 12-13 minutes or until edges are lightly golden.
- Release the Cake Sheet: Let the cake cool a few minutes. Run an offset spatula along the edges to release the cake. Flip the cake onto a wire rack, peel off the parchment paper, place a new parchment on top, and flip the cake back to the parchment so the original top is facing up.
- Roll the Cake: Trim off the browned edges from the short ends. Starting at one short end, roll the cake sheet with the parchment paper and let it cool completely in this rolled shape.
- Whip Cream: In a large bowl, combine whipping cream, powdered sugar, and vanilla extract. Whip with a hand mixer until firm peaks form.
- Unroll and Spread Cream: Unroll the cooled cake. Spread a generous, even layer of whipped cream with an offset spatula, leaving about 2″ clear at one end. Reserve some whipped cream for decoration if desired.
- Add Strawberries: Distribute diced strawberries evenly on the cream layer, pressing gently to help them stick.
- Roll Cake with Filling: Roll the cake back up carefully, scraping off any filling that squeezes out. Place the roll seam side down.
- Chill: Wrap the roll in plastic wrap, reshape if needed, and refrigerate for a minimum of 6 hours or overnight for the filling to set.
- Trim Ends: Once chilled, remove plastic wrap and slice about ½” off both ends to show the swirl pattern.
- Decorate: Pipe the reserved whipped cream on top using a piping bag and top with whole or halved strawberries.
- Slice and Serve: Cut the roll into 6-8 slices and serve.
Notes
- Use room temperature eggs for better aeration in the meringue.
- Rolling the cake while warm helps prevent cracking.
- Reserve some whipped cream for decoration to enhance the presentation.
- Chilling the roll overnight allows the filling to set and flavors to meld.
- Use fresh, firm strawberries for best texture and flavor.
- Carefully fold the meringue into the yolk mixture to maintain an airy batter texture.
- If pink gel food coloring is unavailable, use natural food colorings like beet juice sparingly.
Nutrition
- Serving Size: 1 slice
- Calories: 280 kcal
- Sugar: 24 g
- Sodium: 85 mg
- Fat: 16 g
- Saturated Fat: 9 g
- Unsaturated Fat: 6 g
- Trans Fat: 0 g
- Carbohydrates: 28 g
- Fiber: 2 g
- Protein: 5 g
- Cholesterol: 110 mg

Your email address will not be published. Required fields are marked *